
 Facebook
 X
X
 Pinterest
 Copy Link
Blinds or Curtains? Or Both? Top Things to Consider When Choosing Your Window Style


Some rooms just need blinds, other rooms just need curtains, and then some rooms look best with both. But how do you decide which rooms need what? There are a number of factors to consider when you’re picking window treatments for rooms in your house, from price to insulation to style to orientation within the room.
Price
Adding a combination of blinds and curtains on your windows may seem like the best idea for almost any room in your home. But that can get pricey. Basically, you’re doubling up the cost of the treatments for each window. So when you’re deciding on a budget for your treatments, be methodical. Guest bedrooms, laundry rooms, bathrooms, or any uncommon, informal areas in your home are good candidates for either blinds or curtains, not both—you likely don’t spend much time in these spaces, they don’t need to be the most styled part of your home and/or they don’t require a high level of privacy. Save the money on these areas and choose a treatment that gets the job done. On the other hand, living areas, formal dining rooms and master bedrooms are places where a combination of both can add ultimate style, privacy and temperature comfort, and it could be worth the money to invest in these high-impact areas.
Insulation
Sunlight can be a blessing and a curse for your home. It can fill living areas with wonderful natural light. It can liven up dining areas or kitchens. But, harsh sunlight can also heat up a room late in the afternoon, it can fade furniture, or it can wake you up too early on the weekends. When it comes to blocking out the sun, faux wood blinds and heavier curtains should be considered. Wood blinds or faux wood blinds block out a great deal of sun, but not all of it. If you want complete darkness to grab a few more winks on weekends, add some curtains over the binds to double up the sun defense. Consider the positioning of the windows throughout the house and protect the windows and rooms that bear the brunt of the sun, while making it easy for natural light to shine through when you want it.
When it comes to curtains and shades, there are a number of sun-blocking options. Cellular shades filter out the sunlight while still letting enough natural light into the room. Roman shades, sheer shades, and curtain fabrics all have different thicknesses, which block out different levels of UV rays and sunlight. If your living room faces west, you will certainly want some thicker shades to block out that evening sunshine and keep the temperature in the room manageable.
Style
Just about any style under the sun is available when it comes to choosing window treatments. Gone are the days when curtains were the only way to add style, warmth and luxury to a room. Many options in shades and blinds can achieve the same effect.
Whichever you choose, you want the window treatments to accent the furniture in your room, not vice versa. For example, if your furniture is heavily patterned, choosing solid colors for blinds and curtains is the way to go. If your furniture is solid, light patterns and designs could accentuate certain colors or themes in the room. Keep theme and tone in mind: You wouldn’t choose earthy bamboo shades for a room with a sleek, industrial vibe, or beachy plantation shutters for a room with a modern artsy feel.
Choosing the proper window treatments for each room in your home comes down to a handful of factors. Don’t break the bank or overspend where you don’t need it, make sure you know where the sun is most intrusive in what rooms, and go with a style that fits the vibe of your home. Blinds and curtains can complete the look of a room, and make it feel like home.
Katie Laird is the Director of Social Marketing for Blinds.com and a frequent public speaker on Social Media Marketing, Social Customer Care and profitable company culture. An active blogger and early social technology adopter, you can find her online as ‘happykatie’ sharing home décor, yoga, parenting and vegetarian cooking tips. If you’re interested in window blinds like those described by Katie, please go to the Blinds.com website.
How to Get Through the ‘Punch List’ Stage of Your Remodel
Punch lists are usually made continuously by your construction manager throughout the project to avoid a lengthy list at the end of the project. However, the time when homeowners are involved is usually toward the end, right around the time when you’re able to use your newly remodeled space again. The punch list ensures that both you and your building professional agree that the project is completed. Typically, a signed-off punch list also ensures that the builder will be paid any remaining money owed by the homeowner, so this goes hand in hand with both parties agreeing that the project is complete.
It’s important to keep track of any items you find by adding them to a punch list as well as noting them throughout the house with a small piece of painter’s tape (not duct tape or electrical tape, which could damage finishes). This makes it easier on your memory as well as on your contractor. No one has to go hunting for that one corner with the ding in the drywall.
Punch lists are normal for almost all contractors. No matter how much protective product your remodeler lays down, no matter how good the painters and plumbers and trim carpenters are, there is bound to be at least one thing that will need to be taken care of at the end of the day. And, just like nearly every other aspect of remodeling and home building, how your building professional will resolve punch items varies based on where you live, what type of work your contractor is doing, how big the firm is and so on.
Be sure to check out your contract (take a look at any sections containing the words “substantial completion,” “inspection” or “warranty”) for information on how your contractor handles these issues. If you’re still unsure about issues such as costs associated with punch lists, how quickly punch items are resolved or whether anything is too small to punch, clear the air by having a conversation with your contractor.

Punch List 1: Jamie Keskin Design, original photo on Houzz
Paint
Let’s start with paint. Mistakes involving paint are typically the easiest for homeowners and pros to spot, primarily because paint is so aesthetic. If your walls are a different color than the one you selected, that should be pretty easy to pick up on.
However, there are other, smaller details that can be overlooked. One of my best painters once taught me to check the paint on woodwork with my hands instead of my eyes.
Walk up to your trim and cabinetry, look the other way and run your hand over it. Is it rough or bumpy? Can you feel any blemishes, paint drops or brush strokes? Does the finish make you grimace? If you answer “yes” to any of the previous questions, add this to your punch list of “to-do’s.”
Keep your eyes open for sheen variances. Is one spot of the wall shinier or duller than the rest? Also, note any cut-ins. Is the paint line where the wall meets the ceiling straight?
Depending on how many paint punch items are found, the paint crew may have to touch up a couple of spots on a wall here or there, or it may need to repaint entire sections. Again, this all depends on your contractor. Repainting entire rooms could constitute a change order for some, while others see it as a warranty item. Communication is key in determining where your builder stands on these issues.

Punch List 2: Rafe Churchill: Traditional Houses, original photo on Houzz
Sheetrock
Sheetrock (also known as tape, bed and texture) is another aesthetic finish that can be pretty easy to punch (both in the punch list sense and in the physical sense).
One of the best tips I’ve learned is that Sheetrock is easiest to punch after the paint primer has gone up but before the actual paint color hits the walls. Dings, dips, crooked edges and texture inconsistencies stand out like a sore thumb.
So ask your construction manager whether you can stop by after primer is applied. With your blue tape handy, walk through the construction area and take a look. Turn the lights on and inspect texture. (Is it too heavy in some places or too light in others? If you selected a smooth texture, are there any bumps that stand out?) Take a look at wall corners. (Are they straight and square from bottom to top?) Scan walls and ceilings for scratches and dents.
I’ve got to take a second here to make a small point: I know that every part of your home is important and worth time and attention. But consider this: Is a ding in a bottom corner of a coat closet really worth the same as one at eye-level in a kitchen?
I’m not saying that your contractor shouldn’t put time and effort into making your house your dream home, but if you feel like you’re getting carried away with the blue tape, take a step back and reevaluate. I can promise you that your dinner guests aren’t going to get on their hands and knees and inspect the Sheetrock in the corner of your pantry. And if they do, that’s another conversation entirely.

Punch List 3: Lauren Jacobsen Interior Design, original photo on Houzz
Tile
Like paint, tile can be inspected by sight and touch. Take a minute to make sure that everything looks flat and level, and that grout lines stay a consistent size. Then, if the tile is on the floor, take your shoes and socks off and walk around to make sure everything feels nice.
A creative tip I picked up from a homeowner is to walk throughout the house bouncing a tennis ball. Anywhere the ball hits the tile and makes a hollow sound is a place you’ll want to tag with tape. Tiles that aren’t well-secured will sound hollow and could lead to cracks or loose tiles in the future. Whether you do it during the punch phase or later when the tiles come loose or crack, the tiles will need to be replaced.
I’ve worked with several customers who decide that a loose tile in a corner somewhere isn’t worth the effort. I’m not saying to just throw in the towel on little things like a loose tile, but in the end, it is your house. If you don’t want anyone coming back to fix it and you can live with it, that’s perfectly fine too.

Punch List 4: Best Builders ltd, original photo on Houzz
Electrical, Audio and Video
Punching electrical, audio and video work is a lot less visual than some of the other finishes we’ve covered so far. With electrical and A/V, you’ll want to turn everything on and off. And then turn it on and off again. And then do this one more time.
Then, turn everything on and leave it on for a while. (This makes sure that lights don’t “freak out” when they’re on for extended periods of time.) Next, test the dimmer switches to make sure they dim correctly. Dimmers that aren’t properly paired to the lighting source can cause flickering. (Strobe lights can be cool, just not in your kitchen.)
If you really want to go above and beyond, test to make sure all the outlets are functional, and press the buttons on the GFI outlets — the outlets in wet areas like bathrooms or kitchens — to ensure that they trip (cut off the electricity) as they’re supposed to.
For appliances, make sure you have all the pieces that came with them and the warranty materials (all that paperwork that comes in the box). This is super important, as having the warranty information will be useful for any service you may need for your appliances in the future.
As with all other punch items, mark them with blue tape (if you can reach them; no need to strain yourself to put tape on a flickering can light in a 20-foot ceiling) and add them to your list.

Punch List 5: Kasper Custom Remodeling, LLC, original photo on Houzz
Plumbing
Like electrical, plumbing isn’t the easiest to check visually. There are a few things you can see, like scratches in the finish or straightness of plumbing fixtures, but there’s a lot behind the scenes that might only come to surface after use.
Turn on your hot water and let it run to make sure it gets hot, and turn on the cold water to make sure it stays cold. (It’s not unheard of to have the cold and hot switched.)
Plug your sink, fill it to the top and then drain it. This tests two things: 1) that the drain stopper works and 2) that there aren’t any leaks in the plumbing under the sink. The added pressure of all of the water leaving the sink at once tests the plumbing in a way that a normal stream of water can’t. You can do the same thing in your bathtub. Another good test for a tub is to fill it up to the overflow hole to make sure the overflow is connected properly.
With mechanical punch items such as plumbing and electrical, it’s likely that your building professional will try to lump all the punch items into one visit. This saves money and time. So if you notice that your toilet has hot water (it’s happened!) or a bulb in a closet is flickering and it’s not being attended to immediately, fear not! Your contractor may just be making sure to have a comprehensive list before calling in the cavalry to get it fixed.

Punch List 6: Decotick, original photo on Houzz
I know this all may sound like a lot of work. You may be thinking, “Isn’t this why I hired a general contractor or full-service builder in the first place?” And you’re absolutely right. But it’s my experience that homeowners like to get in on the action sometimes, and this is a great, productive way to do so.
Plus, everyone’s human. No matter how top-notch your remodeler or builder is, there is a chance (even if it’s just a .00001 percent chance) that something may be overlooked. Having a second set of eyes to make sure everything is up to their standards and yours doesn’t do anyone any harm. Now, get punching.
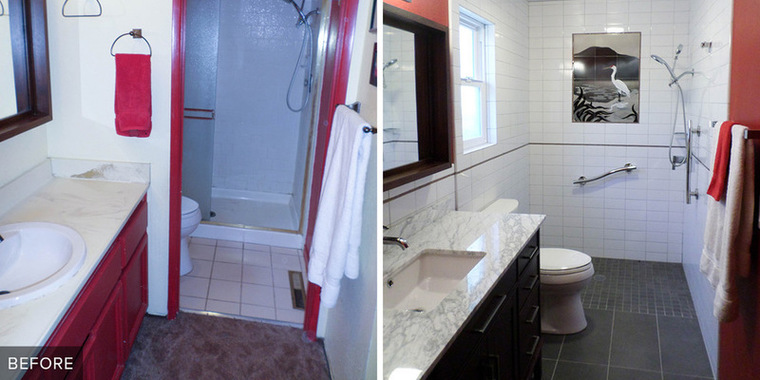
6 Dramatic Bathroom Makeovers You Won’t Believe
Maybe it’s that 1980’s soaking tub with the giant surround, or maybe you’re prepping for resale, or perhaps an overhead flood is to blame. Maybe it’s just time for a change. Whatever the motivation behind them, bathroom renovations are one of the project’s homeowners put the most effort and investment into. Here are 6 of the most dramatic before-and-after bathroom stories from Houzz, from budget-friendly to luxe.
Related: Mini Bathroom Makeovers You Can Complete in a Weekend

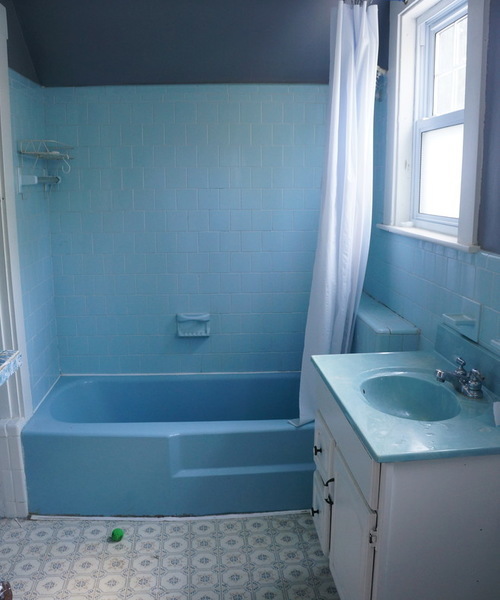
Bath Makeovers 1: Before Photo, original photo on Houzz
1. The Bathroom That Helped Sell a House in One Day
BEFORE: In this Massachusetts bungalow, over 100 years old, the 1960s bathroom renovation wasn’t offering much help to real estate agents.

Bath Makeovers 2: Copper Dot Interiors, original photo on Houzz
AFTER: Interior designer Karen Goodman had resale in mind, as she was redoing the house to flip. But it was important to her to preserve and restore the original 1902 feel. She found a claw-foot tub at the Habitat for Humanity ReStore and painted it green, added a wall-hung sink and used subway tile befitting the home’s turn-of-the-century aesthetic. A unique shower curtain adds color and personality, while the classic fixtures have widespread appeal.
Great tip: Goodman shared her philosophy about painting the original wood with Houzz contributor Annie Thornton. “If it’s painted, it’s getting painted. If it’s wood, it’s staying wood,” she said. “It wasn’t my place to decide what should be wood and what shouldn’t be in a place I don’t plan to call home.”
Shower curtain: Danica Studio; tub paint: Moss Green Rust-Oleum spray paint; claw-foot tub: Habitat for Humanity ReStore

Bath Makeovers 3: Before Photo, original photo on Houzz
2. Dilapidated 1970s Bathroom Gets Inspiration From a Dilapidated Mansion
BEFORE: The state of the bathroom in this 1912 Colonial-style home in New Jersey was sending the whole family up to the third floor to use the facilities because they couldn’t stand the cracked tiles, 12-inch-high tub, awkward layout and dated colors in the main bath. While walking through a once-grand old house during an estate sale and seeing its fabulous colors and tile patterns, homeowner Jody Suden had a clear vision for the bathroom makeover in her own home.

Bath Makeovers 4: Tracey Stephens Interior Design Inc, original photo on Houzz
AFTER: Interior designer Tracey Stephens worked closely with Suden to help her achieve her vision, using classic fixtures and completing lots of complicated tile drawings to get the details just right. The tiles are based on historical patterns and colors and were handmade in Arkansas by American Restoration Tile.
The overall style suits the home’s age and style, mixing mint green, white and black with vintage apothecary style.
Great tip: Even if you have a strong idea of what you want your room to look like, hiring a designer is key — you just have to find one who gets it. Suden told me she couldn’t have done it without Stephens, who told me she considered herself the “midwife” helping Suden achieve her vision.

Bath Makeovers 5: Before Photo, original photo on Houzz
3. The Bathroom Where 2 Doctors Take Deep Soaks After Long Days
BEFORE: This Cincinnati bathroom was dark, dated and awkwardly laid out. Because of a lack of smart storage, the countertop had become a magnet for clutter.

Bath Makeovers 6: Ryan Duebber Architect, LLC, original photo on Houzz
AFTER: Architect Ryan Duebber stole about 16 inches in length for the bathroom from the master bedroom, then moved the toilet to the back of the room. This allowed space for a spacious shower and a Japanese soaking tub.
The sapele wood at the back of the room draws the eye and makes the room look deeper, while the new skylight, reflective white, clear glass, a floating vanity and a strategic lighting scheme bathe the room in light. (For example, check out the glow on the floor provided by the LED tape lights underneath the vanity.) In addition, there’s a place to store everything so the counters can stay clean, maintaining the minimalist look the homeowners love.
Great tip: Having a specific place for everything you use in the bathroom will keep the clutter at bay. Give it a lot of thought early on in the design process. Where will your hairdryer go? Which products do you use every day in front of the mirror? Are you a toothbrush-out or a toothbrush-put-away kind of person?

Bath Makeovers 7: Before Photo, original photo on Houzz
4. Saving the Best for Last
BEFORE: These San Francisco parents worked on the spaces the whole family could enjoy before tackling their awkward master bathroom.

Bath Makeovers 8: Hulburd Design, original photo on Houzz
AFTER: Taking over an unused terrace space gave architect Holly Hulburd plenty of room to work in a new bathtub, a generous separate shower stall and a long vanity complete with dressing table. The room is a study in lines and scale, from the way the tub surround extends into a shower bench to the careful use of different sizes of rectangular tiles.
Great tip: When using strong lines, lining things up is important. In order to have the tiles meet the ceiling and floor without any cuts, Hulburd dropped the ceiling a little to make the geometry work.

Bath Makeovers 9: Before Photo, original photo on Houzz
5. The Bathroom That Makes the Most of Burgundy Floor Tiles
BEFORE: For the 2012 D.C. Design house, Christopher Patrick decided to embrace the existing tile and plumbing configuration in order to stick to a budget.

Bath Makeovers 10: Christopher Patrick Interiors, original photo on Houzz
AFTER: He chose a neoclassic wallpaper that complemented the burgundy tones in the floor, and added a more modern vanity to blend old and new.
Setting the sink and mirror asymmetrically on the right side of the vanity left ample room on the counter.
Great tip: Don’t get stuck in a bathroom design rut. Patrick had an “antibathroom” attitude, styling the room more like a living room or den and adding open shelves instead of a typical medicine cabinet.

Bath Makeovers 11: Before Photo, original photo on Houzz
6. Adding Laundry Makes Way for a Guest Room in a Toronto Pied-à-Terre
BEFORE: The converted loft in this 1905 eyeglass factory offered a decent-sized laundry room that didn’t get much use, but it didn’t have an extra bedroom. By integrating the laundry into the bathroom, there’s now room for guest bunks in the former utility room.

Bath Makeovers 12: Affecting Spaces, original photo on Houzz
AFTER: This shows the opposite wall from the one in the “before” photo; to see the complete makeover, click over to the story. Architect and designer Gillian Lazanik removed a linen closet and planned a layout that made the most of the space. This included room for a stackable washer-dryer and a new walk-in shower stall with a clear glass divider that opens up the room.
12 Tips for Making Your Bedroom Cozier

At the end of a long day, your bedroom should be a sanctuary of comfort that welcomes you in. But, as a room that guests rarely see and in which homeowners spend most of their time with their eyes closed, its upkeep frequently gets pushed to the bottom of the to-do list. Thankfully, there are some little design tricks that can make a big difference. Turn your bedroom into a restful retreat when you up its coziness factor with a few of these easy ideas.
- Layer textures. Sheepskin rugs, a down comforter, plush pillows and knit blankets can add a softness to the room that will make you want to sink right in. Lift these textures upward, with a canopy, tufted headboard, billowy curtains and hanging textiles (like a weaving) so even the walls and ceiling feel snuggly.
- Pick the right paint. Dark, saturated colors make a room feel like it’s embracing you, which is ideal for setting a sleepy environment. But if you’re nervous to commit to a dark color on the wall, choose a pale dusty blue, sage green or another light natural color for a soothing tone (just steer clear of energetic hues). Have you ever wanted to sleep on a cloud? Go with all-white paint and decor which makes even a basic bedroom feel soft and spa-like.
- Personalize it with reminders of the places and things that make you feel at home. Do you have a fondness for flowers? Bring floral patterns in on your textiles. Do you dream of vacation at the lake? Frame a photo of your favorite spot! Photos or paintings of uncluttered natural landscapes—like a sunset reflecting on water or a hammock under the shade of an oak—can rekindle memories of relaxation and are perfect for creating a sense of calm.
- Add mood lighting. Soften the light to mimic dusk for an intimate mood with dimmer switches, lamps, lanterns or even string lights. Just make sure you can reach the switch from bed, so you don’t have to disturb your peace to get up and turn it off when you’re ready to roll over and fall asleep.
- Skip metallic finishes. Choose warm natural decor options like wood and fabric instead of cold, manufactured metallics. This goes for everything from your bedroom furniture to window treatments. Faux wood blinds, especially when paired with floating curtains, fit with a cozy aesthetic and let you filter out harsh sunlight and maintain privacy for a truly sheltered slumber.
- Bring on the books! Stacks of good reads invite you to snuggle in and get lost in another world. A true retreat is a room with plenty of books that begs you to stay.
- Fix up—or fake—a fireplace. If your bed sits hearthside, embrace this romantic accent with styled logs and a decorated mantle. If you don’t have such a luxury, create a faux fireplace to add comfort and warmth through your décor: Arrange oversized candles and lanterns safely within a homemade hearth to bring in that cozy fireside feeling without changing the structure of your home.
- Keep the room uncluttered. When you want to settle in, a mess distracts you from finding comfort, so minimize the amount of stuff that makes it to your bedroom. Watch your nightstand, which often becomes a catch-all, by making a point to rehome any wandering wares now, and put things away as soon as they enter the room in the future. If you’re apt to let laundry pile up, keep it behind the closed doors of your closet so it doesn’t crowd your peace.
- Create a sense of timelessness. Tuck clocks and electronics away so they’re nearby if you need them, but their wires and harsh silhouettes aren’t reminding you of life outside your sanctuary. The hush that falls in a room devoid of gadgets will allow you to easily disengage from the stresses of reality.
- Rethink your bedding. Add a pillow-top pad to your mattress so it feels like your bed is hugging you when you climb in. Or, bring in a contoured body pillow which actually can hug you! Linen sheets feel luxe compared to cotton and are a simple swap to boost your bower. Many people also swear by skipping the top sheet while dressing their beds, which allows them to burrow directly into a fluffy comforter.
- Appeal to your sense of smell. Aromatherapy can have a huge impact on your perception of a space, so find some soothing essential oils or a sweet candle to blanket the room with an ambiance you adore. As soon as you open the door, you’ll be eager to plunge into your little oasis.
- Nestle into nooks. A window seat, a reading nook or an upholstered seating area are all inviting spaces that can draw you in from the doorway. The more intimate alcoves you can create, the cozier your bedroom will feel!
Flooded with soft lighting, plush textures and other comfy touches, your bedroom environment will envelope you at day’s end. And, perhaps even better than the idea of your bedroom refresh itself, is knowing that none of these tips take longer than a weekend to complete! So, slide into your slippers as you settle on which cozy updates you’ll select for your new favorite room of the house.
Katie Laird is the Director of Social Marketing for Blinds.com and a frequent public speaker on Social Media Marketing, Social Customer Care and profitable company culture. An active blogger and early social technology adopter, you can find her online as ‘happykatie’ sharing home décor, yoga, parenting and vegetarian cooking tips. If you’re interested in faux wood blinds like those described by Katie, please go to the Blinds.com website.
5 Lessons Home Renovations Can Teach You About Yourself
I could spend ages talking about everything there is to learn from remodeling your house: the best types of tile for a shower floor, little details that you shouldn’t overlook when remodeling, tips and tricks for finishing a project on time — you name it.
But a remodeling project, being a rather noteworthy life experience, can also teach you a lot about yourself. No, I’m not talking about your tastes or preferences (for example, you learn that you love the color blue on your walls or you learn that you really just don’t like remodeling). Rather, it can teach you about some characteristics you never knew you possessed, or at least never had the opportunity to focus on — the good and the bad. Here are some things you might learn about yourself.

Learn 1: Jane Lockhart Interior Design, original photo on Houzz
1. You’re more impatient than you thought. Remodeling will — I repeat, will — test your patience. It doesn’t matter whether you’re a dedicated yogi who can sit and meditate for hours at a time or a hobbyist who works late into the night tirelessly assembling detailed ships in bottles. Weather delays, unforeseen problems (wait, there’s mold behind that wall?), busy trade schedules — it’s almost impossible to have a remodeling project without a delay or two. And when it’s your project with the delays, you might just find yourself repeating the mantra of kids stuck in the family car during a road trip, “Are we there yet?” Or more specifically, “Are we done yet?”

Learn 2: Transitional Sunroom, original photo on Houzz
2. You’re adaptable. Bathroom remodels and kitchen remodels are notorious for, well, making bathrooms and kitchens unusable while they’re under construction. At the beginning this might seem like a major inconvenience (truth be told, it is!), but by the end you might be thinking “Who really needs a full kitchen?” After all, there are so many small appliances loved by college students and remodeling survivors alike — toaster ovens, microwaves, slow cookers, camping stoves.
Related: Brainstorm Ideas for Your Kitchen Remodel
Bathroom remodels can be easy to work around if you have another bath that isn’t under renovation, or a next door neighbor who is fairly generous, or membership in a gym with clean showers. Remember, creativity and adaptability are your friends. So embrace your inner MacGyver.

Learn 3: AMW Design Studio, original photo on Houzz
3. You want in on the action. It starts small: At first, you’re just chatting with your contractor about the status of your project — normal stuff. But as time goes on, you can’t help but ask questions about the more technical side of things. Some people might find details about tile installation eye-rollingly boring, but you’re intrigued.
Related: Read Reviews to Find the Best General Contractor Near You
Suddenly, you find yourself searching for home improvement how-to books and classes on design. You may even start planning your second project (which you’re considering doing yourself) or looking for houses you think you’d like to flip. Watching your own home transform before your very eyes has been an exciting process, no doubt, and now you’re ready to try your hand at it. Don’t be surprised if at first you just want the process to be over, only to find that you never want it to end.

Learn 4: Deville Custom Homes, original photo on Houzz
4. Your relationships can (probably) weather any storm. If the space you’re remodeling is a place that you share with someone else (whether it be your spouse, children or others), it’s likely that you’ll feel a little more stress than if you were just remodeling your own personal space.
Every stress that you feel about the remodel, they probably feel as well. Every worry you have about budgets and schedules and paint colors, they have too. Pour all that stress into a small group of people who live together, and, well … things can get messy.
But when you finally see the light at the end of the tunnel, you realize that all that pressure was worth it, because you and your people have a beautiful new space to use for years to come. It probably took some compromise and communication to get there, but now that you’ve finally made it, you know you’re that much stronger because of it.
Or not. I don’t want to be a Debbie Downer, but what you might discover about yourself is that you can’t collaborate with the person you’re with. Remodeling is like a stress-test on relationships — for good or ill.

Learn 5: Tiffany McKenzie Interior Design, original photo on Houzz
5. You’re fearless. I’ll tell you this much: It takes a lot of inner strength to not freak out when you see someone you’ve never met come through your front door with a hammer. Remodeling can make some people stronger. Once you see your home demolished before your very eyes by strangers wielding tools and driving heavy construction equipment, your definition of “scary” changes a little.
Obviously, this isn’t an all-encompassing list, nor is it supposed to mean that you will find yourself relating to every point. You may or may not feel the urge to become an amateur remodeler. You might (understandably) still get freaked out at a stranger coming into your home with a hammer. Remodeling is a personal journey, full of personal discoveries and accomplishments and all that good stuff. The only way for you to truly know how it will affect you is for you to experience it yourself. But whatever happens, you will learn more about yourself than you have in a long time.
The 4 Phases of Remodeling: The Honeymoon Stage

As with anything in life, a remodeling project can come with its ups and downs. Certain phases seem to go a mile a minute, while others feel like they’ve lasted a lifetime and a half, all while it looks as though nothing is being completed. Fear not — this is pretty typical. And, while every project is different, a good portion of renovations have four major phases, what I’m calling the Honeymoon, the Midproject Crisis, the Renewal of Vows and the Happily Ever After.
For now, let’s take a closer look at the Honeymoon phase of renovating.

Honeymoon 1: Homegrown Decor, LLC, original photo on Houzz
After weeks of searching for a remodeler in your area, calling references, checking out their Houzz profile and working toward an agreeable price, you say, “I do,” sign the contract, finalize the design and begin work in two weeks. There’s a little nervousness in the air, but as you enter the Honeymoon phase, the mood is mainly one of excitement.
Demolition Begins
A couple of weeks go by, and the day comes for work to start. Protective products are placed, and demolition begins. Demo, sweet, demo. Normally one of the quickest moving stages of a remodel, demolition makes it look as if a lot of work is being done practically overnight. Cabinetry is removed, walls are torn down, appliances are taken away and, in a matter of days or weeks (depending on the size of your project), you’re staring at a blank canvas.
After that, any necessary framing and structural work will begin. Framing usually isn’t as exciting or fast-paced as demolition, but still, there is visible progress almost daily. At this point, you and your partner are walking on air. The rate of work is astounding, and you’re still very excited (although maybe a little less nervous now) about the entire project.

Honeymoon 2: Blondino Design, Inc., original photo on Houzz
Speed Bumps Ahead!
However, like a delayed flight on a real honeymoon trip, there are obstacles that can slow down this phase, specifically during demo. If you’re living in an older house, there’s the possibility that when your walls are opened, asbestos or lead could be discovered, which will need to be dealt with before work can continue.
Another common speed bump is building permit delays. Going through government-mandated processes can be tricky sometimes, especially if you or your building professional don’t have everything you need to get the green light from your municipality the first time around.
More holdups can come from structural elements that become apparent after demolition. For example, say you were going to move a door to another wall in your dining room. Once the demo crew opens up the wall where the new door will be installed — surprise! — there are plumbing pipes running the height of the wall. Reconfiguring design to meet these new requirements will add time to the demo stage.
Don’t panic. These delays happen often, and it’s worth accounting for and accepting these hurdles before you even begin to think about renovating.

Honeymoon 3: Jim Schmid Photography, original photo on Houzz
Rolling With the Punches
To help your honeymoon run more smoothly, here are a few tips I’ve learned from witnessing hundreds of remodels (and even surviving a couple myself):
- Embrace change. Really. Give change a huge hug. Get to know it on a personal level. Because no matter what room you’re touching (whether it’s the kitchen or a teensy guest bath), it’s likely that you use that room daily. The sooner you accept that this room (major or not) will be unavailable for a period of time, the sooner you’ll be able to adapt your daily routines to fit around it.
- Love your microwave. This applies to kitchen remodels specifically. As soon as demo is done, your primary cooking and eating area will be gone. Before your project starts, find an untouched room in your home to create a mini kitchen that will include necessities such as a microwave, toaster oven and coffee pot. Think of it as the mini kitchen you had in your dorm or apartment in college and revel in the nostalgia.
- Don’t worry too much. I know this sounds hard — OK, really hard, especially for control freaks like myself — but trusting your building professionals to know what they’re doing (even if you do come across one of the aforementioned speed bumps) will really help you keep your head on straight. And if you do have questions or concerns …
- Communicate! Communication has proved time and time again to be one of the biggest parts of a remodel — and a successful marriage. I cannot stress it enough. Talk with your contractor, talk with your significant other — talk, talk, talk. Ask framing questions, bring up budgetary concerns, muse over paint colors. Whatever is on your mind, getting it out of your head and into the air is beneficial for everyone involved (especially you).

Honeymoon 4: Jeff Herr Photography, original photo on Houzz
And remember: The Honeymoon phase of a remodel is definitely one of the high points in a process with numerous peaks and valleys, so try to enjoy it. No matter what you may encounter during demolition and framing, it’s likely that the mood of everyone on board — you, your contractor, your family and even your pet — will be very positive.
Related: 15 Questions to Ask Before Buying a Fixer-Upper
You’ve just embarked on a new journey, and the excitement of watching the image of your new home come into focus just adds fuel to your fire. Revel in that post-contract-signing bliss and maybe enjoy a glass of your favorite beverage with your significant other while you two imagine the new space that will be formed in your newly torn-apart home. Enjoy it, because what lies ahead is a bit uncertain.
With that in mind: What happens when it feels like nothing is happening? Is there still work being done? Are we still on schedule? Is it OK to freak out a little bit? Read more in the upcoming article in this series, “The Midproject Crisis.”
3 Design Ideas to Try in Your Bedroom
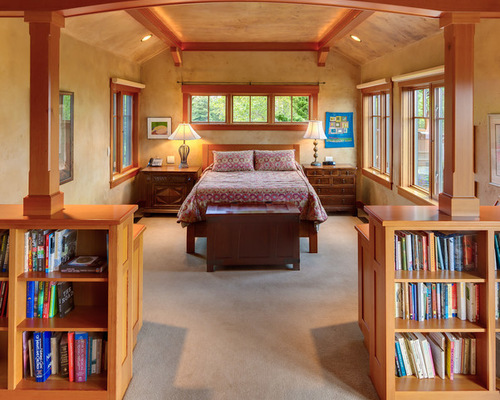
As far as design goes, bedrooms are pretty straightforward. Pick the typical necessary components — bed, nightstands, dresser — and you’ve got a bedroom. But too often homeowners stop there. The designers for these three bedrooms didn’t. They took a holistic approach, embraced built-ins and celebrated simple white walls to turn what could have been ordinary rooms into spaces worth bragging about.
Related: Discover Nighstands in Every Style

Bedroom Projects 1: Erik Biishoff, original photo on Houzz
1. Holistic Approach
Designer: Architect David Edrington
Location: Eugene, Oregon
Size: 14 by 28 feet (4.2 by 8.5 meters)
Year built: 2007
Homeowners’ request: A cozy bedroom with a great view and access to an outdoor room with a comfortable place to sit. This was part of a new home.
Plan of attack: Architect David Edrington used an architectural method detailed in a book titled A Pattern Language to help flesh out the deeper idea of how the homeowners wanted the bedroom to function and how it should be experienced in terms of intimacy, which direction the bed should face and the flow to other rooms. “The primary patterns were ‘intimacy gradient,’ ‘sleeping to the east,’ ‘sleeping alcove’ and ‘the flow through rooms,’” Edrington says.
Why the design works: Simplicity and smart planning. “My work is about the common principles that come from the human experience with spaces,” Edrington says. “The beauty of this bedroom comes not from any unique situation or odd problem that needed to be solved. The beauty comes from the simplicity of the decisions guided by A Pattern Language. The bed is in an alcove-like space that is just big enough for the bed, side tables and room to move around. It has windows on three sides, including one on the east for morning light and several on the west for the evening view of the Oregon Coast Range.

Bedroom Projects 2: Erik Biishoff, original photo on Houzz
Related: Measurements to Remember When Designing Your Dream Bedroom
“Opposite the bed is a sitting space just big enough for two people, with a fireplace and some book storage. The fireplace is raised, so it’s visible from the bed. The proportions of the room are about 2:1, which means it’s naturally two spaces. In between the two spaces there is a thick half wall made of cabinets and columns and beams, which is a continuation of a theme used throughout the house.
“The room has a gently vaulted ceiling that supports the cozy human scale. The walls and ceilings are made of integral colored plaster, which is also a continuation of the wall finishes used throughout the house. The cabinets, windows, trim and other wood detailing is done in Douglas fir, because that’s our local wood and it has a beautiful color and grain.”
Who uses it: A couple in their late 50s and early 60s, who work at home
The nitty-gritty: Cabinets: clear Douglas fir, The Cabinet Factory; walls: colored plaster; floors: bamboo, Imperial Floors
Team involved: Dorman Construction (general contractor); Erik Bishoff (photographer)

Bedroom Projects 3: Garcia Stromberg, original photo on Houzz
2. Embracing Built-Ins
Designer: Garcia Stromberg
Location: Stuart, Florida
Size: 14 by 20 feet (4.2 by 6 meters)
Homeowners’ request: A contemporary yet classic look with clean, straight lines
Designer secret: Strategically planned built-ins save space.
Plan of attack: Create as much livable space as possible, then focus on the view. “Then the built-ins brought the whole room together,” designer Garcia Stromberg says.
Why the design works: “The design of the linear lines worked flawlessly with the natural colors that were incorporated from the view of the outdoors,” Stromberg says.
What wasn’t working: “The biggest challenge was the narrow space and fitting a comfortable amount of furnishings and decorations in the space while still portraying a contemporary look,” Stromberg says.
Splurges and savings: The homeowners saved on furnishings but splurged on built-ins.
Team involved: Palm City Millwork Inc.

Bedroom Projects 4: Eric Charles, original photo on Houzz
3. Off-the-Shelf White Walls
Designer: Carley Montgomery
Location: Silver Lake neighborhood of Los Angeles
Size: 20 by 28 feet (6 by 8.5 meters), or 560 square feet (52 square meters)
Year built: 2015
Homeowner’s request: This home was built on spec for a future owner. Carley Montgomery acted as the architectural designer, interior designer, general contractor and developer. She envisioned modern clean lines and flexible living space for this house, which could be used as a guest house, an office or an artist’s studio.
Designer secret: Plain white walls. “Everyone gets all crazy trying to pick the perfect white,” Montgomery says. “While in many circumstances this is vital to match the furniture or warm a space with a hint of color, I find off-the-shelf white is the most universal, easy and safe color for modern homes.”
Plan of attack: Montgomery designed the home from the ground up, positioning it to capitalize on unobstructed views. Large floor-to-ceiling windows bring in light and views of downtown Los Angeles, which Montgomery wanted to highlight by keeping the interior design minimal. “It’s incredible at night,” she says. “The desk behind the sofa allows you to work and also enjoy the view.”
Why the design works: “This entire space is only 560 square feet and feels so much larger,” Montgomery says. “The ceilings are vaulted, creating a loft-like feel. But the flow of the space is what really works. We fit a full kitchen, full bath, dining area, living area, desk and bed in the space, and it doesn’t feel crowded. This has everything to do with the placement of the entry door, kitchen and bathroom inside the space. It is vital to place your furniture on your plan when in design so that you maintain flow through the finished space.”

Bedroom Projects 5: Eric Charles, original photo on Houzz
Related: Park a Bench at the Foot of the Bed
“Uh-oh” moment: “If this were a project being built for a homeowner, there would have been numerous ‘uh-oh’ moments. There always are,” Montgomery says. “Being that this is my business and I’m acting as owner representative, designer and contractor, decisions are quite simple. The only issue is trying to anticipate what the buyer of the property is going to want. It’s like working for a mystery client.”
Take-away: The value of well-planned and thought-out design
Team involved: Jordan Christian (artist); Corbin Poorboy of The Here Co. (styling); Eric Charles (photographer)
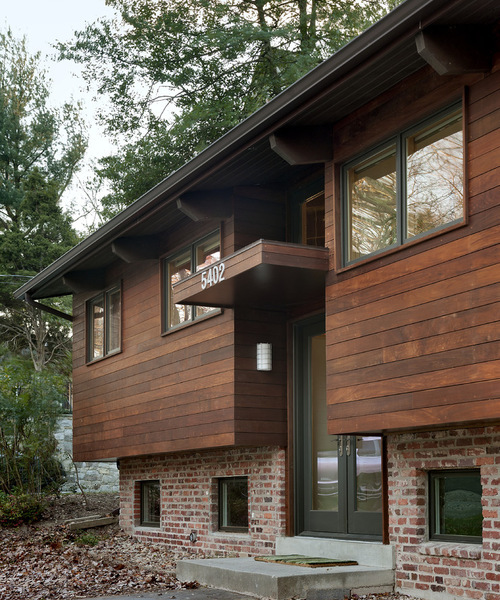
5 Stunning Siding and Brick Combinations
We love brick. Who doesn’t? The building material of choice for ages, it is revered for its rich, organic texture, color and visual interest. And it only gets better with time, the color having more depth after baking in the sun for years.
Related: Hire a Siding and Exterior Expert Here
If you’re building or remodeling and brick will be part of your home’s exterior, it’s worth considering how different siding materials can be paired with brick to create different design and textural effects. Here we look at five distinct siding options — horizontal, shingle, board and batten, stucco and metal — that work hand-in-glove with classic brick.

Siding 1: Bennett Frank McCarthy Architects, Inc., original photo on Houzz
Horizontal Siding
Horizontal siding comes in many forms, including vinyl sheets, wood planks and fiber cement boards. It offers many design possibilities that can break up the look of dense brick and add visual interest.
1. Go wide and modern. The aesthetic of horizontal dark-stained wood siding skews modern when installed above brick on this remodeled, split-level home. This rich style of siding gives the pictured home a sleek appeal; similar siding can be used to transform a tired exterior into an updated jewel.
2. Choose a precise color match. If you’re going for a completely new look for the exterior, consider color-matching your siding and brick. The result is a cohesive main color field that gives trim and shutters a chance to stand out.
3. Create a subtle accent. The siding adds a modest decorative element on a home that might look less interesting in solid brick.

Siding 2: Brooks Ballard, original photo on Houzz
Cedar Shingles
Cedar shingles, or shakes, as they are also known, are versatile in terms of their look and how they can be installed. Whether you use real wood or a composite material, keep them natural, stain them or paint them, they can be used with brick to evoke various architectural styles.
1. Dress up a Craftsman. The shingles here are the cherry on top of this quintessentially Craftsman-style home, with its deep overhang, decorative brackets and columns. The shingles are stained to coordinate nicely with the brick at the skirting and base of the columns.
2. Be dramatic and modern. Dark colors are striking when used as the predominant color on an exterior.
3. Go beachy. This type of siding, originally used on this style of home on the East Coast, was intended to withstand a harsh Atlantic weather beating, requiring little care. If you have a brick-clad Cape Cod, the cedar shingles are a design detail you may not want to leave out.

Siding 3: Meridith Baer Home, original photo on Houzz
Board and Batten
This classic siding installation is characterized by wide, vertical wooden boards joined together with a strip of wood or “batten” covering the seam. When paired with brick, each element has enough of its own distinct visual appeal that they both shine.
Related: Outdoor Lights to Give Your Home a Welcoming Glow
1. Paint it out. In this photo, the board and batten and the brick are painted to match each other, as well as the trim and doors. This works to allow for one popping accent color on the shutters. Color matching the elements also allows the the natural lines of the vertical boards to create a subtle textural contrast with the lines of the brick.
2. Keep the eye rising. The vertical installation of board and batten siding draws the eye upward and gives the illusion of some extra height. Here’s another color-choosing trick for siding: Look to your brick’s mortar for the shade that works best with your house.

Siding 4: Studio C Architecture & Interiors, original photo on Houzz
Stucco
Another versatile material that can work well with many different architectural styles, stucco cooperates naturally with brick. Why? Their respective textures play off each other so well. The relative flatness of the stucco can work beautifully as a canvas for brick’s coarse nature and make it really stand out.
1. Layer the texture. This photo is a great example of how stucco can work as expected with brick on a very classic and traditional Tudor-style house. It also reveals the dense texture of the stucco. This material is available in finishes ranging from smooth to coarse, and layering a rougher stucco with brick’s natural surface can be an appealing look.
2. Use brick as the accent. Using the brick as an accent to the stucco is a great option in some parts of the country where brick is not as plentiful or if budget is a concern, as brick is the more expensive material of the two.

Siding 5: carterwilliamson architects, original photo on Houzz
Metal Siding
Perhaps not as ubiquitous as the other siding options, metal is a great choice for your brick house if you’re looking for something provocative and unexpected. It’s also versatile and available in many forms, and it can be installed vertically, horizontally or diagonally, depending on the look you’re after.
1. Use it as part of a design recipe. As the French mirepoix mix of celery, carrot and onion is the foundation of many culinary dishes, so the combination of metal, brick and wood often is the basis of modern architectural design. In this photo, the metal works in conjunction with the other materials to create a delightful harmony of elements, each with its own visual interest.
2. Create tension. The dark of the metal is the perfect material to play off the warmth of the red brick, providing a smart design tension between the modern and the traditional.
3 DIY Renovation Ideas You Might Want to Steal
Our series on reader renovations of kitchens, bathrooms and laundry rooms has garnered many comments, with plenty of readers chiming in about the features they love. Here, we round up some of the brightest ideas from the Reader Projects featured so far. Perhaps you’d like to try them in your own project.

Reader Remodels 1: Original photo on Houzz
Related: See More Bathroom Remodeling Ideas

Reader Remodels 2: Original photo on Houzz
1. Aging in Place in California
Bathroom at a Glance
Who lives here: Beth Sawatzky
Location: Healdsburg, California
Size: 50 square feet (4.6 square meters)
Total cost: $22,026
Construction time: One month
Great idea: Adding grab bars and a curbless shower. These features anticipate the need to accommodate a wheelchair — or even just avoid the potential hazard, as the homeowner ages, of stepping over a shower curb.
“Wow — that bathroom would be a positive sales feature for a buyer of any age,” writes Jannie in a comment. “I’d like to see the aging-in-place adaptations built into more homes from the get-go. Just the curbless showers and reinforced framing for super sturdy grab bars would be so much cheaper to do on the initial build.”
Related: Find a Design-Build Firm That Specializes in Universal Design

Reader Remodels 3: Original photo on Houzz
2. An Update in San Francisco
Kitchen at a Glance
Who lives here: Houzzer Christa Martin and her husband
Location: San Francisco Bay Area
Size: 90 square feet (8.4 square meters)
Cost: About $35,600
Construction time: Three weeks

Reader Remodels 4: Original photo on Houzz
Great idea: A a pullout pantry placed between the refrigerator and the wall ovens.

Reader Remodels 5: Original photo on Houzz
3. Enjoying the Views in Washington
Kitchen at a Glance
Who lives here: Jo Ann Snover and her husband
Location: Woodinville, Washington
Size: 350 square feet (32.5 square meters)
Cost: $99,021
Construction time: Four months

Reader Remodels 6: Original photo on Houzz
Great idea: This Seattle-area kitchen renovation has a couple of ideas you might want to steal. It removes cabinetry to make room for light — and in this case, beautiful views. To make up for losing those cabinets, the homeowners added some under-the-stairs pullouts where they stash appliances.
How to Start a Renovation and Where to Begin
Working on your home can be a daunting prospect. Your mind may be flooded with ideas. You may be overloaded with advice from family and friends. You may be grappling with big questions, such as: Should we stay or should we move? Should we extend or simply tweak the space we already have?
The biggest obstacle can simply be knowing where to begin. If this is the case, it’s time to step back, gather your thoughts and apply a little objectivity to the process. Whether you’re planning a whole-house makeover or a fundamental reorganization, here are some ideas for how to go about creating a home that meets your needs in the best possible way.

Starting Point 1: Ambient Architecture, original photo on Houzz
Plan a methodical makeover. When major work isn’t required but the whole house needs a face-lift, work systematically through each room to establish the extent of the work and outlay required. Start in the hall — it typically needs more thought than you might imagine — and work logically from there.
Think methodically about each room in terms of floor, walls, ceiling, lighting and furnishings. Prepare a list of items to be purchased and building or decorative work to be done. You’re aiming to create a priced inventory of all the material needed for a successful project.
You may find it useful to create a shopping list with relevant dimensions on your phone or in a dedicated notebook for handy reference on the go.
Start with issues, not solutions. If significant alterations or even an extension are envisaged, take time at the outset to reflect on what’s propelling you to undertake the work in the first place.
Think specifically of what your issues are in terms of space, light and storage. Exploiting each of these elements to its fullest is key to creating a home that fits your needs like a glove. Whatever your space and budget, there’s an optimal solution for each part of this home-design trinity.
Also bear in mind the present and future life stages of members of the household — from toddlers to school children to young adults – and how your home will need to respond to each.

Starting Point 2: Black Fox Interiors, original photo on Houzz
Compare what you have with what you want. Where your issues relate to use of space, start by preparing an inventory of the rooms you have now and how they’re used. Next, itemize the spaces you’d like to have and the uses you need to accommodate. Imagine you’re writing the brief for your ideal home.
Comparing both these lists should identify any “gaps” that need to be filled. The challenge then is to see whether your existing home can be rethought to meet these needs.
For example, can the extra living room you desire be accommodated in a first-floor room? Or in a loft? Can the guest bedroom double as a home office? Be broad in your thinking to achieve best use of your resources, both spatial and financial.
Related: Furniture to Transform That Spare Room Into a Home Office
Maximize your existing space. If you feel you need more space, first check that the rooms you already have are working sufficiently hard before deciding whether to extend.
Perhaps you even have an unused room. Could it be reinvented and put to work in a different way? Is it actually a problem room — with issues of light, warmth or arrangement that need to be solved before it can be put to any use?
Could the dividing walls between the rooms at the back of your house be removed to create that coveted kitchen/dining/family room?
If you do decide to extend, make sure that the existing house flows into the extension and that, between both areas, your needs in terms of space and storage are fully met.

Starting Point 3: Dorman Architects, original photo on Houzz
Boost natural light. If light is your main concern, a light-filled extension might seem a tempting vision. But bear in mind that such an extension may reduce light in your existing spaces.
Large windows to even the tiniest of external spaces can transform the light levels in any room. So, too, can light tubes, always a powerful source of light.
Where space and planning controls permit, a garden room, such as the one in this photo, can expand your space without impinging on the quality of light in the main house. Depending on the orientation of your home, the garden room may even enjoy better sunlight than the main rooms.
Manage your storage. Your aim throughout the house should be to achieve storage that’s both convenient and appropriate to what’s being stored.
You may think your existing storage is woefully inadequate, but before ripping it out and starting again, ask yourself: Could it work harder?
In the kitchen, for example, rearranging the contents of existing drawers and adding cabinet shelves can free up valuable space. This thinking can be applied to closets, linen cabinets and all other special storage areas around the house. Your main outlay here will be time, not money.
Related: Inspiration for a Beautifully Organized Closet

Starting Point 4: Domus Nova, original photo on Houzz
Turn a “problem room” into a successful one. If there’s a room in your home that’s shunned and avoided, you may well have a problem room.
However, there’s always a reason why a room is not used. It may, for example, be physically or architecturally cold, uninviting in its furniture arrangement or just dark and gloomy.
Make an effort to find out what doesn’t work in your problem room, explore possible solutions and get cost estimates for the work involved. Could you take down a wall, as in this inviting, open-plan space? Even moving a door or a radiator can transform a room — and for a fraction of the cost of an extension.
Prioritize the fundamentals. Tackle issues of watertightness, plumbing, electricity and thermal insulation in the first instance.
You won’t see visual benefits, but a warm, snug home is a springboard to greater things.

Starting Point 5: Eoin Lyons, original photo on Houzz
Seek professional advice. There’s no end of advice available when undertaking work on your home. Everyone around you will have an opinion, and you’ll find a huge volume of inspiration from a variety of sources.
The downside is that, amid all this, you risk becoming addled and even paralyzed, unable to figure out what you need to do and how to do it.
If you do find you’re out of your depth, seek expert, paid guidance. A good professional will advise you on how best to spend your money and help you avoid costly mistakes. The earlier you involve a professional in your project — even if it’s just for a one-off consultation — the better.
Stay focused. Whatever scale of work you take on, resolve to stay focused to the very end. Renovation work tends to be a long and tiring process, and you may be tempted along the way to delegate minor — or even major — decisions to outside parties.
Those decisions you delegate may haunt you. Remember, your aim is to create a home that fits like a glove.
