
 Facebook
 X
X
 Pinterest
 Copy Link
How to Install a New Tile Floor

A fresh, new floor is one of the most popular ways to update a bathroom. In fact, floors are among the top three features to upgrade during a master bathroom remodel, with about 91 percent of renovating homeowners making an improvement to this area, according to Houzz research. But what’s involved? And can you do it yourself?

Tile Floor 1: Alexandra Crafton, original photo on Houzz
Related: Considering a Clawfoot Tub? Here’s How to Get a Freestanding Tub for Your Bathroom
For some homeowners, laying tile that you’ll walk on for years to come can elicit a great sense of pride. Others may find the process a bit overwhelming. Read on to determine whether you’d like to tackle this yourself or hire a pro.
Project basics: Installing tile involves stripping the floor down to the substrate, installing a backer board or underlayment, adhering the tile to the floor and grouting it. Depending on the material, sometimes a sealer is needed to protect the material from stains or damage.
It’s a good project for you if: You have the ability to lift 50 pounds, can work on your knees without trouble and don’t have back issues, says Chris Harper, general contractor and partner at Harper Construction in Charleston, South Carolina. You also need to be able to follow directions and have a decent amount of patience. “It’s simple,” Harper says. “But simple does not equal easy.”
Things to consider: Before you decide whether to DIY or hire a contractor, think about the pattern you want to install. Is it basic and fairly straight? Then you might be just fine trying your hand at a little tile-laying. Going for something more complex, with angles or curves involved? You might want to leave the headache to a professional. The idea here is to match your skill level, DIY confidence and tolerance for imperfections to the task. Some creative people find no tile challenge is too great. Others who are certain they’ll be annoyed by off-kilter or irregular grout lines may want to enlist the help of a pro.

Tile Floor 2: Howells Architecture + Design LLC, original photo on Houzz
Another thing to consider is the condition of your subfloor. Chris Chumbley, vice president of USI Design & Remodeling in Southlake, Texas, says that on the concrete slabs common in his area, you must be sure the floor is properly prepped and cleaned and any spiderweb cracks addressed before tiles go down. Also, “you want to make sure your floors are laid level,” Chumbley adds. If assessing these conditions is beyond your DIY depth, even after reading up on the process or watching a host of YouTube videos, you may want to call a professional.
“The bigger the tile, the more challenging,” says Joe Smith, general contractor at Owings Brothers Contracting in Eldersburg, Maryland. A larger tile is more likely to show imperfections since a 2-foot tile may bow over an unlevel subfloor, while a 1-inch tile would climb right over the floor’s curves.
“Natural tiles cost more to install because you have to clean and seal them before you set them,” Smith says. “Glass and marble cost more because you have to prep [them] correctly.”
As you consider various tile options, also think about how well the type of material wears and how hard your family is going to be on it. Porcelain tiles wear “like steel,” Chumbley says, but limestone is more delicate.
Who to hire: A reputable tile setter or a general contractor who will oversee a tile specialist.
Basic steps: Decide what type of tile you want to install. You can get ideas in tile showrooms, magazines and photos and tile product shots on Houzz.
Next, consider the steps that will be involved, from demolition of the existing floors to any work that may need to be done to prep them for new tile installation. Leveling the floors and assessing any substrate issues is likely to be the most technical part of this project. Harper recommends consulting a general contractor who will “look at the structure of the subfloor and at all the angles to make sure what’s getting done is appropriate and will last for a long time.”

Tile Floor 3: Jay-Quin Contracting Inc., original photo on Houzz
How: It’s critical that you don’t install tile on old layers of linoleum, Harper says. Remove any old flooring and get down to the substrate. Needed repairs or leveling of the bare substrate come next.
Once the subfloor is ready, the next basic step is installing cement backer board or an uncoupling membrane. Both materials serve as the underlayer to the tile floor and help prevent cracks.

Tile Floor 4: Blank Page Design Build, original photo on Houzz
Joints should be staggered, not all lined up in a row, to make the floor more stable. “Once it’s all down, it’s a smart thing to go back and check everything and make sure all of those boards are secure by walking across and checking and making sure you have screwed things to the floor appropriately,” Harper says.
Next, mark out the tile layout. “Don’t start with the tile against one wall and go across the room,” Chumbley says. It’s better to start from the center of the room and work your way out. The layout of the tile is typically marked in chalk. The width and color of the grout are part of the aesthetics. The tile layer can use spacers to keep the tiles evenly apart as the pattern progresses.

Tile Floor 5: R.M. Buck Builders, original photo on Houzz
Finally, the tile may be set with mortar. Different types of tiles need different types of mortars or adhesives, so DIYers will need to research this and not grab the first can of mortar on the hardware store shelf. Typically, you need to let the mortared tile set for a day before grouting it. But there are some fast-dry adhesives that, if appropriate for the type of tile you are using, can speed up the process.
Once the tile is set, it’s time to apply the grout. You should take care to choose a grout that works with your particular material. “Glass can get scratched with grout,” Smith says. “There’s different grout for floors and shower walls.”

Tile Floor 6: JAUREGUI Architecture Interiors Construction, original photo on Houzz
Cost range: Labor, which varies greatly by region, may be charged by the square foot ($3.50 to $9) or the job ($300 to $600 per day for tile layers). The tile itself can cost $4 to $125 per square foot, and you also will need backer board or membrane, mortar and grout.
Typical project length:Three days, especially if demolition is involved. Cement board and mortar usually need a day each to set.
Permit: Often not required, but check with your local building department.
Best time to do this project: Since it’s indoors, any time of year is fine.
How to get started: Assess what your room needs and whether you will DIY. If not, find a good tile person.
The 4 Phases of Remodeling: The Midproject Crisis

We recently covered the ins and outs of what I refer to as the Honeymoon Phase of construction. Next up is a stage similar to a concept most everyone is familiar with: the Midlife Crisis. (Whether you’ve experienced one or not is an entirely different story.) It often comes with questions like, “What am I doing? Where am I going? What is the meaning of life?”

Midproject 1: J Design Group – Interior Designers Miami – Modern, original photo on Houzz
Likewise, the second phase of a home remodel, which I fondly refer to as the Midproject Crisis, is paired with parallel questions: What’s my contractor doing? Are we still moving forward as planned? Was this really all worth it? And of course: What is the meaning of life?
Fear not: Your contractor is working hard, your project is moving forward and, yes, your decision to renovate your home is, and will be, worth it. I can’t really speak about the meaning of life, but I can speak about the experiences of homeowners and remodelers during this period of a remodel.
Related: The Reality of Living Through a Remodel

Midproject 2: Vivid Snaps Photography, original photo on Houzz
Typically, once demolition and framing is finished (the Honeymoon Phase) and before sheetrock is put up, mechanicals will begin. (This probably is referred to as “mechanical rough-in” or “mechanical rough” by your contractor.) Mechanicals refer to the guts of the house: electrical; plumbing; and heating, venting and air conditioning (HVAC). Like our own guts, most of the work done during mechanicals occurs behind the scenes.
So what is going on behind the scenes? Let’s break it down by type of work:

Midproject 3: Janet Brooks Design, original photo on Houzz
Electrical. The groundwork for all new light fixtures, outlets, switches and appliances will be done during this phase. New wiring will be run in the walls and ceilings, electrical boxes will be installed for future fixtures, and electrical panels may be upgraded so they can handle heavier loads (this is especially prevalent in remodels where appliances are added). At this point, electricians are making sure that everything that will need power will have access to it and meet your municipality’s building code.
Plumbing. As with electrical, plumbing rough-in ensures that all plumbing fixtures, appliances and other water features will be supplied with water, gas (if your house uses natural gas) or both. So pipes may be moved or installed in new places, shower pans (the things that make sure the water stays in the shower) are installed and inspected, and gas lines may be moved, extended or even put in.
HVAC. Unlike electrical and plumbing, HVAC is the only mechanical where nearly all the work is completed during the rough-in stage. Pathways for new vents (for bath exhaust fans or kitchen vent hoods) are determined and vents are installed, air conditioning units may be replaced, and air return vents are located in appropriate positions.

Midproject 4: Melbourne Contemporary Kitchens, original photo on Houzz
All this sounds exciting, right? No doubt, it is. But the progress isn’t as visual as it is in the Honeymoon Phase. Since everything occurs behind walls, under foundation or in attics, the big “wow” just isn’t there like it is when everything is torn apart.
It’s around this time that I’ve often seen homeowners concerned about progress. Yes, plumbers are there, but where are the new sinks? Why isn’t there a single light fixture installed yet? Is the HVAC guy even working, or is he just taking a nap in the attic?
The other contributing factor to the crisis is the fact that any speed bumps that crop up during this phase take a bit more time to resolve. Overall, the placement of existing framing is the biggest obstacle in mechanical rough-ins.
If your plans specify that there is going to be a can light in Location A, but Location A has a structural beam directly above it — no can do. Or say your architect has designated a toilet to be mounted on the wall instead of on the ground, but existing wall framing prevents this from being a viable option. Back to the drawing board. Or maybe your HVAC contractor needs to be able to provide ductwork to a new vent hood location in your kitchen, but there is no open attic space to place the ducts. Time to think through the alternatives.
Another obstacle, which is less common but should still be noted, is the condition of existing mechanicals. Any wiring, plumbing or venting that is found to be damaged, dangerous or just not up to par with your municipality’s building code will likely need to be remedied.
And don’t even get me started on inspections. If your job is permitted, inspections for mechanicals will occur during this stage. City building inspectors are (at least where I’m from) well known for being thorough. If you don’t have everything just right (which ultimately is good, because they’re looking out for your safety), they will not hesitate to make your contractor fix the issue before any work can continue.

Midproject 5: Kasper Custom Remodeling, LLC, original photo on Houzz
And finally, don’t forget to communicate with your remodeler. If you don’t understand something about mechanical rough-in (which is common), ask. If you’re concerned about the placement of pipes or wiring, say something. If you want an update on project status, request one.
I know it may be tempting to ask for advice from your neighbors who remodeled their house last year or your friend whose cousin’s husband is an architect, but in the end, the person with the most knowledge about your project is your building professional. See if you can get on your contractor’s schedule for a recurring biweekly meeting. It will help make the Midproject Crisis less of a crisis and more of an extended honeymoon.
So we’re halfway there. What’s next? Is the light at the end of the remodeling tunnel finally visible? When will your house start to look like a home again? What is the meaning of life? (I’ll tell you one last time — I can’t help with the meaning of life!)
But for more information on the next phase of a remodel, look for the next installment in this series: the Renewal of Vows.
The 4 Phases of Remodeling: The Renewal of Vows

Passing the midway point of a remodel can be an exciting time. After weeks (or months, but hopefully not years) of being in a state of disarray, things finally start to feel as if they’re coming together.
You’ve experienced the fast-paced bliss of the Honeymoon. You’ve trudged through the slowdown that comes with the Midproject Crisis. And now? Now you’re ready to gaze lovingly into your contractor’s eyes again.

Vows 1: Priority 1 Project Management, original photo on Houzz
Everything you’d hoped and dreamed about when you first envisioned your project is coming true, and you’re feeling ready to say “I do” all over again. It’s time for the remodeling phase I like to refer to as the Renewal of Vows.
You probably won’t hear your contractor refer to this phase as such (but how fun would that be?). Just as the Midproject Crisis is more commonly referred to as the mechanical rough-in stage, this phase has other, more industry-standard names. You will probably hear words like “finish out,” “trim out,” “mechanical trims” or “finishes.”
And, as you can probably guess, this phase is about finishing and beautifying the work that was started in the first couple of months. There’s a lot that may (or may not) be involved in the finish stage of your job, depending on your scope of work, but here’s a list of the most common steps that happen during this phase.

Vows 2: Traci Connell Interiors, original photo on Houzz
- Sheetrock. Holes made during rough-in will be patched, new Sheetrock will be put up at any new walls or ceilings, and texture will be applied to make your walls look like walls again.
- Trim carpentry. There are a few different types of trim that may be installed at this phase: baseboard (which runs along the joint where the bottom of a wall meets the floor), door and window casing (which is installed around the perimeters of doors and windows) and crown molding (which is run along the joint where the top of a wall meets the ceiling). Trim is purely optional — some more contemporary designs forgo it entirely — but it is meant to create a finished, unified look.

Vows 3: TOTAL CONCEPTS, original photo on Houzz
- Cabinetry. The installation of cabinetry is usually around the time when I see a little glimmer come back into a homeowner’s eyes. This is when the kitchen starts looking more like a kitchen, but it’s also when you can visualize how your other storage pieces, such as built-ins and bathroom cabinets, will change the function of your home.
- Related: Shop for Kitchen Cabinets
- Electrical and plumbing trim. This is the other big “wow” that comes with the finish-out phase. A master bathroom can start to look completed when tile and cabinetry is installed, but throw in a freestanding tub and a shower full of rain heads, handheld fixtures and a steam unit, and suddenly you’re not looking at a mostly done, unidentifiable space — you’re looking at your master bathroom.
The same goes for electrical items like decorative light fixtures or appliances. Seeing new stainless steel (or whatever your preferred finish is) appliances being brought into and installed in your kitchen make most people go starry-eyed and drool a little. No judgment here — I’ve done the same.

Vows 4: DKOR Interiors Inc. – Interior Designers Miami, FL, original photo on Houzz
- HVAC trim. I mentioned in the last installment that most HVAC work is done during the rough-in stage, so what is left? Essentially, all that needs to be done is the installation of vent covers and thermostats and maybe a little tweaking of the air-conditioning system. Nothing too exciting, but it should be noted nonetheless.
- Miscellaneous. Like I said, there is a lot that can be going on during the trim-out stage. Flooring — such as carpet, wood, tile or laminate — will be installed. (Flooring installers are known for insisting that they be the absolute last people to work on a house.)
Tile will go up in showers and as backsplashes. Countertops will go in. Priming and painting of walls, ceilings, trim and cabinetry will be completed. A little landscaping may even be done.

Vows 5: Viyet Luxury Consignment, original photo on Houzz
There are a million moving parts during the mechanical finishes phase. And I admit, as a homeowner and general contractor, this is exciting to see.
Just like during the Honeymoon, a lot of visibly quantifiable work is being completed. Only this time, instead of things being torn up and thrown out, they’re being brought in and installed. The puzzle pieces are finally fitting together, and you are starting to see the big picture. (Dreamy sigh.)
I’ve harped repeatedly about how communication is key, and this still rings true during the Renewal of Vows stage. But patience is also important.
As you see new things being carried in and installed, it can be so tempting to begin moving back into your new space or using your new kitchen. But your contractor may still need some time and space to work.
There are last-minute items that will ultimately guarantee your satisfaction that need to be taken care of before you and your family can begin enjoying your new remodel. So hang in there, and your patience will be rewarded.

Vows 6: Jay Jeffers, original photo on Houzz
You may be thinking: There can’t be anything left, can there? That’s it, right? Everything is installed, the house looks like a house again, time to move in and get settled. Not so fast. You’re almost there. Find out what final bits and pieces are involved in the end phase of a remodel, what I like to call the Happily Ever After stage.
The 4 Phases of Remodeling: Happily Ever After

This fairy-tale phase of a home remodel is the tail end of any major project. The Honeymoon has come and gone. The Midproject Crisis has thankfully passed. The Renewal of Vows has given you the strength you need to continue on, and now we’re finally, and gratefully, just about out of phases. It’s time to wrap up this series on the ups and downs of remodeling by detailing the final few steps that are taken to complete a home remodel. What I call the Happily Ever After phase.

Ever After 1: Sophie Metz Design, original photo on Houzz
Whether you have experienced it, known someone who has gone through it or have only read about it, you’re probably familiar with what it’s like to be in love. Emotions run the gamut of excitement, happiness, giddiness and contentedness (as well as a wide range of others). The person in love is likely to be gushing about her beau or his sweetheart to anyone who will listen. It’s a time when even the most cynical of people looks at the world through rose-tinted glasses.
Moving back into a house after remodeling can be a bit like being in love. Are you not excited to use all your new appliances or plumbing fixtures? (Hello, new bathtub!) Is there not a smidge of giddiness as you think about coming home to your pristine new bathroom, kitchen or living room? Don’t deny it — you’re probably even babbling to the barista at Starbucks about your new space.
During this Happily Ever After stage, finally, the work is done! At last, there are no more nail guns and saws and vacuums making noise in your house. After months of destruction and disarray, it’s time to move back in and enjoy your home, sweet home, for the rest of your days (or at least until you sell it or remodel again). And though most of this phase is just you at last having the chance to enjoy the fruit of your general contractor’s labor, there are a few odds and ends that your contractor will be taking care of to make sure your Happily Ever After really lasts forever.

Ever After 2: chadbourne + doss architects, original photo on Houzz
- Cleaning. This probably will happen before you move back into your home (or at least it should). Since day one of demolition, dust and debris have been thrown into the air and, much to your contractor’s chagrin, have crept into other places in the house that weren’t touched in the remodel. Now’s the time to do an all-inclusive clean. No, the cleaners won’t do your laundry for you, but they’ll do just about everything else, from polishing the floors to dusting the ceiling fans. The end-of-project clean is like a cleansing spa day for your home.
- Final walk-through. The last walk-through ensures that you are completely satisfied with everything — and I mean everything — in your home. This is where you will have the chance to sit down and bring up all the odds and ends that you feel need to be addressed. This can be anything from “this faucet isn’t on straight” to “there’s a scratch on the new fridge” to “my shower isn’t draining correctly.”
Contractors may vary on when they hold a final walk-through, but in my experience, it’s scheduled after the homeowners move back in and have a chance to use the new space. Your contractor should’ve caught just about everything during his or her own informal walk-throughs throughout the remodel, but sometimes there are items that just don’t come to the surface until a house is lived in.

Ever After 3: Collins & DuPont Design Group, original photo on Houzz
- Warranty begins. Most builders and remodelers have a warranty for their projects. The length and amount of coverage can vary, of course, but what remains constant is the promise to stand behind their work for any unforeseen circumstances that arise and need addressing. (Side note: If you’re looking at contractors right now, ask them about their warranty. This can be very telling of how they conduct their business. The more that contractors are willing to warrant their work — or the longer the warranty — the more effort they will put into getting the job done right the first time.)
For some contractors, the warranty formally begins after the final walk-through is hosted and the last payment is received. After that, some will stand behind any light fixtures that fizzle, appliances that break, tiles that come loose — you name it. In an ideal world, everything would work right the first time, and it would work right forever. In our world, however, there are bad manufacturing batches and recalls and oversights that may need to be taken care of. Fear not. If you have selected the right remodeler, these issues will be handled.
Related: How Builders Deal With Problems Beyond the Warranty

Ever After 4: Mark Hickman Homes, original photo on Houzz
What else is involved in the Happily Ever After? Absolutely nothing. Take a deep breath in, let it out, look around your new place and smile, knowing that it’s all yours, to have and to hold from this day forward, for better, for worse, for richer, for poorer, in sickness and in health, to love and to cherish till death do you part. You get the picture.
How to Stay Organized During a Home Renovation

When you’re embarking on a renovation project, it’s a good idea to clear as much space as possible before the chaos ensues. Think about what you want and need in your new room, and thoroughly declutter the area. Follow these tips for clearing, organizing and storing to ensure your building work creates as little upheaval as possible.
Be systematic. Start sifting through your cupboards and bookshelves. If you need to pack up a room or two, now is a great time to assess what’s lurking in the back of your cabinets.
Pack frequently used items into transparent storage boxes. Label them clearly and move them to another room. They’ll be out of the way of dust and builders, but still easily accessible.
Items used less often can be packed in cardboard boxes and stored out of the way. Pack them carefully and label each box with the general contents. It’s a great idea to take photos of the box and label in its new location, so you can easily find things during the renovation or when you’re unpacking after the work is complete.

Organize 1: Hannah Brown, original photo on Houzz
Consider your needs. If you’re planning an interior remodel to change the way you use your space, think about why you want to change the layout. Do you need a safe play area for young children, or maybe a small office space to facilitate working from home?
Provide your designer or architect with as much information as possible about how you want to use your space, so he or she can make it really work for you. A good professional will listen and provide a solution tailored to your requirements. In this dining area, for example, the designer has incorporated neat wine storage beneath the bench seating.
Look at the space objectively. Once you have an idea of how you want your renovated space to look, you can plan your decluttering strategy. Take a few photos of your room and look at them with a friend or relative whose opinion you trust. Talk about what you need to take out to achieve your desired look. This will help motivate you as you declutter, getting rid of everything that doesn’t contribute toward your goal.
Also, think about whether you want to take on the mammoth task of decluttering yourself, or whether it’s worth calling in a professional organizer to help you declutter at the outset.

Organize 2: ZeroEnergy Design, original photo on Houzz
Use storage that moves. Plastic storage boxes on wheels will come in very handy, as you’ll probably be moving things around to give your builders access around the house.
If you’re planning a bedroom refurbishment, you’ll need to be selective about which clothes and toiletries you pack away and which you want to keep on hand for the duration of the improvements. A portable covered clothes rail and some lightweight drawers on wheels can store a capsule wardrobe and keep your clothes dust-free.
Think about daily routines. Most home remodeling projects involve some disruption, so plan ahead for changes to your daily routine. If you’re having your kitchen renovated, you could think about setting up a mini cook station elsewhere in the house. This could be something as simple as a table and microwave.
Related: Search for Console Tables
Alternatively, you could arrange to stay somewhere else for a while. Pets might also need a place to go; ask a friend to help out or research reputable pet sitters in your area.

Organize 3: Kelly Hoppen London, original photo on Houzz
Store valuables securely. While it’s important that you trust your builders, there will be periods during the renovation when your home will be left unlocked. It might possibly be without windows, doors and even walls at some point. In addition, a stream of tradespeople will be coming and going. So take precautions and keep valuables in a safe in your home, or in a deposit box off-site.
Make some room. Almost any renovation project will require you to be living in fewer rooms than usual, and these areas will probably need to be multifunctional. If you’re not going to keep all your room furniture when the work is finished, it’s a good idea to pass pieces on or sell them before the work starts. Decluttering prior to the renovation means you’ll have fewer items to move, pack, store and unpack once the work is finished.
If you’re planning to use a garage or loft for storage during the project, check in advance that large items will fit through doors and openings. Also, make sure you’ve cleared out sufficient space for the furniture to fit. Alternatively, you could rent a secure storage locker while the renovation is taking place.

Organize 4: The Posh Shed Company, original photo on Houzz
Don’t forget the outside. If your project involves some external work, do that outside decluttering you’ve been putting off. Clear away all those items you’ve left outside to deal with in the future, as the future has now arrived! Rent a dumpster or a van and get rid of your accumulated junk. If it’s not junk, add to your project budget by selling your unwanted possessions.
Gather everyday essentials. With all the disruption of a home improvement project, it’s crucial that you don’t lose essentials such as your keys, phone, chargers, project paperwork and tape measure. Consider setting up a special workstation to keep these necessities on hand.
5 Things Your Contractor Doesn’t Want to Hear

There are parts of every job, no matter what field you’re in, that are just less fun than others. Building professionals pride themselves on doing anything and everything to make clients happy. But that doesn’t always mean the builder is jumping up and down with excitement at every stage of a project.
Related: 10 Things to Discuss With a Contractor Before Work Starts
When it comes to remodeling and home building, contractors will do just about anything to make you happy. They’ll meet with you on short notice. They’ll come up with creative solutions to your unique requests. They’ll even clean your toilets if you ask (although maybe not for free).
Contractors may have a brave face on at all times, but I’ll let you in on a little secret: There are some things they just don’t like to hear. Such as …

Comments 1: Gepetto, original photo on Houzz
1. “I reselected my plumbing fixtures.” Most good contractors will harp on how important it is to get all your selections made as soon as possible. Some won’t even start a project until everything is selected. It’s a great practice, and it helps to keep your project going as smoothly as possible.
Related: Bathroom Sinks for Every Budget
So if you come to your builder in the middle of the project and say, “Hey, by the way, I chose all new plumbing fixtures for the master bathroom,” they might get a little nervous. Depending on what stage of work they’re in and what you reselected, this could be no big deal. Or it could mean doing a lot of extra work to prepare for the new fixtures. Even worse, there may be a lead time associated with your new selections. This could cause an unplanned stop in work, which nobody (homeowners, subcontractors, builders, neighbors) likes.

Comments 2: BCV ARCHITECTS, original photo on Houzz
2. “Can we hang this chandelier up there?” (Points to 20-foot-tall ceiling.) Why, yes! Yes, we can. I’ll just be sitting in the corner biting my nails as I watch my electricians stand on massive ladders that I (the person with the fear of heights) would never set foot on, all while they hold and hang a massively heavy and most likely expensive chandelier. But, yeah, we can definitely do that. No problem.
Related: Search Chandeliers by Style
There’s really no way to avoid challenges like this. But it helps to give your builder a heads up on out-of-the-ordinary needs you may have. That way, he or she can take extra precautions, such as setting up scaffolding, and warn you of any additional costs that your request could involve.

Comments 3: Buildwell, original photo on Houzz
3. “Can you meet at 5 p.m. this Friday?” Admittedly, I don’t think anyone likes to hear this. Contractors may work long hours and be available pretty much whenever you need them to be, but that doesn’t mean that they don’t want to go home a little early (or at least leave on time) on Friday to relax.
A great way to ensure you’ll have your contractor’s undivided attention is to set up recurring meetings. Find a time that works for both of you and save it in your calendars. That way, no one has to worry about last-minute, pre-weekend meetings.

Comments 4: Kasper Custom Remodeling, LLC, original photo on Houzz
4. “Let’s make all of the walls smooth!” I think smooth walls are beautiful. They’re crisp and clean and are a must in my book. I’ll say this much, though: They aren’t always easy. It’s one thing to hire a high-quality drywall contractor who is a pro at smooth finishes. It’s another thing entirely to have all involved parties be happy with the final product.
It’s kind of like If You Give a Moose a Muffin. It starts with one thing that needs to be fixed (“That corner isn’t perfectly square”) and seemingly overnight turns into a mile-long punch list detailing everything from millimeter-wide blemishes to areas of texture that look weird in a certain light. Like I said, I adore smooth walls, but getting them to a level of smoothness that everyone can agree on can be a bit of a task.
If you can find it within yourself to hold off on the nitpicking until your builder at least has the paint primer up (this is the stage when it’s easiest to see any remaining imperfections), you’ll save yourself and your builder a headache.

Comments 5: Barbara Bagot Architecture, original photo on Houzz
5. “Could you help me move [insert expensive item here]?” Grand pianos, $50,000 paintings, one-of-a-kind sculptures — you name it, I’m afraid of moving it. Asking remodelers to help you move something valuable to you (whether monetarily or emotionally) is asking them to take on a lot of liability.
While it may make sense to ask them for a little help — after all, they have plenty of crews, and they’re already at your house — it’s not worth the risk for any party involved. Your best bet is rephrasing the question to “Do you know anyone I could hire to help me move [insert expensive item here]?”
As I was speaking to my co-workers for their take on things contractors “hate” to do, it became apparent to me that, for the most part, there isn’t too much that we won’t do to make our customers happy. On top of that, there aren’t a huge number of things that make us shudder. (Notable exception: When someone used the toilet at a house where the water wasn’t on — yuck.)
There might be materials or tasks contractors try to avoid if they can, and some might even steer their customers away from certain things to make everyone’s life a little easier. (Our in-house designer avoids marble in kitchens at all costs because of its susceptibility to stains.) But in the end, we’re in the customer service game for a reason. We love to make people happy, and we’ll do whatever we can to facilitate that.
How to Hire the Best Landscape Contractor for Your Project
You’ve approved your landscape architect’s final site plan for your landscape design, and now it’s time to get the project built. You can pay the landscape architect to select a contractor for you, or you can hire one on your own. Like other building professionals, landscape contractors have different skillsets and levels of experience. A landscape contractor does not need an award-winning portfolio of work in order to do a great job. The work of the contractor comes down to getting the job done on budget and on time while providing good, reliable service and quality installation work.
There are different ways to hire a landscape contractor to build your project. If you have worked with a landscape architect on a design plan, you can further engage him or her to steward the hiring of a contractor for building the project. Or, you can do the work of finding, screening and hiring a landscape contractor on your own. Whatever your path is for hiring landscape contractors, there are things you should know about their qualifications and how they work with designers. Use this article as a guide to hiring a landscape contractor so that you find the best one for your project.

Landscape Contractor 1: Falon Land Studio LLC, original photo on Houzz
How to Find a Landscape Contractor for Your Project
As mentioned, there are two main ways to find a contractor: work with the landscape architect to select one or research and hire one on your own.
You have the option to pay the landscape architect who designed your property to do construction administration. That’s a technical term in the landscape industry for managing the administrative tasks of getting the installation under way. The landscape architect is then responsible for getting estimates or bids for the work and recommending the best company to you. The architect does not have to send the project out for pricing to several companies. Instead, the landscape architect will probably have a working relationship with a local contractor and will recommend that company to you.
Once you sign an agreement with the contractor, the landscape architect and builder will work together to ensure that the work will be built according to how it was designed.
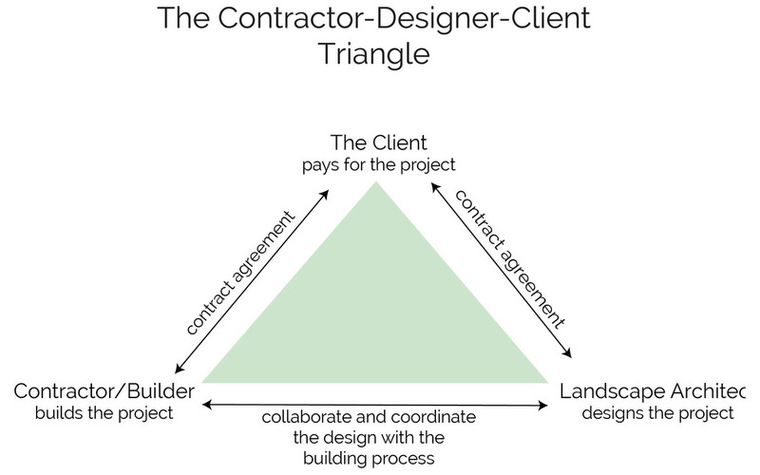
This method sets up a relationship like a triangle, in which you, as the client, have a contract agreement with the landscape architect for design and construction administration and a separate agreement with the contractor for installation. The tricky part is that there is no contract directly between the architect and the contractor, and the architect does not act as the contractor’s supervisor or boss. However, it is in the best interest of the contractor to build the project according to how it was designed, because the design has already been approved by the client. Ideally, the contractor’s agreement with the client will state that the project is to be built according to the landscape drawings and specifications, as prepared by the landscape architect.
The second option is to hire a contractor on your own. This eliminates the triangle relationship and will work well if you are savvy with building processes or if your project is very straightforward. If you are looking to have simple work completed, by all means hire the contractor on your own without involving an architect. If you do have detailed design drawings from the landscape architect, you can use them to get estimates, because you paid for the design services and you are free to use the plans to get the project built. This use of plans is often stated in the design services contract. The disadvantage of hiring the contractor on your own is that you won’t have the design help of a landscape architect when issues arise. For example, the contractor may not be able to find a particular type of stone and will have to substitute a different type. Without the landscape architect to provide design feedback, you’d have to make the decision alone. This might be fine for people who are knowledgeable about materials and construction lingo, but overwhelming for someone without much experience in design and construction.
A related option is to work with a landscape design-build firm that combines the design services with the installation. I will be covering this topic in a future ideabook.
Regardless of which route you choose, it’s good to know what to expect from the contractor so that you feel confident signing a contract agreement.

Landscape Contractor 2: Creative Atmospheres Inc, original photo on Houzz
How to Hire a Contractor on Your Own
If you are hiring the contractor on your own, you need to know where to look and how to review the company’s credentials.
Where to look. There are several ways to find your contractor. Doing a broad Internet search might not yield the best results, so it’s better to focus your search and find a local company. Here are a few good resources:
○ Search Houzz for landscape contractors in your area.
○ Ask your friends and neighbors for referrals.
○ Check with your local chamber of commerce.
○ Ask your local nursery or garden store for a referral.

Landscape Contractor 3: Benjamin Vogt / Monarch Gardens, original photo on Houzz
Review credentials. You want to hire a contractor who is knowledgeable, easy to work with and reliable. At the end of the day, your primary concern is hiring someone who will build the project on time and on schedule using quality materials and best practices. Here is a checklist of items to request that will inform you of the contractor’s credentials:
○ Licenses. Landscape contractors have licenses regulated by the state. Furthermore, your town may have additional requirements for a contractor performing work. Contractors will list their license number on Houzz and on their website. You can search on your state’s regulated professions website using this number to check that a license is in good standing.
○ Insurance. A landscape contractor should have general liability insurance and worker’s compensation insurance. Ask to see the certificate of insurance.
○ Client references. Call a few former clients and see if they were pleased with the services. It may be a red flag if a contractor has a hard time providing references. Some specific questions to ask of references include: Was the contractor reliable? Was the project completed on schedule? Are you pleased with the quality of the work?
○ Photos showing quality of work. Landscape contractors install plantings, paving, grading systems, decks, site walls, sod, seed, fences and water features. They have to be generalists, because they work with a variety of materials. They hire subcontractors to do specialty work around pools and other water features, irrigation, metalwork and any other work that’s outside their area of expertise. Ask for some detailed photos of projects they have built to demonstrate quality building techniques.
○ Experience with similarly sized work. Contractors work on a large array of project types, but most focus their work in terms of scale. This is important because their crew will bring a level of expertise that’s appropriate for the workflow and staging of your project.

Landscape Contractor 4: SavATree, original photo on Houzz
Ask about sustainable practices. The contractor will be disrupting the site and installing new materials, which will impact the environment. Make that impact less damaging by using the most sustainable materials and methods possible. Some contractors have been using sustainable practices for a long time, while others are just catching on to the concept. Let the landscape contractor know if sustainability is important to you by discussing it early.
You can gauge how well versed a contractor is in sustainable practices by asking some questions:
○ What organic and sustainable practices do you use? If the contractor hesitates to answer, try asking more specific questions, like the ones below.
○ Where will the materials be sourced from? It is best to use local stone and wood for your project to decrease the carbon footprint. Sourcing local materials can also save you money, because you won’t have to pay for materials to be shipped long distances.
○ Do you recycle plant containers or return them to the nursery? Most wholesale nurseries take back plastic plant containers and clean them for reuse. This might seem like a small thing, but those little containers can add up to a lot of plastic in projects with large planted areas. The contractor is responsible for hauling away materials once the job is done, so make sure they will be recycled or brought back to a nursery for reuse.
○ Do you use a mulch that’s free of chemicals and additives? Chemicals and dyes are used to make mulch in different colors, and they’re unnecessary additives. Go chemical free. The chemical-free mulches are usually less expensive anyway if they are from a local source.
○ Do you use power tools or hand tools? A lot can be accomplished with hand tools, and some compact sites will even require the use of hand tools over power tools and motorized utility vehicles. Most contractors use a combination of both types. If your project is small, there won’t be a big need for big power machinery.

Landscape Contractor 5: Eco Minded Solutions, original photo on Houzz
Know who will supervise your project. It’s helpful to know who the key players are in building your project, so that you’ll know who you will be speaking with as the work progresses. Larger companies, with several crews and supervisors, often have multiple project managers, and your project will be assigned to one supervisor and crew team. Small companies (with one or two supervisors) often have one main company manager, who is also an owner-founder of the company. You should know who the point people will be for your project, so you’ll know who to talk to as issues arise.
The site supervisor is the person responsible for leading the work crews each day. The supervisor is the person in charge, whom you will be communicating with onsite during the building process. If you have hired a landscape architect for construction administration, the landscape architect will check in with the site supervisor to keep track of progress and let you know if any issues arise.

Landscape Contractor 6: Gardens by Gabriel Inc, original photo on Houzz
Review the subcontractors. As a generalist, the landscape contractor relies on specialty artisans and workers to do custom work or build components with special materials and techniques. Along with knowing who will supervise the work, you will want to know who is responsible for specialty and artisan work, so that you can make sure those people are qualified. Ask for detailed information about the subcontractor’s qualifications, using similar questions to those you asked the landscape contractor.
The contractor hires subcontractors directly and typically has a roster of skilled people for special work. Common subcontracted work includes irrigation (some states require a specific irrigation license), pool installation, pond installation, specialty work (with materials like stone, wood, metal and concrete) and artisan work with sculpture,mosaics or ornate custom fabrications.

Landscape Contractor 7: Falon Land Studio LLC, original photo on Houzz
How much it will cost. There are two ways to get a cost from a contractor: an estimate or a bid. The differences between the two are explained in detail here.
When hiring a landscape contractor, you may want to use the bid, or fixed-price, method if you have a specific price that you do not want to exceed. However, the estimate is easier to compare among companies, because you’ll get detailed line item costs for the project. The landscape architect’s site plan for the project helps the contractor provide a more precise estimate.
Pictured here is a section of an estimate for a small swale garden installation from a landscape contractor. Landscape construction estimates include the materials, labor, delivery fees, waste disposal fees, project management fees (typically included in the labor cost) and anything else required to build the project. The cost of plants and materials is lower than what you would pay for plants at a retail store, because contractors purchase from wholesale distributors. A contractor will provide a detailed estimate with line items, like the one here. Compare estimates from several companies to make your selection.

Landscape Contractor 8: Madrone Landscapes, original photo on Houzz
Making a Decision
It’s ultimately your choice as the client to pick the company you prefer. This means that you can override the landscape architect’s suggestion if there is another company you want to hire. The implication of suggesting someone else is that the architect and contractor will need to meet early in the project to build trust and a working relationship prior to the start of construction.
Base your decision on the best combination of qualifications, experience and cost to do the work. The cheapest estimate might not be the best choice, nor might the company with the most experience. It’s also helpful to meet potential contractors in person. The contractor will want to walk your property — or at least drive by — before providing an estimate anyhow, so use the opportunity to meet and get a feel for how professional and reliable he or she is. If you are vetting contractors on your own, request that they visit the site and have a short meeting with you so that you can talk in person. The background check can be done online and by speaking with the company over the phone.
Once you’ve made your selection, you will need to sign a contract that outlines the scope of work, warranty on plants and schedule for project completion.
12 Sanity Savers to Get You Through Your Home Remodel

It’s easy to get excited about a home project at the beginning, when the work seems theoretical and you hear yourself saying things like, “Oh, we could just knock all of these walls out, no problem!” Then reality sets in. The workers you hired go AWOL, your budget is blown and you can’t find your good shoes under the pile of scrap wood and duct tape. It’s time to take a deep breath and make a plan. Read on to find a dozen ways to stay sane while you are creating your dream home, no matter how long it takes.
 Preview (opens in a new window)
Sanity Saver 1: Richard Bubnowski Design LLC, original photo on Houzz
1. Have a plan A … and a plan B and C too. Even when you set what seem like perfectly reasonable goals, things have a way of coming up unexpectedly to bump your project completion date further and further back. Having a back-up plan (or two) is key.
I find it helps immensely to think of your goal in three parts. There is the ideal goal — if everything went right and there were no snafus, this is what you would want done by a certain date. Then there is your plan B, where you pare down your list to the essentials. To make a plan C, pick just one thing that if you got done would still make you feel somewhat accomplished.

Sanity Saver 2: Soorikian Architecture, original photo on Houzz
2. Take “before” photos. In fact, take lots of photos throughout the process. When you feel motivation beginning to falter, take a look at pictures from early on in the process to remind yourself just how far you have come.

Sanity Saver 3: Young House Love, original photo on Houzz
3. Start a blog. Just like many diet and exercise programs recommend sharing your plans with supportive friends and family members, I advocate starting a blog as a way of holding yourself accountable during the renovation process. After a rough day, when nothing went as planned, at least you can vent your frustrations in a blog post and get kind words of support in return from readers all over the world.
They did it: Sherry and John started their blog Young House Love while they were fixing up their first home, and it became a wildly popular and award-winning site that attracts many visitors each day. Realistically, most of us won’t become the next Young House Love, but starting a blog can still be a worthwhile project and documentation of your home progress.
4. Focus on making it livable first. This may sound obvious, but it is all too easy at the beginning of a project to take on too much. By saving some of the cosmetic changes (like decorative tilework) for later and choosing to focus on essentials (like plumbing) now, you will make your life much easier.

Sanity Saver 4: Richard Bubnowski Design LLC, original photo on Houzz
5. Schedule your renovation in stages. During an extensive renovation, be smart about the order you work on things if you are staying in the house at the same time. Work to finish bedrooms and a bathroom first, so you can have a comfortable area to live in while other changes are going on.
6. Set one small, attainable goal each week. Tasks like putting up new house numbers, ordering something you need online, or patching holes in a wall do not take very long, yet being able to cross something off your list — and see visible improvement— will help keep you motivated.

Sanity Saver 5: Holly Marder, original photo on Houzz
7. Help the pros by doing your job: Be decisive. Yes, contractors, architects and designers can sometimes go beyond the original schedule, but each time you change your mind or put off key decisions, know that the process will take that much longer. The best thing you can do to speed progress is to maintain a clear vision of what you want and communicate it clearly to all of those involved in the project.
8. Stay busy during downtime. It is inevitable that there will be times it seems that nothing is happening. Whether due to a tight budget, workers vanishing midproject or simply a stretch of bad weather, it is important to keep your spirits up when work stalls out.
Try keeping a list of simple tasks that you can do anytime. Then, when you start feeling antsy, pull out your list and get to work. Cleaning, organizing, decluttering and doing small repairs are all good places to start.

Sanity Saver 6: decordemon, original photo on Houzz
9. Pitch in and do some work yourself. Even if you’ve hired pros to do the bulk of your renovation, consider taking on a small DIY project of your own. Using your own hands to pitch in and improve your home can be incredibly satisfying.
10. Make your bedroom a refuge. Even if outside your door is quite literally a disaster area, having a calm, relaxing spot to rest and recharge can do wonders for your spirit.

Sanity Saver 7: Mykonos Panormos Villas, original photo on Houzz
11. Use your outdoor space. If the weather is good and your project is taking place indoors, setting up a comfortable outdoor living space is a wonderful way to get away from the noise and chaos of the renovation. I’ve heard of people setting up full outdoor kitchens to use while the indoor kitchen is being remodeled, and I think it’s a wonderful idea.
Related: Pull Together Outdoor Furniture Pieces to Relax On
12. Remind yourself why you are doing this … Clicking through your inspiration photos is a great way to get juiced up about your project all over again. You can also try simply closing your eyes and visualizing your home project completed, vividly imagining every little detail, and how wonderful it will feel to have it all done.
… and know when to get out of town. Of course there are times when it’s best to admit it’s time for a break. When the entire house in in utter disarray, taking a spontaneous weekend getaway can be just what the doctor ordered.
By Laura Gaskill, Houzz
6 Master Suite Remodel Rules for Success

Some good friends of ours just finished a master suite remodel. On the whole it went well: on time, on budget and generally to their satisfaction. Still, the process and execution were less than flawless, and as I listened to what didn’t go exactly to plan, I realized that other people could benefit from considering many of the lessons my friends learned before they embark on their own projects.

Bathroom Remodel 1: Tucker & Marks, original photo on Houzz
1. Have a plan. This is not just an idea in your head and some hand waving or rough sketches. A plan is dimensioned and intentional, and includes elevations showing what rooms look like from different directions. Plans are most frequently and effectively assembled by design professionals who know the amount of space required for common features in rooms, like showers and vanities, and are accustomed to working out solutions for challenging spaces.
The purpose of a plan is twofold: to show homeowners what they should expect, and to show contractors what they are expected to build. Without a plan, you have only hand waving, and that’s not much on which to base a contract, or from which to build.
Having a plan also enables homeowners to interview a shortlist of contractors and to evaluate their thoughts on the likely cost. Without a plan, every contractor you talk with will have a slightly different idea of what you have in mind.
Hire a design professional to create this plan. Design professionals do this all day, every day, and will put together a functional plan that 99.9 percent of the time will be better than anything you could come up with yourself. It will also have some beautiful feature or function that you never would have thought of (or would have thought impossible). Spend the money. It’s worth it. If you’re not convinced, talk with a friend or two who decided to forgo professional design and see how their project turned out.

Bathroom Remodel 2: Susan Lachance Interior Design, original photo on Houzz
2. Specify materials. A corollary to plans is specifications. This list of materials and methods outlines what will be installed and in what way. Specifications provide the opportunity to outline everything that will be installed and mention things like where seams will be in countertops and how many seams are acceptable. These kinds of things can have a large bearing on cost, so documenting what you expect will help contractors provide pricing for the specific things you want.
Think about cars as a comparison. Do you just ask for a 14-foot-long black car with a 6-cylinder engine? That could be a lot of different cars at different price points. Think about the kinds of details you’d consider for ordering a car, and make sure you ask for all of the features you’d like in your project, or you might end up with a base-model bath or kitchen.
As in item No. 1, hire a professional to do this. It will be money well spent.

Bathroom Remodel 3: Sutro Architects, original photo on Houzz
3. Don’t be frightened. The dollar amount you will spend on your remodel can be high, particularly if the plan for the project you really want costs twice what you thought it would. It’s not unusual for homeowners to start with a wish list and then make decisions to bring the scope of work for their project back in line with their budget. Expect this to be part of the process.
The first step of budgeting for a project is to talk with your design professional about how much you are willing to spend. Make sure you account for at least a 10 percent contingency amount in that so you are aiming for a realistic number. When the first round of pricing comes back from contractors and it’s higher than your budget, it’s probably because it includes your entire wish list.
This is when value engineering (VE) comes in. When you value engineer a project, you identify parts of the scope of work (either the materials or the size of the project) that can be deleted or substituted. In most projects there’s a decent list of items that will reduce costs and allow you to bring the project into the range of your budget.
Working with design professionals through this process will allow you to benefit from their expertise and delete or change items that won’t substantially affect the finished project.
Related: See How Much a Bathroom Remodel Will Cost You

Bathroom Remodel 4: FINNE Architects, original photo on Houzz
4. See the value of CA. CA is not California. It’s construction administration, and it’s one of the key services that architects offer their clients.
When the construction set of plans is done, the elevations and electrical plans are complete, and the project is ready to start, it is not time to bid your architect adieu. Construction administration keeps architects on through construction, usually attending weekly meetings and providing design details as needed, assisting with electrical and tile layout, and providing feedback to the contractor as they build.
Architects also provide clients with an objective and experienced eye as construction proceeds. They can scan the room and notice whether framing is installed as they designed it and whether the materials they specified are being used — particularly on the components of the house that are inside walls.
I can unequivocally say that the projects we work on where CA is part of the project go more smoothly and have more consistently excellent outcomes, because of the collaboration that is built into the process. Would you rather have your contractor work out design details, or the architect to whom you entrusted the design of your project? Let all the professionals do their jobs, and keep your team together during construction.

Bathroom Remodel 5: Dick Clark + Associates, original photo on Houzz
5. Ask how and why. If you aren’t entirely certain about how something is done or why it’s being done, ask. Construction professionals’ work is usually routine and expected. Because of that, tradespeople sometimes will install things a certain way because it’s the simplest and easiest way to do it. But sometimes the path of least resistance won’t yield the result you want.
Why does that ductwork need to go there? Probably it doesn’t. It can go in one or two other places, and having a conversation about where it will go can make a big difference in your finished space. The same thing with plumbing lines and other infrastructure.
In residential jobs, plumbing, electrical and HVAC work is almost always bidder-designed, meaning that your construction plans won’t give instructions about how to get utilities to their locations — it will just show where they need to end up. That means a deliberate discussion is needed. If you don’t ask, and your contractor is not proactive, don’t be surprised to see ductwork or plumbing in places you don’t want it.

Bathroom Remodel 6: Sketch Building Design, original photo on Houzz
6. Ask how long and how much. When changes are made during construction — and they inevitably will be — don’t just ask whether a change can be made, but know the cost and the impact on schedule. Change orders are supposed to detail the change made and all of its effects, but sometimes they don’t capture everything. For instance, you might like to add an outlet to an existing wall. There’s the obvious cost of the electrician, but what about the demolition where the outlet will go, patching the Sheetrock and repainting the wall at that location? Oh, and protecting the floor while the work is going on. It never hurts to ask, “Is this really all of it?”
One other thing to make sure you ask with change orders is whether the decision you’re making affects anything else. An example might be changing the size of a vanity sink base from standard to custom. There’s an obvious change in cost for the cabinet, and perhaps an adjustment to the countertop cost if the size of the cabinet makes it larger or smaller, but did you think about the sink and faucet you selected months ago for the standard cabinet? Changes to casework almost always have a cascade of effects, from countertops to tile to millwork, and can necessitate revisiting sinks and faucets to make sure they still fit.
By Anne Higuera CGR, CAPS, Houzz
Everything You Need to Know to Tear Down Your Concrete Patio

Concrete patios are often found in older homes, especially those built in the ’70s. But by now they’ve cracked and crumbled, leaving many homeowners wondering how to replace them, or even hoping to reclaim some of the green space lost by a particularly large patio.
If you count yourself in this group, here you’ll learn how to improve your outdoor space by removing or shrinking your concrete patio, or replacing an old cracked patio with a fresh new one that better suits your style today.

Concrete Patio 1: Falling Waters Landscape, original photo on Houzz
Getting rid of a concrete patio enables you to replace it with a more attractive option — like pavers, stone or a modern combination, as with this patio by Falling Waters Landscape, featuring a grid of concrete rectangles divided by permeable plantings. It can also allow you to create more lawn or garden space.
Best time to do it: When the weather is dry and temperate enough to permit heavy-duty work outdoors.
Why: “Concrete cracks, it’s not a very pretty product, and there are a lot of better solutions on the market,” says Micah Dennis of Paradise Restored Landscaping & Exterior Design.
Who to hire: This project requires heavy machinery and can have hidden pitfalls (like rebar lurking in your concrete), so it’s only a DIY if you earn your bread and butter in home improvement. If that doesn’t sound like you, it’s best to hire a licensed contractor.
Related: Deck Builders in Your Area
Tip: Dennis warns that many contractors won’t take the project if they aren’t installing a replacement patio or garden, so have a plan in place when you start interviewing professionals.

Concrete Patio 2: Hart Wright Architects AIA, original photo on Houzz
Cost range: Between $800 and $1,000 for demolition alone. The total cost of your project will depend on what you decide to put in the patio’s place.
Typical project length: One day.
Permit required: None for the project, although some municipalities require a permit for dumping concrete, so call ahead.
Project considerations: While your contractor will check with utility companies to make sure there aren’t any gas lines lurking beneath your patio’s surface, that doesn’t mean there’s nothing under there. If the crew discovers rebar or an unexpected gas line, the project may be slightly delayed or cost more.
Your contractor will also likely use a jackhammer to remove the concrete, so it might be a good idea to plan to be gone for the day so you aren’t disturbed by the noise. Give your neighbors due consideration as well.

Concrete Patio 3: Mary Prince Photography, original photo on Houzz
First steps: Your contractor will protect your windows with plywood, as concrete chunks can spray up and crack or break the glass or cause pits.
Your contractor may also take some “before” photos to record the way the elevations worked for when it’s time to install the new materials.
Then it’s time to remove your concrete. If you’re simply reducing the size of your patio, the contractor will start by using a concrete cutting saw to cut the concrete joints out. “If you don’t cut it, then you’re going to start jackhammering, and the rest of the patio is just going to crack,” Dennis explains.
If you’re removing the entire patio, the contractor will use both the saw and jackhammer to break the patio into chunks that crews can then comfortably remove.
After that the only thing left to do is haul out the concrete chunks — or recycle them as pavers or a stacked garden wall — and start work on whatever you have planned to replace it.
Concrete patios are often found in older homes, especially those built in the ’70s. But by now they’ve cracked and crumbled, leaving many homeowners wondering how to replace them, or even hoping to reclaim some of the green space lost by a particularly large patio.
If you count yourself in this group, here you’ll learn how to improve your outdoor space by removing or shrinking your concrete patio, or replacing an old cracked patio with a fresh new one that better suits your style today.
Concrete Patio 1: Falling Waters Landscape, original photo on Houzz
Getting rid of a concrete patio enables you to replace it with a more attractive option — like pavers, stone or a modern combination, as with this patio by Falling Waters Landscape, featuring a grid of concrete rectangles divided by permeable plantings. It can also allow you to create more lawn or garden space.
Best time to do it: When the weather is dry and temperate enough to permit heavy-duty work outdoors.
Why: “Concrete cracks, it’s not a very pretty product, and there are a lot of better solutions on the market,” says Micah Dennis of Paradise Restored Landscaping & Exterior Design.
Who to hire: This project requires heavy machinery and can have hidden pitfalls (like rebar lurking in your concrete), so it’s only a DIY if you earn your bread and butter in home improvement. If that doesn’t sound like you, it’s best to hire a licensed contractor.
Related: Deck Builders in Your Area
Tip: Dennis warns that many contractors won’t take the project if they aren’t installing a replacement patio or garden, so have a plan in place when you start interviewing professionals.
Concrete Patio 2: Hart Wright Architects AIA, original photo on Houzz
Cost range: Between $800 and $1,000 for demolition alone. The total cost of your project will depend on what you decide to put in the patio’s place.
Typical project length: One day.
Permit required: None for the project, although some municipalities require a permit for dumping concrete, so call ahead.
Project considerations: While your contractor will check with utility companies to make sure there aren’t any gas lines lurking beneath your patio’s surface, that doesn’t mean there’s nothing under there. If the crew discovers rebar or an unexpected gas line, the project may be slightly delayed or cost more.
Your contractor will also likely use a jackhammer to remove the concrete, so it might be a good idea to plan to be gone for the day so you aren’t disturbed by the noise. Give your neighbors due consideration as well.
Concrete Patio 3: Mary Prince Photography, original photo on Houzz
First steps: Your contractor will protect your windows with plywood, as concrete chunks can spray up and crack or break the glass or cause pits.
Your contractor may also take some “before” photos to record the way the elevations worked for when it’s time to install the new materials.
Then it’s time to remove your concrete. If you’re simply reducing the size of your patio, the contractor will start by using a concrete cutting saw to cut the concrete joints out. “If you don’t cut it, then you’re going to start jackhammering, and the rest of the patio is just going to crack,” Dennis explains.
If you’re removing the entire patio, the contractor will use both the saw and jackhammer to break the patio into chunks that crews can then comfortably remove.
After that the only thing left to do is haul out the concrete chunks — or recycle them as pavers or a stacked garden wall — and start work on whatever you have planned to replace it.
