
 Facebook
 X
X
 Pinterest
 Copy Link
5 Stunning Siding and Brick Combinations

We love brick. Who doesn’t? The building material of choice for ages, it is revered for its rich, organic texture, color and visual interest. And it only gets better with time, the color having more depth after baking in the sun for years.
Related: Hire a Siding and Exterior Expert Here
If you’re building or remodeling and brick will be part of your home’s exterior, it’s worth considering how different siding materials can be paired with brick to create different design and textural effects. Here we look at five distinct siding options — horizontal, shingle, board and batten, stucco and metal — that work hand-in-glove with classic brick.

Siding 1: Bennett Frank McCarthy Architects, Inc., original photo on Houzz
Horizontal Siding
Horizontal siding comes in many forms, including vinyl sheets, wood planks and fiber cement boards. It offers many design possibilities that can break up the look of dense brick and add visual interest.
1. Go wide and modern. The aesthetic of horizontal dark-stained wood siding skews modern when installed above brick on this remodeled, split-level home. This rich style of siding gives the pictured home a sleek appeal; similar siding can be used to transform a tired exterior into an updated jewel.
2. Choose a precise color match. If you’re going for a completely new look for the exterior, consider color-matching your siding and brick. The result is a cohesive main color field that gives trim and shutters a chance to stand out.
3. Create a subtle accent. The siding adds a modest decorative element on a home that might look less interesting in solid brick.

Siding 2: Brooks Ballard, original photo on Houzz
Cedar Shingles
Cedar shingles, or shakes, as they are also known, are versatile in terms of their look and how they can be installed. Whether you use real wood or a composite material, keep them natural, stain them or paint them, they can be used with brick to evoke various architectural styles.
1. Dress up a Craftsman. The shingles here are the cherry on top of this quintessentially Craftsman-style home, with its deep overhang, decorative brackets and columns. The shingles are stained to coordinate nicely with the brick at the skirting and base of the columns.
2. Be dramatic and modern. Dark colors are striking when used as the predominant color on an exterior.
3. Go beachy. This type of siding, originally used on this style of home on the East Coast, was intended to withstand a harsh Atlantic weather beating, requiring little care. If you have a brick-clad Cape Cod, the cedar shingles are a design detail you may not want to leave out.

Siding 3: Meridith Baer Home, original photo on Houzz
Board and Batten
This classic siding installation is characterized by wide, vertical wooden boards joined together with a strip of wood or “batten” covering the seam. When paired with brick, each element has enough of its own distinct visual appeal that they both shine.
Related: Outdoor Lights to Give Your Home a Welcoming Glow
1. Paint it out. In this photo, the board and batten and the brick are painted to match each other, as well as the trim and doors. This works to allow for one popping accent color on the shutters. Color matching the elements also allows the the natural lines of the vertical boards to create a subtle textural contrast with the lines of the brick.
2. Keep the eye rising. The vertical installation of board and batten siding draws the eye upward and gives the illusion of some extra height. Here’s another color-choosing trick for siding: Look to your brick’s mortar for the shade that works best with your house.

Siding 4: Studio C Architecture & Interiors, original photo on Houzz
Stucco
Another versatile material that can work well with many different architectural styles, stucco cooperates naturally with brick. Why? Their respective textures play off each other so well. The relative flatness of the stucco can work beautifully as a canvas for brick’s coarse nature and make it really stand out.
1. Layer the texture. This photo is a great example of how stucco can work as expected with brick on a very classic and traditional Tudor-style house. It also reveals the dense texture of the stucco. This material is available in finishes ranging from smooth to coarse, and layering a rougher stucco with brick’s natural surface can be an appealing look.
2. Use brick as the accent. Using the brick as an accent to the stucco is a great option in some parts of the country where brick is not as plentiful or if budget is a concern, as brick is the more expensive material of the two.

Siding 5: carterwilliamson architects, original photo on Houzz
Metal Siding
Perhaps not as ubiquitous as the other siding options, metal is a great choice for your brick house if you’re looking for something provocative and unexpected. It’s also versatile and available in many forms, and it can be installed vertically, horizontally or diagonally, depending on the look you’re after.
1. Use it as part of a design recipe. As the French mirepoix mix of celery, carrot and onion is the foundation of many culinary dishes, so the combination of metal, brick and wood often is the basis of modern architectural design. In this photo, the metal works in conjunction with the other materials to create a delightful harmony of elements, each with its own visual interest.
2. Create tension. The dark of the metal is the perfect material to play off the warmth of the red brick, providing a smart design tension between the modern and the traditional.
3 DIY Renovation Ideas You Might Want to Steal
Our series on reader renovations of kitchens, bathrooms and laundry rooms has garnered many comments, with plenty of readers chiming in about the features they love. Here, we round up some of the brightest ideas from the Reader Projects featured so far. Perhaps you’d like to try them in your own project.

Reader Remodels 1: Original photo on Houzz
Related: See More Bathroom Remodeling Ideas

Reader Remodels 2: Original photo on Houzz
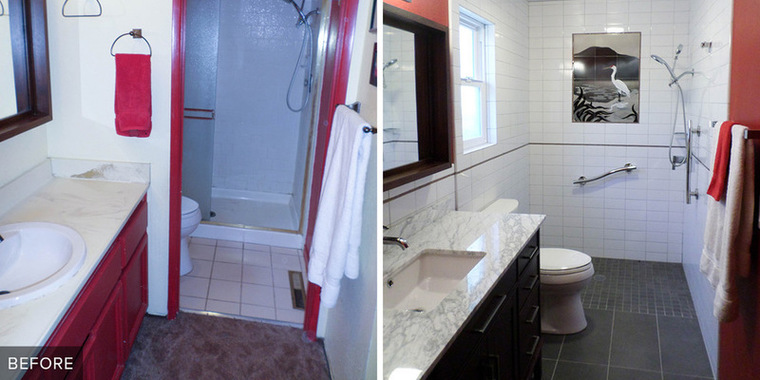
1. Aging in Place in California
Bathroom at a Glance
Who lives here: Beth Sawatzky
Location: Healdsburg, California
Size: 50 square feet (4.6 square meters)
Total cost: $22,026
Construction time: One month
Great idea: Adding grab bars and a curbless shower. These features anticipate the need to accommodate a wheelchair — or even just avoid the potential hazard, as the homeowner ages, of stepping over a shower curb.
“Wow — that bathroom would be a positive sales feature for a buyer of any age,” writes Jannie in a comment. “I’d like to see the aging-in-place adaptations built into more homes from the get-go. Just the curbless showers and reinforced framing for super sturdy grab bars would be so much cheaper to do on the initial build.”
Related: Find a Design-Build Firm That Specializes in Universal Design

Reader Remodels 3: Original photo on Houzz
2. An Update in San Francisco
Kitchen at a Glance
Who lives here: Houzzer Christa Martin and her husband
Location: San Francisco Bay Area
Size: 90 square feet (8.4 square meters)
Cost: About $35,600
Construction time: Three weeks

Reader Remodels 4: Original photo on Houzz
Great idea: A a pullout pantry placed between the refrigerator and the wall ovens.

Reader Remodels 5: Original photo on Houzz
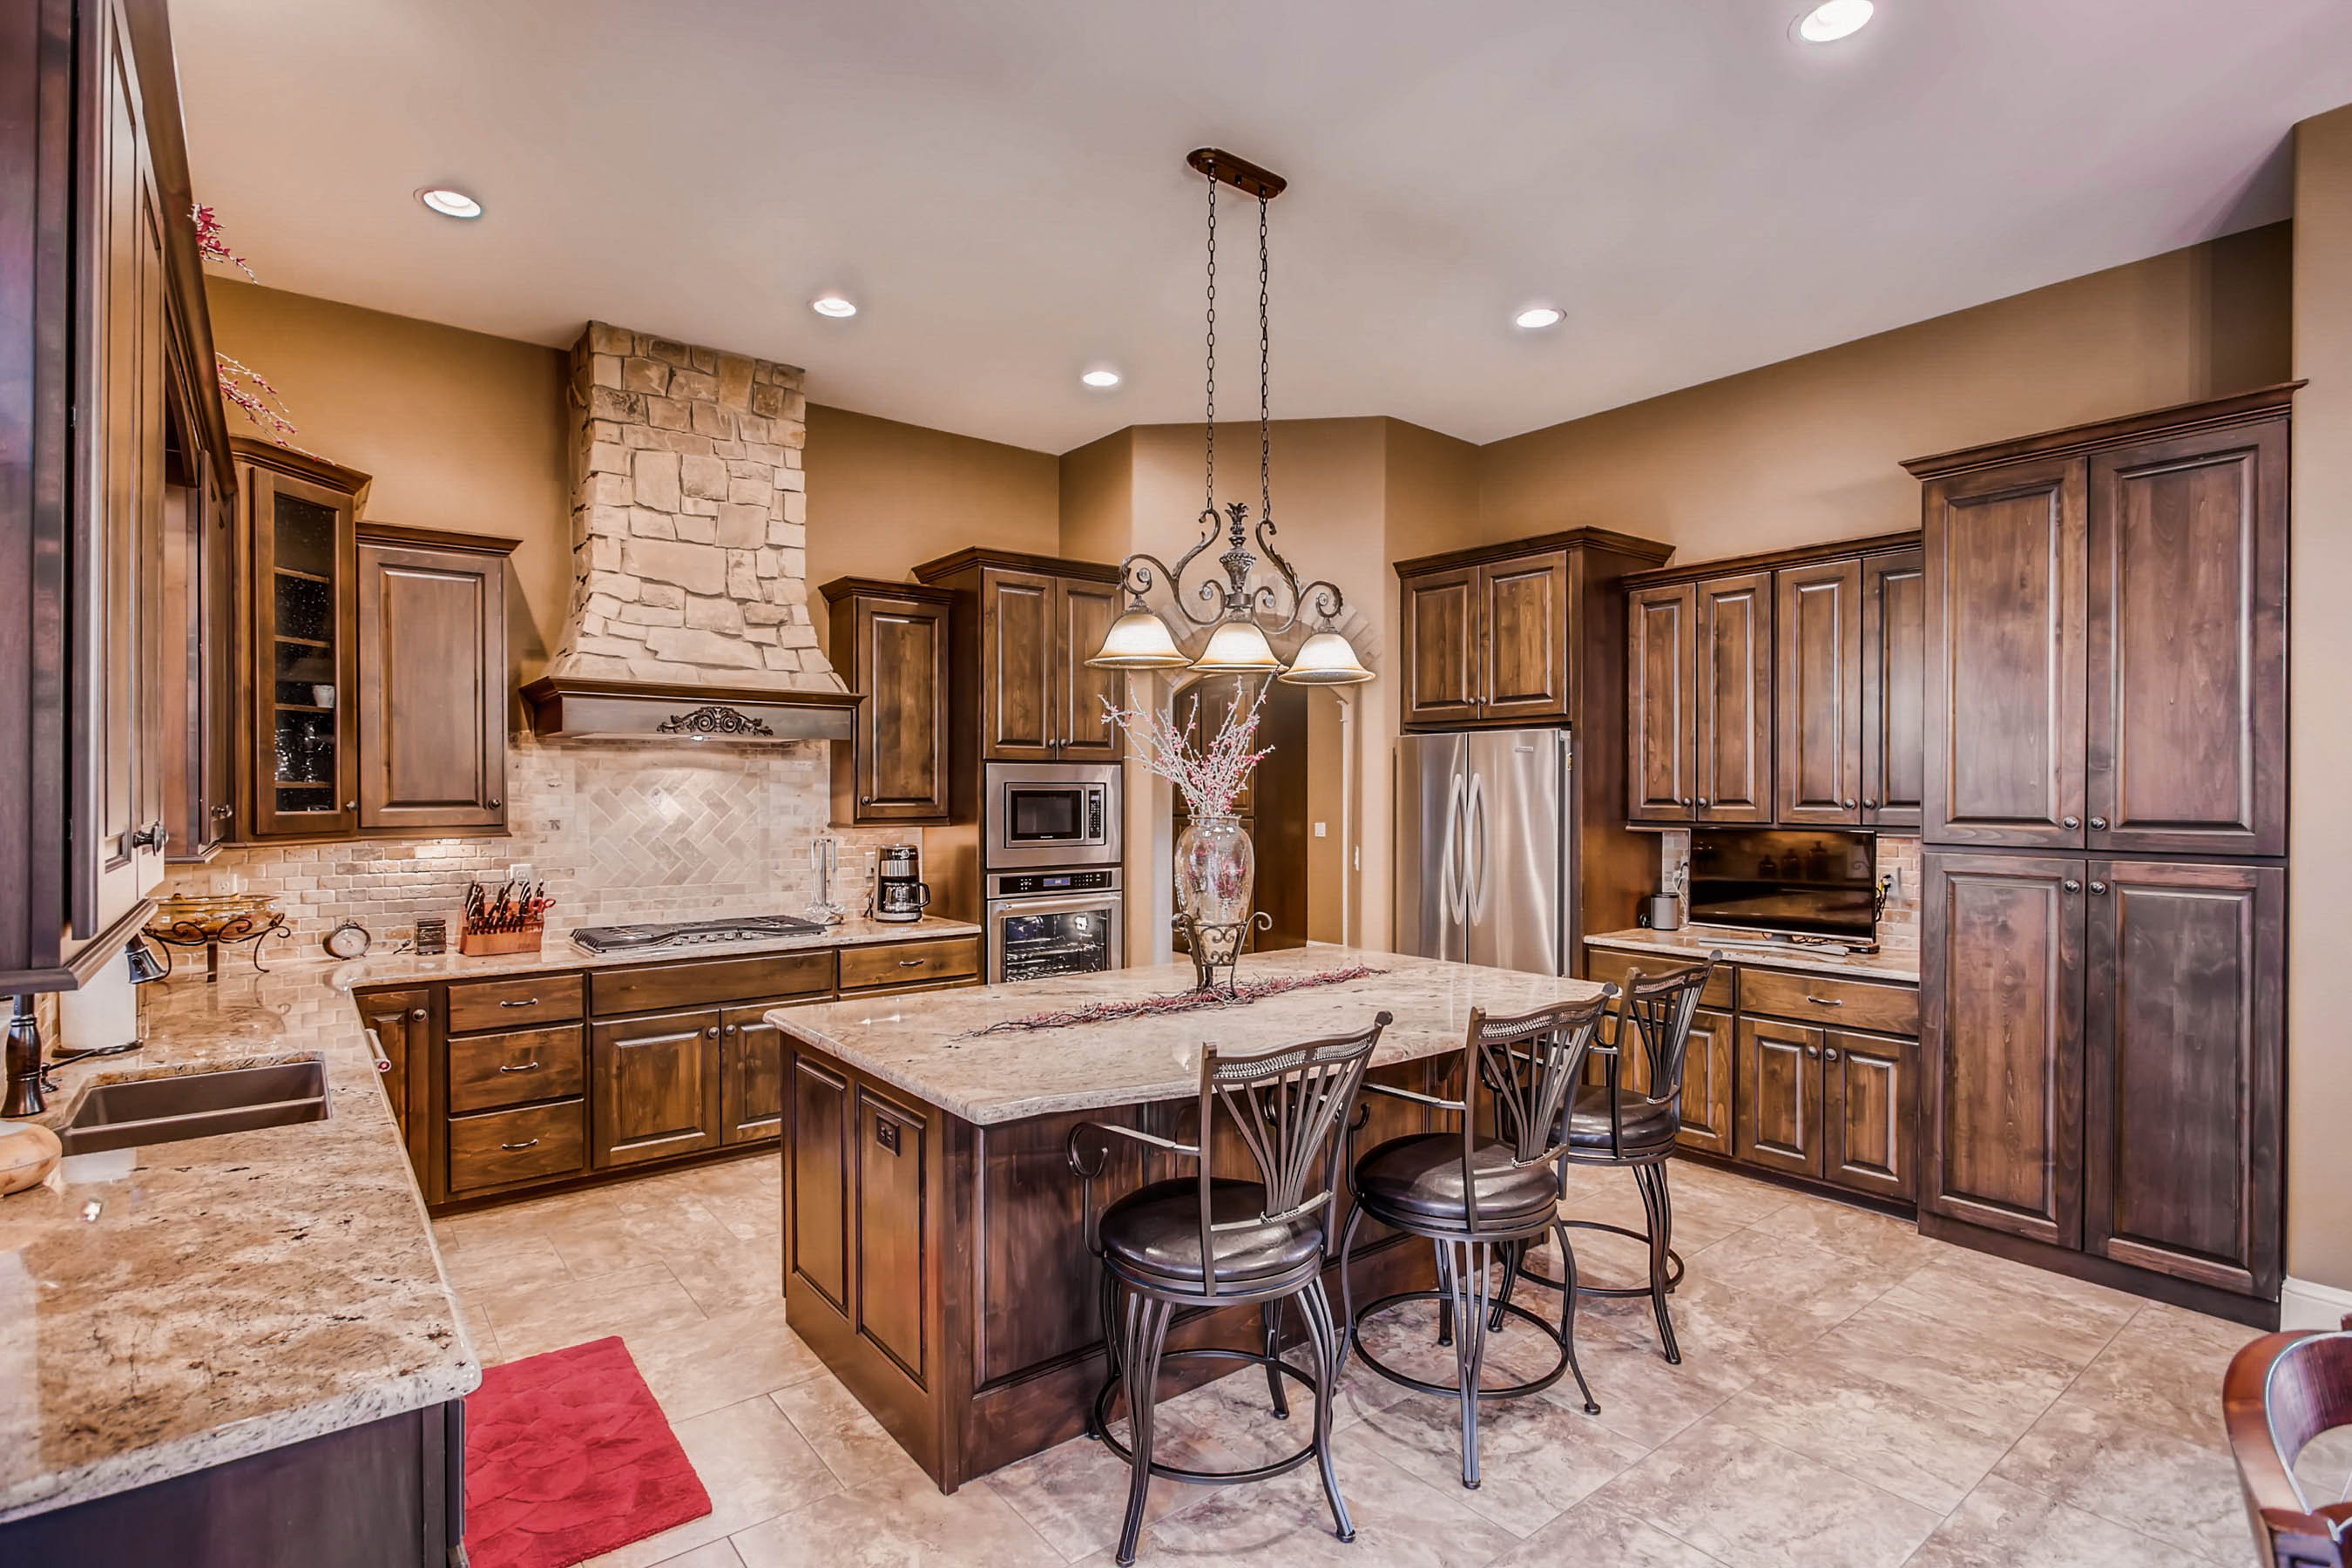
3. Enjoying the Views in Washington
Kitchen at a Glance
Who lives here: Jo Ann Snover and her husband
Location: Woodinville, Washington
Size: 350 square feet (32.5 square meters)
Cost: $99,021
Construction time: Four months

Reader Remodels 6: Original photo on Houzz
Great idea: This Seattle-area kitchen renovation has a couple of ideas you might want to steal. It removes cabinetry to make room for light — and in this case, beautiful views. To make up for losing those cabinets, the homeowners added some under-the-stairs pullouts where they stash appliances.
Inventory Is Up
For the past few years the hot topic in Northern Colorado real estate is
Six Key Factors That Affect the Sales Price of Your Home


Pricing a home for sale is not nearly as simple as most people think. You can’t base the price on what the house down the street sold for. You can’t depend on tax assessments. Even automatic valuation methods (AVMs), while useful for a rough estimate of value, are unreliable for purposes of pricing a home for sale.
AVMs, like those used by Zillow and Eppraisal, have been used for many years by banks for appraisal purposes. They are derived from algorithms based on past sales. But producers of AVMs agree that they are not accurate indicators of home value. For example, Zillow.com states, “Our data sources may be incomplete or incorrect; also, we have not physically inspected a specific home. Remember, the Zestimate is a starting point and does not consider all the market intricacies that can determine the actual price a house will sell for. It is not an appraisal.”
So what does Zillow recommend sellers do instead? The same thing the real estate industry has been advising for decades: Ask a real estate agent who knows your neighborhood to provide you with a comparative market analysis. To accomplish that, I typically consider the following factors—plus others, depending on the house:
Location
The location of your home will have the biggest impact on how much it can sell for. Identical homes located just blocks apart can fetch significantly different prices based on location-specific conditions unique to each, including: traffic, freeway-access, noise, crime, sun exposure, views, parking, neighboring homes, vacant lots, foreclosures, the number of surrounding rentals, access to quality schools, parks, shops, restaurants and more.
Recommendation: Be willing to price your house for less if it’s located in a less desirable area or near a neighborhood nuisance.
Market
Another major factor that also can’t be controlled is your local housing market (which could be quite different from the national, state or city housing markets). If there are few other homes on the market in your local area (a situation known as a “sellers market”), you may be able to set a higher price. However, if there’s a surplus of homes like yours for sale (a “buyer’s market”), your pricing will also reflect that.
Recommendation: If it’s a buyer’s market and you can delay selling your home until things change, you should consider doing so. If you can’t wait, be willing to price your home extremely competitively, especially if you are in a hurry to sell.
Condition
The majority of buyers are not looking to purchase fixer-uppers, which is why any deferred maintenance and repair issues can also significantly impact the selling price of your home. When your home’s condition is different than the average condition of homes in your location, AVMs tend to produce the widest range of error.
Recommendation: Hire a professional home inspector to provide you with a full, written report of everything that needs upgrading, maintenance or repair, then work with your real estate agent to prioritize the list and decide what items are worth completing before the property is listed for sale, and what should be addressed through a lower list price. Also, some defects are best addressed during negotiations with buyers.
Widespread appeal
If you want to sell your home quickly and for the most money, you have to make it as appealing as possible to the largest pool of prospective buyers. The more universally attractive it is, the greater the interest and the faster competing offers will come.
Recommendation:
Hire a professional home stager (not a decorator) to temporarily stage the interior of your home. Also spend time making the exterior look its best: address any peeling paint, make sure the front door/ door hardware is attractive, prune bushes and trees, remove old play equipment and outdoor structures, etc.
Compare homes
The only neighboring homes that should be used to estimate the value of your home are those that have been carefully selected by a real estate professional with special training, access to all sales records, and in-depth knowledge of the neighborhood.
Recommendation: If you’re considering selling your home, ask your real estate agent to recommend a professional appraiser.
Searchability
When working with a prospective buyer, most real estate agents will search the available inventory only for the homes priced at (or less than) their client’s maximum, which is typically a round number. If you home is priced slightly above or below that amount (e.g., $510,000 or $495,000), it will appear in fewer buyer searches.
Recommendation: Be willing to adjust your selling price to maximize visibility.
Periodic price adjustments
Pricing a home isn’t a set-it-and-forget-it proposal. As with any strategy, you need to be prepared to adapt to fast-changing market conditions, new competition, a lack of offers and other outside factors.
Recommendation: After listing your house, be ready to adjust your asking price, if necessary.
How to Start a Renovation and Where to Begin
Working on your home can be a daunting prospect. Your mind may be flooded with ideas. You may be overloaded with advice from family and friends. You may be grappling with big questions, such as: Should we stay or should we move? Should we extend or simply tweak the space we already have?
The biggest obstacle can simply be knowing where to begin. If this is the case, it’s time to step back, gather your thoughts and apply a little objectivity to the process. Whether you’re planning a whole-house makeover or a fundamental reorganization, here are some ideas for how to go about creating a home that meets your needs in the best possible way.

Starting Point 1: Ambient Architecture, original photo on Houzz
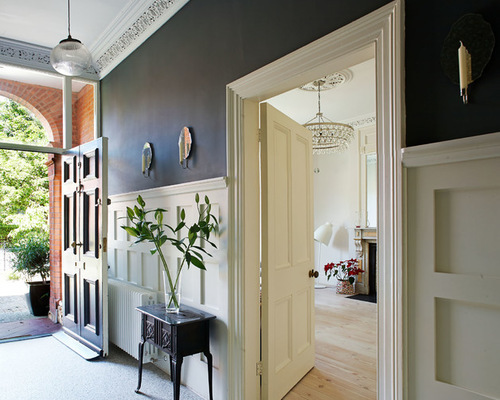
Plan a methodical makeover. When major work isn’t required but the whole house needs a face-lift, work systematically through each room to establish the extent of the work and outlay required. Start in the hall — it typically needs more thought than you might imagine — and work logically from there.
Think methodically about each room in terms of floor, walls, ceiling, lighting and furnishings. Prepare a list of items to be purchased and building or decorative work to be done. You’re aiming to create a priced inventory of all the material needed for a successful project.
You may find it useful to create a shopping list with relevant dimensions on your phone or in a dedicated notebook for handy reference on the go.
Start with issues, not solutions. If significant alterations or even an extension are envisaged, take time at the outset to reflect on what’s propelling you to undertake the work in the first place.
Think specifically of what your issues are in terms of space, light and storage. Exploiting each of these elements to its fullest is key to creating a home that fits your needs like a glove. Whatever your space and budget, there’s an optimal solution for each part of this home-design trinity.
Also bear in mind the present and future life stages of members of the household — from toddlers to school children to young adults – and how your home will need to respond to each.

Starting Point 2: Black Fox Interiors, original photo on Houzz
Compare what you have with what you want. Where your issues relate to use of space, start by preparing an inventory of the rooms you have now and how they’re used. Next, itemize the spaces you’d like to have and the uses you need to accommodate. Imagine you’re writing the brief for your ideal home.
Comparing both these lists should identify any “gaps” that need to be filled. The challenge then is to see whether your existing home can be rethought to meet these needs.
For example, can the extra living room you desire be accommodated in a first-floor room? Or in a loft? Can the guest bedroom double as a home office? Be broad in your thinking to achieve best use of your resources, both spatial and financial.
Related: Furniture to Transform That Spare Room Into a Home Office
Maximize your existing space. If you feel you need more space, first check that the rooms you already have are working sufficiently hard before deciding whether to extend.
Perhaps you even have an unused room. Could it be reinvented and put to work in a different way? Is it actually a problem room — with issues of light, warmth or arrangement that need to be solved before it can be put to any use?
Could the dividing walls between the rooms at the back of your house be removed to create that coveted kitchen/dining/family room?
If you do decide to extend, make sure that the existing house flows into the extension and that, between both areas, your needs in terms of space and storage are fully met.

Starting Point 3: Dorman Architects, original photo on Houzz
Boost natural light. If light is your main concern, a light-filled extension might seem a tempting vision. But bear in mind that such an extension may reduce light in your existing spaces.
Large windows to even the tiniest of external spaces can transform the light levels in any room. So, too, can light tubes, always a powerful source of light.
Where space and planning controls permit, a garden room, such as the one in this photo, can expand your space without impinging on the quality of light in the main house. Depending on the orientation of your home, the garden room may even enjoy better sunlight than the main rooms.
Manage your storage. Your aim throughout the house should be to achieve storage that’s both convenient and appropriate to what’s being stored.
You may think your existing storage is woefully inadequate, but before ripping it out and starting again, ask yourself: Could it work harder?
In the kitchen, for example, rearranging the contents of existing drawers and adding cabinet shelves can free up valuable space. This thinking can be applied to closets, linen cabinets and all other special storage areas around the house. Your main outlay here will be time, not money.
Related: Inspiration for a Beautifully Organized Closet

Starting Point 4: Domus Nova, original photo on Houzz
Turn a “problem room” into a successful one. If there’s a room in your home that’s shunned and avoided, you may well have a problem room.
However, there’s always a reason why a room is not used. It may, for example, be physically or architecturally cold, uninviting in its furniture arrangement or just dark and gloomy.
Make an effort to find out what doesn’t work in your problem room, explore possible solutions and get cost estimates for the work involved. Could you take down a wall, as in this inviting, open-plan space? Even moving a door or a radiator can transform a room — and for a fraction of the cost of an extension.
Prioritize the fundamentals. Tackle issues of watertightness, plumbing, electricity and thermal insulation in the first instance.
You won’t see visual benefits, but a warm, snug home is a springboard to greater things.

Starting Point 5: Eoin Lyons, original photo on Houzz
Seek professional advice. There’s no end of advice available when undertaking work on your home. Everyone around you will have an opinion, and you’ll find a huge volume of inspiration from a variety of sources.
The downside is that, amid all this, you risk becoming addled and even paralyzed, unable to figure out what you need to do and how to do it.
If you do find you’re out of your depth, seek expert, paid guidance. A good professional will advise you on how best to spend your money and help you avoid costly mistakes. The earlier you involve a professional in your project — even if it’s just for a one-off consultation — the better.
Stay focused. Whatever scale of work you take on, resolve to stay focused to the very end. Renovation work tends to be a long and tiring process, and you may be tempted along the way to delegate minor — or even major — decisions to outside parties.
Those decisions you delegate may haunt you. Remember, your aim is to create a home that fits like a glove.
Home Inspection: a Reality Check from a Pro


For many people, a home inspection is a hurdle that has to be overcome during the process of buying or selling a home. But, in fact, it can be a useful tool for buyers, sellers or anyone who plans to get the greatest possible value from their home.
Find out if the house you are selling has “issues”
When you’re selling a house, a pre-sale inspection can be particularly useful. By uncovering any potential problems your house may have, an inspection can give you an opportunity to address them before your first prospective buyer arrives.
According to Bill Richardson, president of the American Society of Home Inspectors (ASHI), “More and more, sellers are obtaining pre-sale inspections. This simple step can allow for better planning and lower expenses in making repairs, add value to the home, and help speed up the process and likelihood of an offer.”
In any market, a pre-sale inspection can give your home a competitive edge. Potential buyers are likely to find the kind of detailed information an inspection provides reassuring—and are encouraged to give your home a closer look.
Get to know a house before you buy it
A home is a major investment and, for many people, the greatest financial asset they have. With so much at stake, it makes sense to do what you can to protect your financial interest. Getting an inspection is a smart, simple way to do just that.
When you make a written offer on a home, insist that the offer provide that your contract is contingent on a home inspection conducted by a qualified inspector. You’ll have to pay for the inspection yourself, but an investment of a few hundred dollars could save you thousands of dollars and years of headaches. If you’re satisfied with the results of the inspection and are assured that the home you’re purchasing is in good shape, you can proceed with your transaction, confident that you are making a smart purchase.
When does a home inspection make sense?
In addition to routine maintenance and pre-sale inspections, there are a number of circumstances in which a home inspection could greatly benefit a homeowner. If you are not sure, here are a few simple questions to ask yourself:
· Was your home inspected when you bought it? If not, an inspection would be beneficial even if your home was a new construction at sale.
· Are you an older homeowner who plans to stay in your home? If so, it makes sense to hire a professional who can inspect difficult-to-reach areas and point out maintenance or safety issues.
· Do you have a baby on the way or small children? An inspection can alert you to any potential safety issues that could possibly affect a growing family, such as mold, lead or structural problems. If mold or lead is present, be sure to rely on technicians or labs with specialized training in dealing with these conditions.
· Are you buying a home that’s under construction? You may want to hire an inspector early on and schedule phased inspections to protect your interest and ensure that the quality of construction meets your expectations.
What doesn’t your home inspection cover?
For a variety of reasons, some homes will require specialty inspections that are not covered by a typical home inspection. A specialty inspection might include such items as your home’s sewer scope, septic system, geotechnical conditions (for homes perched on steep slopes or where there are concerns regarding soil stability) or underground oil storage tank. If you have any questions about whether or not your home needs a specialty inspection, talk to your real estate agent.
Hire a professional
If you decide to hire a home inspector, be sure they’re licensed in your state. They should be able to provide you with their license number, which you can use to verify their status with the appropriate government agency. It’s also helpful to ask for recommendations from friends and family members. Even among licensed and qualified home inspectors, there can be a difference in knowledge, performance and communication skills, so learn what you can before your hire a home inspector to ensure that you get the detailed inspection that you want.
What to ask your home inspector
Ask the right questions to make sure you are hiring the right professional for the job.
What does your inspection cover?
Insist that you get this information in writing. Then make sure that it’s in compliance with state requirements and includes the items you want inspected.
How long have you been in the business?
Ask for referrals, especially with newer inspectors.
Are you experienced in residential inspections?
Residential inspection is a unique discipline with specific challenges, so it’s important to make sure the inspector is experienced in this area.
Do you make repairs or make improvements based on inspection?
Some states and/or professional associations allow the inspector to perform repair work on problems uncovered in an inspection. If you’re considering engaging your inspector to do repairs, be sure to get referrals.
How long will the inspection take?
A typical single-family dwelling takes two to three hours.
How much will it cost?
Costs can vary depending upon a variety of things, such as the square footage, age, and foundation of the house.
What type of report will you provide and when will I get it?
Ask to see samples to make sure you understand his or her reporting style. Also make sure the timeline works for you.
Can I be there for the inspection?
This could be a valuable learning opportunity. If your inspector refuses, this should raise a red flag.
Are you a member of a professional home inspector association? What other credentials do you hold?
Ask to see their membership ID; it provides some assurance.
Do you keep your skills up to date through continuing education?
An inspector’s interest in continuing education shows a genuine commitment to performing at the highest level. It’s especially important with older homes or homes with unique elements.
If you have questions about finding a home inspector, or are looking for an agent in your area we have professionals that can help you. Contact us here.
Custom Home With Impeccable Panoramic Views

Featuring 4 Bedrooms, 5 Bathrooms And Beautiful Rustic Finishes
https://www.youtube.com/watch?v=mG3ZC6n8lZ0
Peaceful mountain living awaits you in the gated Buckhorn Ranch. Gorgeous custom home has impeccable designer finishes. Brick detail throughout compliment rustic mountain features. Gourmet kitchen, theater room and beautifully finished walk-out basement make this a true entertainers dream. 4-car attached garage and 2-car detached garage w/ potential for private apartment possible. Enjoy wildlife and views from this 3 acre mountain property close to downtown Fort Collins and Horsetooth Reservoir.
For more information, please visit: http://windermerenoco.com/listing/68265251 or call Rondi duPont at (970) 460-3033.

Here’s Your Spring Maintenance Checklist


Now that spring has sprung, let’s clear the cobwebs and get your home ready! Here is our quick guide to spring home maintenance:
Inspection top to bottom: Now that the weather is temperate you will want to check on how your home weathered the winter. Check the roof for leaks, the gutters for damage, and the siding for cracks. You will also want to inspect your basement or foundation for any shifts. Make repairs now to prevent further damage.
Clean out the gutters: April showers bring May flowers… so clear out the gutters to keep rain from pooling on your roof or near your foundation.
Pest control: Spring is mating season for eight legged critters, so sweep out cobwebs, clear debris, and check the nooks and crannies. If you live in an area prone to dangerous species like brown recluse or black widows, you may want to contact your local pest control, but otherwise household spiders do help eliminate other bugs.
Check your basement and attic for signs of other infestations. For more information on pest control go here: http://www.windermere.com/blogs/windermere/categories/living/posts/when-things-go-bump-in-the-night
HVAC system: If you have an air conditioner now is the time to check to make sure it is ready before summer gets here and everyone else is clamoring for maintenance. Now is a good time to check your home air filters and replace or upgrade to keep allergens at bay.
Clear the clutter: Do a sweep around the house and get rid of junk that you don’t use! Take a little time each week to tackle a room. Closets, playrooms, and basements can be especially daunting, but getting rid of old stuff and refreshing your space will go a long way!
Deep clean: On a nice day open the windows, dust, wipe, scrub, and clean. You will get a nice work out and your home will look and feel so fresh after a winter of being cooped up.
Update your décor: Add a splash of color to your home with small embellishments. Add a colorful vase, a lighter throw for your sofa, pretty pastel pillows, or spring-time candles, to upgrade your living space.
Take it outdoors: Let your throw rugs, curtains, and other tapestries air our outside. Shake off the dust, spot clean what you can and let everything bask in the sun for an afternoon.
Don’t forget the back yard: It may not be time to start up the grill, yet, but you can get started on your outdoor entertaining checklist. Check your lawn, and if you have some spare spots start filling in with seed. Check your outdoor plants, prune, plant bulbs, start to replenish soil for your garden, and mow, so you are ready to start when the season allows.
Speaking of the grill – if you have a gas grill you will want to pull this out and perform a maintenance check. Clean everything up and check to make sure all the gas lines are clear, as these can get clogged after sitting idle all winter. Make sure the grill is clear of spiders too, as they can build webs in the tubes, causing damage to your grill. You can start to bring out your garden furniture too, or clean it up if you left it covered outside all winter. Because before you know it, it’ll be barbeque season!
How to Install a New Tile Floor
A fresh, new floor is one of the most popular ways to update a bathroom. In fact, floors are among the top three features to upgrade during a master bathroom remodel, with about 91 percent of renovating homeowners making an improvement to this area, according to Houzz research. But what’s involved? And can you do it yourself?

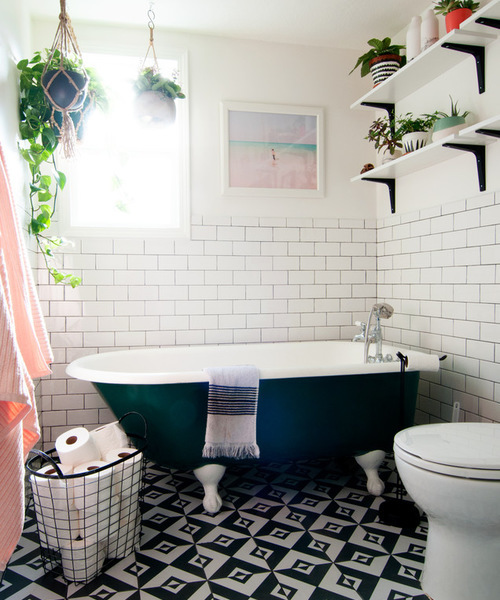
Tile Floor 1: Alexandra Crafton, original photo on Houzz
Related: Considering a Clawfoot Tub? Here’s How to Get a Freestanding Tub for Your Bathroom
For some homeowners, laying tile that you’ll walk on for years to come can elicit a great sense of pride. Others may find the process a bit overwhelming. Read on to determine whether you’d like to tackle this yourself or hire a pro.
Project basics: Installing tile involves stripping the floor down to the substrate, installing a backer board or underlayment, adhering the tile to the floor and grouting it. Depending on the material, sometimes a sealer is needed to protect the material from stains or damage.
It’s a good project for you if: You have the ability to lift 50 pounds, can work on your knees without trouble and don’t have back issues, says Chris Harper, general contractor and partner at Harper Construction in Charleston, South Carolina. You also need to be able to follow directions and have a decent amount of patience. “It’s simple,” Harper says. “But simple does not equal easy.”
Things to consider: Before you decide whether to DIY or hire a contractor, think about the pattern you want to install. Is it basic and fairly straight? Then you might be just fine trying your hand at a little tile-laying. Going for something more complex, with angles or curves involved? You might want to leave the headache to a professional. The idea here is to match your skill level, DIY confidence and tolerance for imperfections to the task. Some creative people find no tile challenge is too great. Others who are certain they’ll be annoyed by off-kilter or irregular grout lines may want to enlist the help of a pro.

Tile Floor 2: Howells Architecture + Design LLC, original photo on Houzz
Another thing to consider is the condition of your subfloor. Chris Chumbley, vice president of USI Design & Remodeling in Southlake, Texas, says that on the concrete slabs common in his area, you must be sure the floor is properly prepped and cleaned and any spiderweb cracks addressed before tiles go down. Also, “you want to make sure your floors are laid level,” Chumbley adds. If assessing these conditions is beyond your DIY depth, even after reading up on the process or watching a host of YouTube videos, you may want to call a professional.
“The bigger the tile, the more challenging,” says Joe Smith, general contractor at Owings Brothers Contracting in Eldersburg, Maryland. A larger tile is more likely to show imperfections since a 2-foot tile may bow over an unlevel subfloor, while a 1-inch tile would climb right over the floor’s curves.
“Natural tiles cost more to install because you have to clean and seal them before you set them,” Smith says. “Glass and marble cost more because you have to prep [them] correctly.”
As you consider various tile options, also think about how well the type of material wears and how hard your family is going to be on it. Porcelain tiles wear “like steel,” Chumbley says, but limestone is more delicate.
Who to hire: A reputable tile setter or a general contractor who will oversee a tile specialist.
Basic steps: Decide what type of tile you want to install. You can get ideas in tile showrooms, magazines and photos and tile product shots on Houzz.
Next, consider the steps that will be involved, from demolition of the existing floors to any work that may need to be done to prep them for new tile installation. Leveling the floors and assessing any substrate issues is likely to be the most technical part of this project. Harper recommends consulting a general contractor who will “look at the structure of the subfloor and at all the angles to make sure what’s getting done is appropriate and will last for a long time.”

Tile Floor 3: Jay-Quin Contracting Inc., original photo on Houzz
How: It’s critical that you don’t install tile on old layers of linoleum, Harper says. Remove any old flooring and get down to the substrate. Needed repairs or leveling of the bare substrate come next.
Once the subfloor is ready, the next basic step is installing cement backer board or an uncoupling membrane. Both materials serve as the underlayer to the tile floor and help prevent cracks.

Tile Floor 4: Blank Page Design Build, original photo on Houzz
Joints should be staggered, not all lined up in a row, to make the floor more stable. “Once it’s all down, it’s a smart thing to go back and check everything and make sure all of those boards are secure by walking across and checking and making sure you have screwed things to the floor appropriately,” Harper says.
Next, mark out the tile layout. “Don’t start with the tile against one wall and go across the room,” Chumbley says. It’s better to start from the center of the room and work your way out. The layout of the tile is typically marked in chalk. The width and color of the grout are part of the aesthetics. The tile layer can use spacers to keep the tiles evenly apart as the pattern progresses.

Tile Floor 5: R.M. Buck Builders, original photo on Houzz
Finally, the tile may be set with mortar. Different types of tiles need different types of mortars or adhesives, so DIYers will need to research this and not grab the first can of mortar on the hardware store shelf. Typically, you need to let the mortared tile set for a day before grouting it. But there are some fast-dry adhesives that, if appropriate for the type of tile you are using, can speed up the process.
Once the tile is set, it’s time to apply the grout. You should take care to choose a grout that works with your particular material. “Glass can get scratched with grout,” Smith says. “There’s different grout for floors and shower walls.”

Tile Floor 6: JAUREGUI Architecture Interiors Construction, original photo on Houzz
Cost range: Labor, which varies greatly by region, may be charged by the square foot ($3.50 to $9) or the job ($300 to $600 per day for tile layers). The tile itself can cost $4 to $125 per square foot, and you also will need backer board or membrane, mortar and grout.
Typical project length:Three days, especially if demolition is involved. Cement board and mortar usually need a day each to set.
Permit: Often not required, but check with your local building department.
Best time to do this project: Since it’s indoors, any time of year is fine.
How to get started: Assess what your room needs and whether you will DIY. If not, find a good tile person.
Indoor Air Quality Basics


Most of us tend to think of air pollution as something that occurs outdoors where car exhaust and factory fumes proliferate, but there’s such a thing as indoor air pollution, too. Since the 1950s, the number of synthetic chemicals used in products for the home has increased drastically, while at the same time, homes have become much tighter and better insulated. As a result, the EPA estimates that indoor pollutants today are anywhere from five to 70 times higher than pollutants in outside air.
Luckily, there are many ways to reduce indoor air pollution. We all know that buying organic and natural home materials and cleaning supplies can improve the air quality in our homes, but there are several other measures you can take as well.
How pollutants get into our homes
Potentially toxic ingredients are found in many materials throughout the home, and they leach out into the air as Volatile Organic Compounds, or VOCs. If you open a can of paint, you can probably smell those VOCs. The “new car smell” is another example of this. The smell seems to dissipate after a while, but VOCs can actually “off-gas” for a long time, even after a noticeable smell is gone.
We all know to use paint and glue in a well-ventilated room, but there are many other materials that don’t come with that warning. For instance, there are chemicals, such as formaldehyde, in the resin used to make most cabinets and plywood particle board. It’s also in wall paneling and closet shelves, and in certain wood finishes used on cabinets and furniture. The problems aren’t just with wood, either. Fabrics—everything from draperies to upholstery, bedding, and carpets—are a potent source of VOCs.
The good news about VOCs is that they do dissipate with time. For that reason, the highest levels of VOCs are usually found in new homes or remodels. If you are concerned about VOCs, there are several products you can buy that are either low- or no-VOC. You can also have your home professionally tested.
How to reduce VOCs in your home
Make smart choices in building materials.
- For floors, use tile or solid wood—hardwood, bamboo, or cork – instead of composites.
- Instead of using pressed particle board or indoor plywood, choose solid wood or outdoor-quality plywood that uses a less toxic form of formaldehyde.
- Choose low-VOC or VOC-free paints and finishes.
Purify the air that’s there.
- Make sure your rooms have adequate ventilation, and air out newly renovated or refurnished areas for at least a week, if possible.
- Clean ductwork and furnace filters regularly.
- Install air cleaners if needed.
- Use only environmentally responsible cleaning chemicals.
- Plants can help clean the air: good nonpoisonous options include bamboo palm, lady palm, parlor palm, and moth orchids.
- Air out freshly dry-cleaned clothes or choose a “green” cleaner.
Fight the carpet demons.
- Choose “Green Label” carpeting or a natural fiber such as wool or sisal.
- Use nails instead of glue to secure carpet.
- Install carpet LAST after completing painting, wall coverings and other high-VOC processes.
- Air out newly carpeted areas before using.
- Use a HEPA vacuum or a central vac system that vents outdoors.
Prevent Mold.
- Clean up water leaks fast.
- Use dehumidifiers, if necessary, to keep humidity below 60 percent.
- Don’t carpet rooms that stay damp.
- Insulate pipes, crawl spaces, and windows to eliminate condensation.
- Kill mold before it gets a grip with one-half cup of bleach per gallon of water.
We hope this information is helpful. If you would like to learn more about VOCs and indoor air quality, please visit: http://www.epa.gov/iaq/.
