
 Facebook
 X
X
 Pinterest
 Copy Link
6 Dramatic Bathroom Makeovers You Won’t Believe
Maybe it’s that 1980’s soaking tub with the giant surround, or maybe you’re prepping for resale, or perhaps an overhead flood is to blame. Maybe it’s just time for a change. Whatever the motivation behind them, bathroom renovations are one of the project’s homeowners put the most effort and investment into. Here are 6 of the most dramatic before-and-after bathroom stories from Houzz, from budget-friendly to luxe.
Related: Mini Bathroom Makeovers You Can Complete in a Weekend

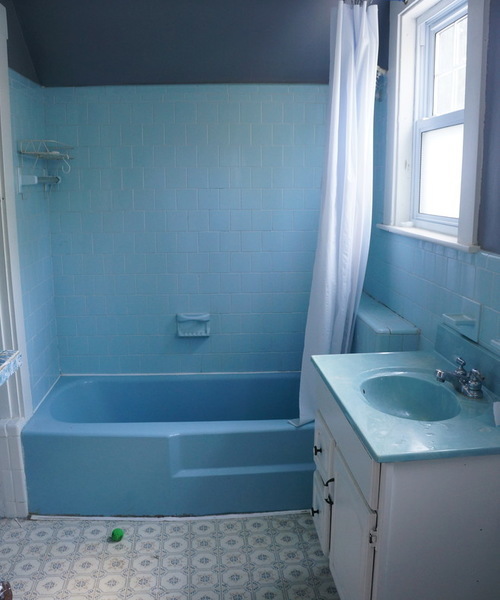
Bath Makeovers 1: Before Photo, original photo on Houzz
1. The Bathroom That Helped Sell a House in One Day
BEFORE: In this Massachusetts bungalow, over 100 years old, the 1960s bathroom renovation wasn’t offering much help to real estate agents.

Bath Makeovers 2: Copper Dot Interiors, original photo on Houzz
AFTER: Interior designer Karen Goodman had resale in mind, as she was redoing the house to flip. But it was important to her to preserve and restore the original 1902 feel. She found a claw-foot tub at the Habitat for Humanity ReStore and painted it green, added a wall-hung sink and used subway tile befitting the home’s turn-of-the-century aesthetic. A unique shower curtain adds color and personality, while the classic fixtures have widespread appeal.
Great tip: Goodman shared her philosophy about painting the original wood with Houzz contributor Annie Thornton. “If it’s painted, it’s getting painted. If it’s wood, it’s staying wood,” she said. “It wasn’t my place to decide what should be wood and what shouldn’t be in a place I don’t plan to call home.”
Shower curtain: Danica Studio; tub paint: Moss Green Rust-Oleum spray paint; claw-foot tub: Habitat for Humanity ReStore

Bath Makeovers 3: Before Photo, original photo on Houzz
2. Dilapidated 1970s Bathroom Gets Inspiration From a Dilapidated Mansion
BEFORE: The state of the bathroom in this 1912 Colonial-style home in New Jersey was sending the whole family up to the third floor to use the facilities because they couldn’t stand the cracked tiles, 12-inch-high tub, awkward layout and dated colors in the main bath. While walking through a once-grand old house during an estate sale and seeing its fabulous colors and tile patterns, homeowner Jody Suden had a clear vision for the bathroom makeover in her own home.

Bath Makeovers 4: Tracey Stephens Interior Design Inc, original photo on Houzz
AFTER: Interior designer Tracey Stephens worked closely with Suden to help her achieve her vision, using classic fixtures and completing lots of complicated tile drawings to get the details just right. The tiles are based on historical patterns and colors and were handmade in Arkansas by American Restoration Tile.
The overall style suits the home’s age and style, mixing mint green, white and black with vintage apothecary style.
Great tip: Even if you have a strong idea of what you want your room to look like, hiring a designer is key — you just have to find one who gets it. Suden told me she couldn’t have done it without Stephens, who told me she considered herself the “midwife” helping Suden achieve her vision.

Bath Makeovers 5: Before Photo, original photo on Houzz
3. The Bathroom Where 2 Doctors Take Deep Soaks After Long Days
BEFORE: This Cincinnati bathroom was dark, dated and awkwardly laid out. Because of a lack of smart storage, the countertop had become a magnet for clutter.

Bath Makeovers 6: Ryan Duebber Architect, LLC, original photo on Houzz
AFTER: Architect Ryan Duebber stole about 16 inches in length for the bathroom from the master bedroom, then moved the toilet to the back of the room. This allowed space for a spacious shower and a Japanese soaking tub.
The sapele wood at the back of the room draws the eye and makes the room look deeper, while the new skylight, reflective white, clear glass, a floating vanity and a strategic lighting scheme bathe the room in light. (For example, check out the glow on the floor provided by the LED tape lights underneath the vanity.) In addition, there’s a place to store everything so the counters can stay clean, maintaining the minimalist look the homeowners love.
Great tip: Having a specific place for everything you use in the bathroom will keep the clutter at bay. Give it a lot of thought early on in the design process. Where will your hairdryer go? Which products do you use every day in front of the mirror? Are you a toothbrush-out or a toothbrush-put-away kind of person?

Bath Makeovers 7: Before Photo, original photo on Houzz
4. Saving the Best for Last
BEFORE: These San Francisco parents worked on the spaces the whole family could enjoy before tackling their awkward master bathroom.

Bath Makeovers 8: Hulburd Design, original photo on Houzz
AFTER: Taking over an unused terrace space gave architect Holly Hulburd plenty of room to work in a new bathtub, a generous separate shower stall and a long vanity complete with dressing table. The room is a study in lines and scale, from the way the tub surround extends into a shower bench to the careful use of different sizes of rectangular tiles.
Great tip: When using strong lines, lining things up is important. In order to have the tiles meet the ceiling and floor without any cuts, Hulburd dropped the ceiling a little to make the geometry work.

Bath Makeovers 9: Before Photo, original photo on Houzz
5. The Bathroom That Makes the Most of Burgundy Floor Tiles
BEFORE: For the 2012 D.C. Design house, Christopher Patrick decided to embrace the existing tile and plumbing configuration in order to stick to a budget.

Bath Makeovers 10: Christopher Patrick Interiors, original photo on Houzz
AFTER: He chose a neoclassic wallpaper that complemented the burgundy tones in the floor, and added a more modern vanity to blend old and new.
Setting the sink and mirror asymmetrically on the right side of the vanity left ample room on the counter.
Great tip: Don’t get stuck in a bathroom design rut. Patrick had an “antibathroom” attitude, styling the room more like a living room or den and adding open shelves instead of a typical medicine cabinet.

Bath Makeovers 11: Before Photo, original photo on Houzz
6. Adding Laundry Makes Way for a Guest Room in a Toronto Pied-à-Terre
BEFORE: The converted loft in this 1905 eyeglass factory offered a decent-sized laundry room that didn’t get much use, but it didn’t have an extra bedroom. By integrating the laundry into the bathroom, there’s now room for guest bunks in the former utility room.

Bath Makeovers 12: Affecting Spaces, original photo on Houzz
AFTER: This shows the opposite wall from the one in the “before” photo; to see the complete makeover, click over to the story. Architect and designer Gillian Lazanik removed a linen closet and planned a layout that made the most of the space. This included room for a stackable washer-dryer and a new walk-in shower stall with a clear glass divider that opens up the room.
12 Tips for Making Your Bedroom Cozier

At the end of a long day, your bedroom should be a sanctuary of comfort that welcomes you in. But, as a room that guests rarely see and in which homeowners spend most of their time with their eyes closed, its upkeep frequently gets pushed to the bottom of the to-do list. Thankfully, there are some little design tricks that can make a big difference. Turn your bedroom into a restful retreat when you up its coziness factor with a few of these easy ideas.
- Layer textures. Sheepskin rugs, a down comforter, plush pillows and knit blankets can add a softness to the room that will make you want to sink right in. Lift these textures upward, with a canopy, tufted headboard, billowy curtains and hanging textiles (like a weaving) so even the walls and ceiling feel snuggly.
- Pick the right paint. Dark, saturated colors make a room feel like it’s embracing you, which is ideal for setting a sleepy environment. But if you’re nervous to commit to a dark color on the wall, choose a pale dusty blue, sage green or another light natural color for a soothing tone (just steer clear of energetic hues). Have you ever wanted to sleep on a cloud? Go with all-white paint and decor which makes even a basic bedroom feel soft and spa-like.
- Personalize it with reminders of the places and things that make you feel at home. Do you have a fondness for flowers? Bring floral patterns in on your textiles. Do you dream of vacation at the lake? Frame a photo of your favorite spot! Photos or paintings of uncluttered natural landscapes—like a sunset reflecting on water or a hammock under the shade of an oak—can rekindle memories of relaxation and are perfect for creating a sense of calm.
- Add mood lighting. Soften the light to mimic dusk for an intimate mood with dimmer switches, lamps, lanterns or even string lights. Just make sure you can reach the switch from bed, so you don’t have to disturb your peace to get up and turn it off when you’re ready to roll over and fall asleep.
- Skip metallic finishes. Choose warm natural decor options like wood and fabric instead of cold, manufactured metallics. This goes for everything from your bedroom furniture to window treatments. Faux wood blinds, especially when paired with floating curtains, fit with a cozy aesthetic and let you filter out harsh sunlight and maintain privacy for a truly sheltered slumber.
- Bring on the books! Stacks of good reads invite you to snuggle in and get lost in another world. A true retreat is a room with plenty of books that begs you to stay.
- Fix up—or fake—a fireplace. If your bed sits hearthside, embrace this romantic accent with styled logs and a decorated mantle. If you don’t have such a luxury, create a faux fireplace to add comfort and warmth through your décor: Arrange oversized candles and lanterns safely within a homemade hearth to bring in that cozy fireside feeling without changing the structure of your home.
- Keep the room uncluttered. When you want to settle in, a mess distracts you from finding comfort, so minimize the amount of stuff that makes it to your bedroom. Watch your nightstand, which often becomes a catch-all, by making a point to rehome any wandering wares now, and put things away as soon as they enter the room in the future. If you’re apt to let laundry pile up, keep it behind the closed doors of your closet so it doesn’t crowd your peace.
- Create a sense of timelessness. Tuck clocks and electronics away so they’re nearby if you need them, but their wires and harsh silhouettes aren’t reminding you of life outside your sanctuary. The hush that falls in a room devoid of gadgets will allow you to easily disengage from the stresses of reality.
- Rethink your bedding. Add a pillow-top pad to your mattress so it feels like your bed is hugging you when you climb in. Or, bring in a contoured body pillow which actually can hug you! Linen sheets feel luxe compared to cotton and are a simple swap to boost your bower. Many people also swear by skipping the top sheet while dressing their beds, which allows them to burrow directly into a fluffy comforter.
- Appeal to your sense of smell. Aromatherapy can have a huge impact on your perception of a space, so find some soothing essential oils or a sweet candle to blanket the room with an ambiance you adore. As soon as you open the door, you’ll be eager to plunge into your little oasis.
- Nestle into nooks. A window seat, a reading nook or an upholstered seating area are all inviting spaces that can draw you in from the doorway. The more intimate alcoves you can create, the cozier your bedroom will feel!
Flooded with soft lighting, plush textures and other comfy touches, your bedroom environment will envelope you at day’s end. And, perhaps even better than the idea of your bedroom refresh itself, is knowing that none of these tips take longer than a weekend to complete! So, slide into your slippers as you settle on which cozy updates you’ll select for your new favorite room of the house.
Katie Laird is the Director of Social Marketing for Blinds.com and a frequent public speaker on Social Media Marketing, Social Customer Care and profitable company culture. An active blogger and early social technology adopter, you can find her online as ‘happykatie’ sharing home décor, yoga, parenting and vegetarian cooking tips. If you’re interested in faux wood blinds like those described by Katie, please go to the Blinds.com website.
5 Lessons Home Renovations Can Teach You About Yourself
I could spend ages talking about everything there is to learn from remodeling your house: the best types of tile for a shower floor, little details that you shouldn’t overlook when remodeling, tips and tricks for finishing a project on time — you name it.
But a remodeling project, being a rather noteworthy life experience, can also teach you a lot about yourself. No, I’m not talking about your tastes or preferences (for example, you learn that you love the color blue on your walls or you learn that you really just don’t like remodeling). Rather, it can teach you about some characteristics you never knew you possessed, or at least never had the opportunity to focus on — the good and the bad. Here are some things you might learn about yourself.

Learn 1: Jane Lockhart Interior Design, original photo on Houzz
1. You’re more impatient than you thought. Remodeling will — I repeat, will — test your patience. It doesn’t matter whether you’re a dedicated yogi who can sit and meditate for hours at a time or a hobbyist who works late into the night tirelessly assembling detailed ships in bottles. Weather delays, unforeseen problems (wait, there’s mold behind that wall?), busy trade schedules — it’s almost impossible to have a remodeling project without a delay or two. And when it’s your project with the delays, you might just find yourself repeating the mantra of kids stuck in the family car during a road trip, “Are we there yet?” Or more specifically, “Are we done yet?”

Learn 2: Transitional Sunroom, original photo on Houzz
2. You’re adaptable. Bathroom remodels and kitchen remodels are notorious for, well, making bathrooms and kitchens unusable while they’re under construction. At the beginning this might seem like a major inconvenience (truth be told, it is!), but by the end you might be thinking “Who really needs a full kitchen?” After all, there are so many small appliances loved by college students and remodeling survivors alike — toaster ovens, microwaves, slow cookers, camping stoves.
Related: Brainstorm Ideas for Your Kitchen Remodel
Bathroom remodels can be easy to work around if you have another bath that isn’t under renovation, or a next door neighbor who is fairly generous, or membership in a gym with clean showers. Remember, creativity and adaptability are your friends. So embrace your inner MacGyver.

Learn 3: AMW Design Studio, original photo on Houzz
3. You want in on the action. It starts small: At first, you’re just chatting with your contractor about the status of your project — normal stuff. But as time goes on, you can’t help but ask questions about the more technical side of things. Some people might find details about tile installation eye-rollingly boring, but you’re intrigued.
Related: Read Reviews to Find the Best General Contractor Near You
Suddenly, you find yourself searching for home improvement how-to books and classes on design. You may even start planning your second project (which you’re considering doing yourself) or looking for houses you think you’d like to flip. Watching your own home transform before your very eyes has been an exciting process, no doubt, and now you’re ready to try your hand at it. Don’t be surprised if at first you just want the process to be over, only to find that you never want it to end.

Learn 4: Deville Custom Homes, original photo on Houzz
4. Your relationships can (probably) weather any storm. If the space you’re remodeling is a place that you share with someone else (whether it be your spouse, children or others), it’s likely that you’ll feel a little more stress than if you were just remodeling your own personal space.
Every stress that you feel about the remodel, they probably feel as well. Every worry you have about budgets and schedules and paint colors, they have too. Pour all that stress into a small group of people who live together, and, well … things can get messy.
But when you finally see the light at the end of the tunnel, you realize that all that pressure was worth it, because you and your people have a beautiful new space to use for years to come. It probably took some compromise and communication to get there, but now that you’ve finally made it, you know you’re that much stronger because of it.
Or not. I don’t want to be a Debbie Downer, but what you might discover about yourself is that you can’t collaborate with the person you’re with. Remodeling is like a stress-test on relationships — for good or ill.

Learn 5: Tiffany McKenzie Interior Design, original photo on Houzz
5. You’re fearless. I’ll tell you this much: It takes a lot of inner strength to not freak out when you see someone you’ve never met come through your front door with a hammer. Remodeling can make some people stronger. Once you see your home demolished before your very eyes by strangers wielding tools and driving heavy construction equipment, your definition of “scary” changes a little.
Obviously, this isn’t an all-encompassing list, nor is it supposed to mean that you will find yourself relating to every point. You may or may not feel the urge to become an amateur remodeler. You might (understandably) still get freaked out at a stranger coming into your home with a hammer. Remodeling is a personal journey, full of personal discoveries and accomplishments and all that good stuff. The only way for you to truly know how it will affect you is for you to experience it yourself. But whatever happens, you will learn more about yourself than you have in a long time.
Short vs. Long
There are short-term questions about real estate and there are long term questions about real estate.

Beautiful Horse Property With 34.5 Acres
Featuring 3 Bedrooms, 2 Bathrooms And A 1,560 Square Foot Barn!
https://www.youtube.com/watch?v=z6sLKhNE-fI&feature=youtu.be
Amazing horse property! Many outbuildings, horse facilities, views and a cute updated home. Horse features include: 10 stalls, 8 loafing sheds, 15 auto waterers (in pastures and runs), outdoor arena, vet office, foaling stall, 1560 square foot hay barn, turn-out traps and a pasture. Outbuildings – 36×45 greenhouse with lights and hydroponics system, 1500 square foot pole barn/garage with 454 square foot loft/ bunk house. Home has been updated over the years and features an office, patio off of the master and a sunroom.
For more information, please visit: http://windermerenoco.com/listing/69423121 or call Meagan Griesel at (970) 460-3033.


The 4 Phases of Remodeling: The Honeymoon Stage

As with anything in life, a remodeling project can come with its ups and downs. Certain phases seem to go a mile a minute, while others feel like they’ve lasted a lifetime and a half, all while it looks as though nothing is being completed. Fear not — this is pretty typical. And, while every project is different, a good portion of renovations have four major phases, what I’m calling the Honeymoon, the Midproject Crisis, the Renewal of Vows and the Happily Ever After.
For now, let’s take a closer look at the Honeymoon phase of renovating.

Honeymoon 1: Homegrown Decor, LLC, original photo on Houzz
After weeks of searching for a remodeler in your area, calling references, checking out their Houzz profile and working toward an agreeable price, you say, “I do,” sign the contract, finalize the design and begin work in two weeks. There’s a little nervousness in the air, but as you enter the Honeymoon phase, the mood is mainly one of excitement.
Demolition Begins
A couple of weeks go by, and the day comes for work to start. Protective products are placed, and demolition begins. Demo, sweet, demo. Normally one of the quickest moving stages of a remodel, demolition makes it look as if a lot of work is being done practically overnight. Cabinetry is removed, walls are torn down, appliances are taken away and, in a matter of days or weeks (depending on the size of your project), you’re staring at a blank canvas.
After that, any necessary framing and structural work will begin. Framing usually isn’t as exciting or fast-paced as demolition, but still, there is visible progress almost daily. At this point, you and your partner are walking on air. The rate of work is astounding, and you’re still very excited (although maybe a little less nervous now) about the entire project.

Honeymoon 2: Blondino Design, Inc., original photo on Houzz
Speed Bumps Ahead!
However, like a delayed flight on a real honeymoon trip, there are obstacles that can slow down this phase, specifically during demo. If you’re living in an older house, there’s the possibility that when your walls are opened, asbestos or lead could be discovered, which will need to be dealt with before work can continue.
Another common speed bump is building permit delays. Going through government-mandated processes can be tricky sometimes, especially if you or your building professional don’t have everything you need to get the green light from your municipality the first time around.
More holdups can come from structural elements that become apparent after demolition. For example, say you were going to move a door to another wall in your dining room. Once the demo crew opens up the wall where the new door will be installed — surprise! — there are plumbing pipes running the height of the wall. Reconfiguring design to meet these new requirements will add time to the demo stage.
Don’t panic. These delays happen often, and it’s worth accounting for and accepting these hurdles before you even begin to think about renovating.

Honeymoon 3: Jim Schmid Photography, original photo on Houzz
Rolling With the Punches
To help your honeymoon run more smoothly, here are a few tips I’ve learned from witnessing hundreds of remodels (and even surviving a couple myself):
- Embrace change. Really. Give change a huge hug. Get to know it on a personal level. Because no matter what room you’re touching (whether it’s the kitchen or a teensy guest bath), it’s likely that you use that room daily. The sooner you accept that this room (major or not) will be unavailable for a period of time, the sooner you’ll be able to adapt your daily routines to fit around it.
- Love your microwave. This applies to kitchen remodels specifically. As soon as demo is done, your primary cooking and eating area will be gone. Before your project starts, find an untouched room in your home to create a mini kitchen that will include necessities such as a microwave, toaster oven and coffee pot. Think of it as the mini kitchen you had in your dorm or apartment in college and revel in the nostalgia.
- Don’t worry too much. I know this sounds hard — OK, really hard, especially for control freaks like myself — but trusting your building professionals to know what they’re doing (even if you do come across one of the aforementioned speed bumps) will really help you keep your head on straight. And if you do have questions or concerns …
- Communicate! Communication has proved time and time again to be one of the biggest parts of a remodel — and a successful marriage. I cannot stress it enough. Talk with your contractor, talk with your significant other — talk, talk, talk. Ask framing questions, bring up budgetary concerns, muse over paint colors. Whatever is on your mind, getting it out of your head and into the air is beneficial for everyone involved (especially you).

Honeymoon 4: Jeff Herr Photography, original photo on Houzz
And remember: The Honeymoon phase of a remodel is definitely one of the high points in a process with numerous peaks and valleys, so try to enjoy it. No matter what you may encounter during demolition and framing, it’s likely that the mood of everyone on board — you, your contractor, your family and even your pet — will be very positive.
Related: 15 Questions to Ask Before Buying a Fixer-Upper
You’ve just embarked on a new journey, and the excitement of watching the image of your new home come into focus just adds fuel to your fire. Revel in that post-contract-signing bliss and maybe enjoy a glass of your favorite beverage with your significant other while you two imagine the new space that will be formed in your newly torn-apart home. Enjoy it, because what lies ahead is a bit uncertain.
With that in mind: What happens when it feels like nothing is happening? Is there still work being done? Are we still on schedule? Is it OK to freak out a little bit? Read more in the upcoming article in this series, “The Midproject Crisis.”
Turn-Key Home In Southeast Fort Collins
Featuring 3 Bedrooms, 3 Bathrooms And Vaulted Ceilings!
https://www.youtube.com/watch?v=8fHieViuN7w
Move-in ready 2-story with large corner lot in Sunstone! Large open family room with gas fireplace opens to bright eat-in kitchen with island and freshly refinished wood floors. Main floor laundry. Enjoy the large fully fenced backyard with patio, fruit trees and garden boxes. Master upstairs has vaulted ceiling with walk-in closet and master bath. Two additional bedrooms complete the upstairs, all with newly installed carpet. Full unfinished basement. Great location with easy access to shopping, schools and I-25.
For more information, please visit: http://windermerenoco.com/listing/69215992 or call Kelly Swift at (970) 460-3033.

New Features vs. Character


We are often asked, “Which is the better buy, a newer or older home?” Our answer: It all depends on your needs and personal preferences. We decided to put together a list of the six biggest differences between newer and older homes:
The neighborhood
Surprisingly, one of the biggest factors in choosing a new home isn’t the property itself, but rather the surrounding neighborhood. While new homes occasionally spring up in established communities, most are built in new developments. The settings are quite different, each with their own unique benefits.
Older neighborhoods often feature tree-lined streets; larger property lots; a wide array of architectural styles; easy walking access to mass transportation, restaurants and local shops; and more established relationships among neighbors.
New developments are better known for wider streets and quiet cul-de-sacs; controlled development; fewer aboveground utilities; more parks; and often newer public facilities (schools, libraries, pools, etc.). There are typically more children in newer communities, as well.
Consider your daily work commute, too. While not always true, older neighborhoods tend to be closer to major employment centers, mass transportation and multiple car routes (neighborhood arterials, highways and freeways).
Design and layout
If you like Victorian, Craftsman or Cape Cod style homes, it used to be that you would have to buy an older home from the appropriate era. But with new-home builders now offering modern takes on those classic designs, that’s no longer the case. There are even modern log homes available.
Have you given much thought to your floor plans? If you have your heart set on a family room, an entertainment kitchen, a home office and walk-in closets, you’ll likely want to buy a newer home—or plan to do some heavy remodeling of an older home. Unless they’ve already been remodeled, most older homes feature more basic layouts.
If you have a specific home-décor style in mind, you’ll want to take that into consideration, as well. Professional designers say it’s best if the style and era of your furnishings match the style and era of your house. But if you are willing to adapt, then the options are wide open.
Materials and craftsmanship
Homes built before material and labor costs spiked in the late 1950’s have a reputation for higher-grade lumber and old-world craftsmanship (hardwood floors, old-growth timber supports, ornate siding, artistic molding, etc.).
However, newer homes have the benefit of modern materials and more advanced building codes (copper or polyurethane plumbing, better insulation, double-pane windows, modern electrical wiring, earthquake/ windstorm supports, etc.).
Current condition
The condition of a home for sale is always a top consideration for any buyer. However, age is a factor here, as well. For example, if the exterior of a newer home needs repainting, it’s a relatively easy task to determine the cost. But if it’s a home built before the 1970s, you have to also consider the fact that the underlying paint is most likely lead based, and that the wood siding may have rot or other structural issues that need to be addressed before it can be recoated.
On the flip side, the mechanicals in older homes (lights, heating systems, sump pump, etc.) tend to be better built and last longer.
Outdoor space
One of the great things about older homes is that they usually come with mature tress and bushes already in place. Buyers of new homes may have to wait years for ornamental trees, fruit trees, roses, ferns, cacti and other long-term vegetation to fill in a yard, create shade, provide privacy, and develop into an inviting outdoor space. However, maybe you’re one of the many homeowners who prefer the wide-open, low-maintenance benefits of a lightly planted yard.
Car considerations
Like it or not, most of us are extremely dependent on our cars for daily transportation. And here again, you’ll find a big difference between newer and older homes. Newer homes almost always feature ample off-street parking: usually a two-car garage and a wide driveway. An older home, depending on just how old it is, may not offer a garage—and if it does, there’s often only enough space for one car. For people who don’t feel comfortable leaving their car on the street, this alone can be a determining factor.
Finalizing your decision
While the differences between older and newer homes are striking, there’s certainly no right or wrong answer. It is a matter of personal taste, and what is available in your desired area. To quickly determine which direction your taste trends, use the information above to make a list of your most desired features, then categorize those according to the type of house in which they’re most likely to be found. The results can often be telling.
If you have questions about newer versus older homes, or are looking for an agent in your area we have professionals that can help you. Contact us here.
3 Design Ideas to Try in Your Bedroom
As far as design goes, bedrooms are pretty straightforward. Pick the typical necessary components — bed, nightstands, dresser — and you’ve got a bedroom. But too often homeowners stop there. The designers for these three bedrooms didn’t. They took a holistic approach, embraced built-ins and celebrated simple white walls to turn what could have been ordinary rooms into spaces worth bragging about.
Related: Discover Nighstands in Every Style

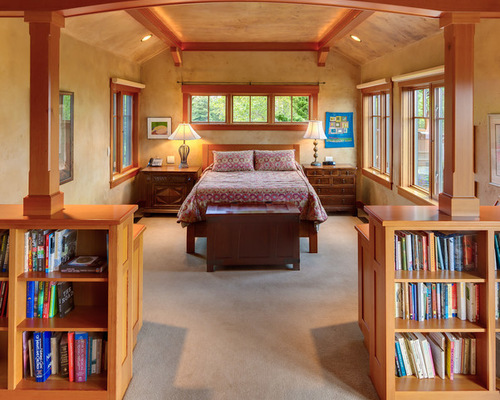
Bedroom Projects 1: Erik Biishoff, original photo on Houzz
1. Holistic Approach
Designer: Architect David Edrington
Location: Eugene, Oregon
Size: 14 by 28 feet (4.2 by 8.5 meters)
Year built: 2007
Homeowners’ request: A cozy bedroom with a great view and access to an outdoor room with a comfortable place to sit. This was part of a new home.
Plan of attack: Architect David Edrington used an architectural method detailed in a book titled A Pattern Language to help flesh out the deeper idea of how the homeowners wanted the bedroom to function and how it should be experienced in terms of intimacy, which direction the bed should face and the flow to other rooms. “The primary patterns were ‘intimacy gradient,’ ‘sleeping to the east,’ ‘sleeping alcove’ and ‘the flow through rooms,’” Edrington says.
Why the design works: Simplicity and smart planning. “My work is about the common principles that come from the human experience with spaces,” Edrington says. “The beauty of this bedroom comes not from any unique situation or odd problem that needed to be solved. The beauty comes from the simplicity of the decisions guided by A Pattern Language. The bed is in an alcove-like space that is just big enough for the bed, side tables and room to move around. It has windows on three sides, including one on the east for morning light and several on the west for the evening view of the Oregon Coast Range.

Bedroom Projects 2: Erik Biishoff, original photo on Houzz
Related: Measurements to Remember When Designing Your Dream Bedroom
“Opposite the bed is a sitting space just big enough for two people, with a fireplace and some book storage. The fireplace is raised, so it’s visible from the bed. The proportions of the room are about 2:1, which means it’s naturally two spaces. In between the two spaces there is a thick half wall made of cabinets and columns and beams, which is a continuation of a theme used throughout the house.
“The room has a gently vaulted ceiling that supports the cozy human scale. The walls and ceilings are made of integral colored plaster, which is also a continuation of the wall finishes used throughout the house. The cabinets, windows, trim and other wood detailing is done in Douglas fir, because that’s our local wood and it has a beautiful color and grain.”
Who uses it: A couple in their late 50s and early 60s, who work at home
The nitty-gritty: Cabinets: clear Douglas fir, The Cabinet Factory; walls: colored plaster; floors: bamboo, Imperial Floors
Team involved: Dorman Construction (general contractor); Erik Bishoff (photographer)

Bedroom Projects 3: Garcia Stromberg, original photo on Houzz
2. Embracing Built-Ins
Designer: Garcia Stromberg
Location: Stuart, Florida
Size: 14 by 20 feet (4.2 by 6 meters)
Homeowners’ request: A contemporary yet classic look with clean, straight lines
Designer secret: Strategically planned built-ins save space.
Plan of attack: Create as much livable space as possible, then focus on the view. “Then the built-ins brought the whole room together,” designer Garcia Stromberg says.
Why the design works: “The design of the linear lines worked flawlessly with the natural colors that were incorporated from the view of the outdoors,” Stromberg says.
What wasn’t working: “The biggest challenge was the narrow space and fitting a comfortable amount of furnishings and decorations in the space while still portraying a contemporary look,” Stromberg says.
Splurges and savings: The homeowners saved on furnishings but splurged on built-ins.
Team involved: Palm City Millwork Inc.

Bedroom Projects 4: Eric Charles, original photo on Houzz
3. Off-the-Shelf White Walls
Designer: Carley Montgomery
Location: Silver Lake neighborhood of Los Angeles
Size: 20 by 28 feet (6 by 8.5 meters), or 560 square feet (52 square meters)
Year built: 2015
Homeowner’s request: This home was built on spec for a future owner. Carley Montgomery acted as the architectural designer, interior designer, general contractor and developer. She envisioned modern clean lines and flexible living space for this house, which could be used as a guest house, an office or an artist’s studio.
Designer secret: Plain white walls. “Everyone gets all crazy trying to pick the perfect white,” Montgomery says. “While in many circumstances this is vital to match the furniture or warm a space with a hint of color, I find off-the-shelf white is the most universal, easy and safe color for modern homes.”
Plan of attack: Montgomery designed the home from the ground up, positioning it to capitalize on unobstructed views. Large floor-to-ceiling windows bring in light and views of downtown Los Angeles, which Montgomery wanted to highlight by keeping the interior design minimal. “It’s incredible at night,” she says. “The desk behind the sofa allows you to work and also enjoy the view.”
Why the design works: “This entire space is only 560 square feet and feels so much larger,” Montgomery says. “The ceilings are vaulted, creating a loft-like feel. But the flow of the space is what really works. We fit a full kitchen, full bath, dining area, living area, desk and bed in the space, and it doesn’t feel crowded. This has everything to do with the placement of the entry door, kitchen and bathroom inside the space. It is vital to place your furniture on your plan when in design so that you maintain flow through the finished space.”

Bedroom Projects 5: Eric Charles, original photo on Houzz
Related: Park a Bench at the Foot of the Bed
“Uh-oh” moment: “If this were a project being built for a homeowner, there would have been numerous ‘uh-oh’ moments. There always are,” Montgomery says. “Being that this is my business and I’m acting as owner representative, designer and contractor, decisions are quite simple. The only issue is trying to anticipate what the buyer of the property is going to want. It’s like working for a mystery client.”
Take-away: The value of well-planned and thought-out design
Team involved: Jordan Christian (artist); Corbin Poorboy of The Here Co. (styling); Eric Charles (photographer)
