
 Facebook
 X
X
 Pinterest
 Copy Link
5 Lessons Home Renovations Can Teach You About Yourself
I could spend ages talking about everything there is to learn from remodeling your house: the best types of tile for a shower floor, little details that you shouldn’t overlook when remodeling, tips and tricks for finishing a project on time — you name it.
But a remodeling project, being a rather noteworthy life experience, can also teach you a lot about yourself. No, I’m not talking about your tastes or preferences (for example, you learn that you love the color blue on your walls or you learn that you really just don’t like remodeling). Rather, it can teach you about some characteristics you never knew you possessed, or at least never had the opportunity to focus on — the good and the bad. Here are some things you might learn about yourself.

Learn 1: Jane Lockhart Interior Design, original photo on Houzz
1. You’re more impatient than you thought. Remodeling will — I repeat, will — test your patience. It doesn’t matter whether you’re a dedicated yogi who can sit and meditate for hours at a time or a hobbyist who works late into the night tirelessly assembling detailed ships in bottles. Weather delays, unforeseen problems (wait, there’s mold behind that wall?), busy trade schedules — it’s almost impossible to have a remodeling project without a delay or two. And when it’s your project with the delays, you might just find yourself repeating the mantra of kids stuck in the family car during a road trip, “Are we there yet?” Or more specifically, “Are we done yet?”

Learn 2: Transitional Sunroom, original photo on Houzz
2. You’re adaptable. Bathroom remodels and kitchen remodels are notorious for, well, making bathrooms and kitchens unusable while they’re under construction. At the beginning this might seem like a major inconvenience (truth be told, it is!), but by the end you might be thinking “Who really needs a full kitchen?” After all, there are so many small appliances loved by college students and remodeling survivors alike — toaster ovens, microwaves, slow cookers, camping stoves.
Related: Brainstorm Ideas for Your Kitchen Remodel
Bathroom remodels can be easy to work around if you have another bath that isn’t under renovation, or a next door neighbor who is fairly generous, or membership in a gym with clean showers. Remember, creativity and adaptability are your friends. So embrace your inner MacGyver.

Learn 3: AMW Design Studio, original photo on Houzz
3. You want in on the action. It starts small: At first, you’re just chatting with your contractor about the status of your project — normal stuff. But as time goes on, you can’t help but ask questions about the more technical side of things. Some people might find details about tile installation eye-rollingly boring, but you’re intrigued.
Related: Read Reviews to Find the Best General Contractor Near You
Suddenly, you find yourself searching for home improvement how-to books and classes on design. You may even start planning your second project (which you’re considering doing yourself) or looking for houses you think you’d like to flip. Watching your own home transform before your very eyes has been an exciting process, no doubt, and now you’re ready to try your hand at it. Don’t be surprised if at first you just want the process to be over, only to find that you never want it to end.

Learn 4: Deville Custom Homes, original photo on Houzz
4. Your relationships can (probably) weather any storm. If the space you’re remodeling is a place that you share with someone else (whether it be your spouse, children or others), it’s likely that you’ll feel a little more stress than if you were just remodeling your own personal space.
Every stress that you feel about the remodel, they probably feel as well. Every worry you have about budgets and schedules and paint colors, they have too. Pour all that stress into a small group of people who live together, and, well … things can get messy.
But when you finally see the light at the end of the tunnel, you realize that all that pressure was worth it, because you and your people have a beautiful new space to use for years to come. It probably took some compromise and communication to get there, but now that you’ve finally made it, you know you’re that much stronger because of it.
Or not. I don’t want to be a Debbie Downer, but what you might discover about yourself is that you can’t collaborate with the person you’re with. Remodeling is like a stress-test on relationships — for good or ill.

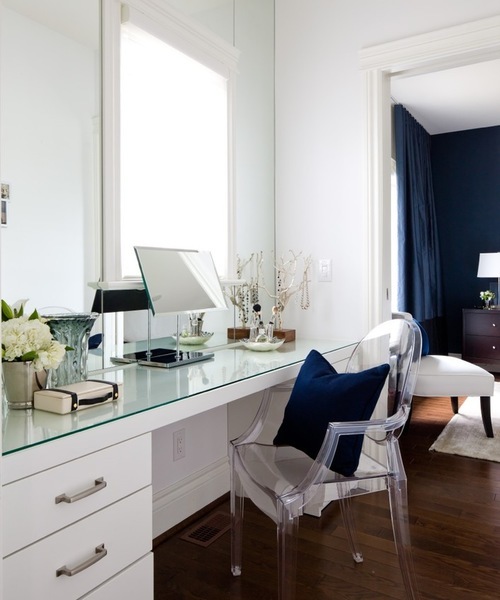
Learn 5: Tiffany McKenzie Interior Design, original photo on Houzz
5. You’re fearless. I’ll tell you this much: It takes a lot of inner strength to not freak out when you see someone you’ve never met come through your front door with a hammer. Remodeling can make some people stronger. Once you see your home demolished before your very eyes by strangers wielding tools and driving heavy construction equipment, your definition of “scary” changes a little.
Obviously, this isn’t an all-encompassing list, nor is it supposed to mean that you will find yourself relating to every point. You may or may not feel the urge to become an amateur remodeler. You might (understandably) still get freaked out at a stranger coming into your home with a hammer. Remodeling is a personal journey, full of personal discoveries and accomplishments and all that good stuff. The only way for you to truly know how it will affect you is for you to experience it yourself. But whatever happens, you will learn more about yourself than you have in a long time.
3 Design Ideas to Try in Your Bedroom
As far as design goes, bedrooms are pretty straightforward. Pick the typical necessary components — bed, nightstands, dresser — and you’ve got a bedroom. But too often homeowners stop there. The designers for these three bedrooms didn’t. They took a holistic approach, embraced built-ins and celebrated simple white walls to turn what could have been ordinary rooms into spaces worth bragging about.
Related: Discover Nighstands in Every Style

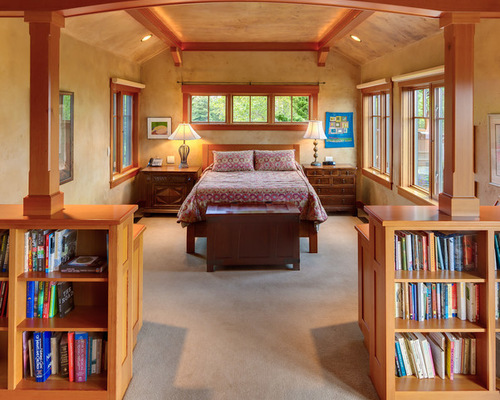
Bedroom Projects 1: Erik Biishoff, original photo on Houzz
1. Holistic Approach
Designer: Architect David Edrington
Location: Eugene, Oregon
Size: 14 by 28 feet (4.2 by 8.5 meters)
Year built: 2007
Homeowners’ request: A cozy bedroom with a great view and access to an outdoor room with a comfortable place to sit. This was part of a new home.
Plan of attack: Architect David Edrington used an architectural method detailed in a book titled A Pattern Language to help flesh out the deeper idea of how the homeowners wanted the bedroom to function and how it should be experienced in terms of intimacy, which direction the bed should face and the flow to other rooms. “The primary patterns were ‘intimacy gradient,’ ‘sleeping to the east,’ ‘sleeping alcove’ and ‘the flow through rooms,’” Edrington says.
Why the design works: Simplicity and smart planning. “My work is about the common principles that come from the human experience with spaces,” Edrington says. “The beauty of this bedroom comes not from any unique situation or odd problem that needed to be solved. The beauty comes from the simplicity of the decisions guided by A Pattern Language. The bed is in an alcove-like space that is just big enough for the bed, side tables and room to move around. It has windows on three sides, including one on the east for morning light and several on the west for the evening view of the Oregon Coast Range.

Bedroom Projects 2: Erik Biishoff, original photo on Houzz
Related: Measurements to Remember When Designing Your Dream Bedroom
“Opposite the bed is a sitting space just big enough for two people, with a fireplace and some book storage. The fireplace is raised, so it’s visible from the bed. The proportions of the room are about 2:1, which means it’s naturally two spaces. In between the two spaces there is a thick half wall made of cabinets and columns and beams, which is a continuation of a theme used throughout the house.
“The room has a gently vaulted ceiling that supports the cozy human scale. The walls and ceilings are made of integral colored plaster, which is also a continuation of the wall finishes used throughout the house. The cabinets, windows, trim and other wood detailing is done in Douglas fir, because that’s our local wood and it has a beautiful color and grain.”
Who uses it: A couple in their late 50s and early 60s, who work at home
The nitty-gritty: Cabinets: clear Douglas fir, The Cabinet Factory; walls: colored plaster; floors: bamboo, Imperial Floors
Team involved: Dorman Construction (general contractor); Erik Bishoff (photographer)

Bedroom Projects 3: Garcia Stromberg, original photo on Houzz
2. Embracing Built-Ins
Designer: Garcia Stromberg
Location: Stuart, Florida
Size: 14 by 20 feet (4.2 by 6 meters)
Homeowners’ request: A contemporary yet classic look with clean, straight lines
Designer secret: Strategically planned built-ins save space.
Plan of attack: Create as much livable space as possible, then focus on the view. “Then the built-ins brought the whole room together,” designer Garcia Stromberg says.
Why the design works: “The design of the linear lines worked flawlessly with the natural colors that were incorporated from the view of the outdoors,” Stromberg says.
What wasn’t working: “The biggest challenge was the narrow space and fitting a comfortable amount of furnishings and decorations in the space while still portraying a contemporary look,” Stromberg says.
Splurges and savings: The homeowners saved on furnishings but splurged on built-ins.
Team involved: Palm City Millwork Inc.

Bedroom Projects 4: Eric Charles, original photo on Houzz
3. Off-the-Shelf White Walls
Designer: Carley Montgomery
Location: Silver Lake neighborhood of Los Angeles
Size: 20 by 28 feet (6 by 8.5 meters), or 560 square feet (52 square meters)
Year built: 2015
Homeowner’s request: This home was built on spec for a future owner. Carley Montgomery acted as the architectural designer, interior designer, general contractor and developer. She envisioned modern clean lines and flexible living space for this house, which could be used as a guest house, an office or an artist’s studio.
Designer secret: Plain white walls. “Everyone gets all crazy trying to pick the perfect white,” Montgomery says. “While in many circumstances this is vital to match the furniture or warm a space with a hint of color, I find off-the-shelf white is the most universal, easy and safe color for modern homes.”
Plan of attack: Montgomery designed the home from the ground up, positioning it to capitalize on unobstructed views. Large floor-to-ceiling windows bring in light and views of downtown Los Angeles, which Montgomery wanted to highlight by keeping the interior design minimal. “It’s incredible at night,” she says. “The desk behind the sofa allows you to work and also enjoy the view.”
Why the design works: “This entire space is only 560 square feet and feels so much larger,” Montgomery says. “The ceilings are vaulted, creating a loft-like feel. But the flow of the space is what really works. We fit a full kitchen, full bath, dining area, living area, desk and bed in the space, and it doesn’t feel crowded. This has everything to do with the placement of the entry door, kitchen and bathroom inside the space. It is vital to place your furniture on your plan when in design so that you maintain flow through the finished space.”

Bedroom Projects 5: Eric Charles, original photo on Houzz
Related: Park a Bench at the Foot of the Bed
“Uh-oh” moment: “If this were a project being built for a homeowner, there would have been numerous ‘uh-oh’ moments. There always are,” Montgomery says. “Being that this is my business and I’m acting as owner representative, designer and contractor, decisions are quite simple. The only issue is trying to anticipate what the buyer of the property is going to want. It’s like working for a mystery client.”
Take-away: The value of well-planned and thought-out design
Team involved: Jordan Christian (artist); Corbin Poorboy of The Here Co. (styling); Eric Charles (photographer)
How to Install a New Tile Floor
A fresh, new floor is one of the most popular ways to update a bathroom. In fact, floors are among the top three features to upgrade during a master bathroom remodel, with about 91 percent of renovating homeowners making an improvement to this area, according to Houzz research. But what’s involved? And can you do it yourself?

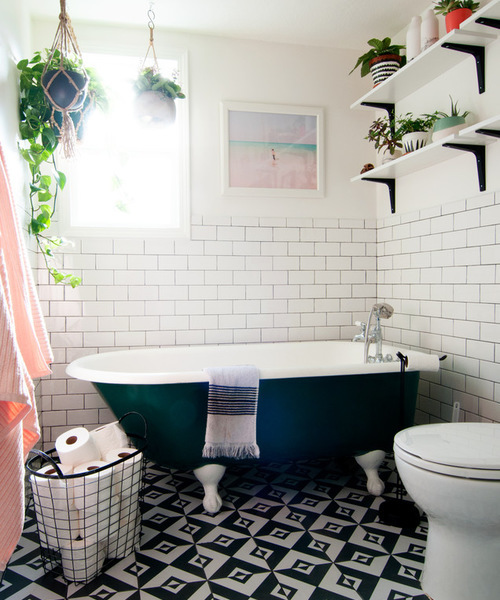
Tile Floor 1: Alexandra Crafton, original photo on Houzz
Related: Considering a Clawfoot Tub? Here’s How to Get a Freestanding Tub for Your Bathroom
For some homeowners, laying tile that you’ll walk on for years to come can elicit a great sense of pride. Others may find the process a bit overwhelming. Read on to determine whether you’d like to tackle this yourself or hire a pro.
Project basics: Installing tile involves stripping the floor down to the substrate, installing a backer board or underlayment, adhering the tile to the floor and grouting it. Depending on the material, sometimes a sealer is needed to protect the material from stains or damage.
It’s a good project for you if: You have the ability to lift 50 pounds, can work on your knees without trouble and don’t have back issues, says Chris Harper, general contractor and partner at Harper Construction in Charleston, South Carolina. You also need to be able to follow directions and have a decent amount of patience. “It’s simple,” Harper says. “But simple does not equal easy.”
Things to consider: Before you decide whether to DIY or hire a contractor, think about the pattern you want to install. Is it basic and fairly straight? Then you might be just fine trying your hand at a little tile-laying. Going for something more complex, with angles or curves involved? You might want to leave the headache to a professional. The idea here is to match your skill level, DIY confidence and tolerance for imperfections to the task. Some creative people find no tile challenge is too great. Others who are certain they’ll be annoyed by off-kilter or irregular grout lines may want to enlist the help of a pro.

Tile Floor 2: Howells Architecture + Design LLC, original photo on Houzz
Another thing to consider is the condition of your subfloor. Chris Chumbley, vice president of USI Design & Remodeling in Southlake, Texas, says that on the concrete slabs common in his area, you must be sure the floor is properly prepped and cleaned and any spiderweb cracks addressed before tiles go down. Also, “you want to make sure your floors are laid level,” Chumbley adds. If assessing these conditions is beyond your DIY depth, even after reading up on the process or watching a host of YouTube videos, you may want to call a professional.
“The bigger the tile, the more challenging,” says Joe Smith, general contractor at Owings Brothers Contracting in Eldersburg, Maryland. A larger tile is more likely to show imperfections since a 2-foot tile may bow over an unlevel subfloor, while a 1-inch tile would climb right over the floor’s curves.
“Natural tiles cost more to install because you have to clean and seal them before you set them,” Smith says. “Glass and marble cost more because you have to prep [them] correctly.”
As you consider various tile options, also think about how well the type of material wears and how hard your family is going to be on it. Porcelain tiles wear “like steel,” Chumbley says, but limestone is more delicate.
Who to hire: A reputable tile setter or a general contractor who will oversee a tile specialist.
Basic steps: Decide what type of tile you want to install. You can get ideas in tile showrooms, magazines and photos and tile product shots on Houzz.
Next, consider the steps that will be involved, from demolition of the existing floors to any work that may need to be done to prep them for new tile installation. Leveling the floors and assessing any substrate issues is likely to be the most technical part of this project. Harper recommends consulting a general contractor who will “look at the structure of the subfloor and at all the angles to make sure what’s getting done is appropriate and will last for a long time.”

Tile Floor 3: Jay-Quin Contracting Inc., original photo on Houzz
How: It’s critical that you don’t install tile on old layers of linoleum, Harper says. Remove any old flooring and get down to the substrate. Needed repairs or leveling of the bare substrate come next.
Once the subfloor is ready, the next basic step is installing cement backer board or an uncoupling membrane. Both materials serve as the underlayer to the tile floor and help prevent cracks.

Tile Floor 4: Blank Page Design Build, original photo on Houzz
Joints should be staggered, not all lined up in a row, to make the floor more stable. “Once it’s all down, it’s a smart thing to go back and check everything and make sure all of those boards are secure by walking across and checking and making sure you have screwed things to the floor appropriately,” Harper says.
Next, mark out the tile layout. “Don’t start with the tile against one wall and go across the room,” Chumbley says. It’s better to start from the center of the room and work your way out. The layout of the tile is typically marked in chalk. The width and color of the grout are part of the aesthetics. The tile layer can use spacers to keep the tiles evenly apart as the pattern progresses.

Tile Floor 5: R.M. Buck Builders, original photo on Houzz
Finally, the tile may be set with mortar. Different types of tiles need different types of mortars or adhesives, so DIYers will need to research this and not grab the first can of mortar on the hardware store shelf. Typically, you need to let the mortared tile set for a day before grouting it. But there are some fast-dry adhesives that, if appropriate for the type of tile you are using, can speed up the process.
Once the tile is set, it’s time to apply the grout. You should take care to choose a grout that works with your particular material. “Glass can get scratched with grout,” Smith says. “There’s different grout for floors and shower walls.”

Tile Floor 6: JAUREGUI Architecture Interiors Construction, original photo on Houzz
Cost range: Labor, which varies greatly by region, may be charged by the square foot ($3.50 to $9) or the job ($300 to $600 per day for tile layers). The tile itself can cost $4 to $125 per square foot, and you also will need backer board or membrane, mortar and grout.
Typical project length:Three days, especially if demolition is involved. Cement board and mortar usually need a day each to set.
Permit: Often not required, but check with your local building department.
Best time to do this project: Since it’s indoors, any time of year is fine.
How to get started: Assess what your room needs and whether you will DIY. If not, find a good tile person.
The 4 Phases of Remodeling: The Renewal of Vows
Passing the midway point of a remodel can be an exciting time. After weeks (or months, but hopefully not years) of being in a state of disarray, things finally start to feel as if they’re coming together.
You’ve experienced the fast-paced bliss of the Honeymoon. You’ve trudged through the slowdown that comes with the Midproject Crisis. And now? Now you’re ready to gaze lovingly into your contractor’s eyes again.

Vows 1: Priority 1 Project Management, original photo on Houzz
Everything you’d hoped and dreamed about when you first envisioned your project is coming true, and you’re feeling ready to say “I do” all over again. It’s time for the remodeling phase I like to refer to as the Renewal of Vows.
You probably won’t hear your contractor refer to this phase as such (but how fun would that be?). Just as the Midproject Crisis is more commonly referred to as the mechanical rough-in stage, this phase has other, more industry-standard names. You will probably hear words like “finish out,” “trim out,” “mechanical trims” or “finishes.”
And, as you can probably guess, this phase is about finishing and beautifying the work that was started in the first couple of months. There’s a lot that may (or may not) be involved in the finish stage of your job, depending on your scope of work, but here’s a list of the most common steps that happen during this phase.

Vows 2: Traci Connell Interiors, original photo on Houzz
- Sheetrock. Holes made during rough-in will be patched, new Sheetrock will be put up at any new walls or ceilings, and texture will be applied to make your walls look like walls again.
- Trim carpentry. There are a few different types of trim that may be installed at this phase: baseboard (which runs along the joint where the bottom of a wall meets the floor), door and window casing (which is installed around the perimeters of doors and windows) and crown molding (which is run along the joint where the top of a wall meets the ceiling). Trim is purely optional — some more contemporary designs forgo it entirely — but it is meant to create a finished, unified look.

Vows 3: TOTAL CONCEPTS, original photo on Houzz
- Cabinetry. The installation of cabinetry is usually around the time when I see a little glimmer come back into a homeowner’s eyes. This is when the kitchen starts looking more like a kitchen, but it’s also when you can visualize how your other storage pieces, such as built-ins and bathroom cabinets, will change the function of your home.
- Related: Shop for Kitchen Cabinets
- Electrical and plumbing trim. This is the other big “wow” that comes with the finish-out phase. A master bathroom can start to look completed when tile and cabinetry is installed, but throw in a freestanding tub and a shower full of rain heads, handheld fixtures and a steam unit, and suddenly you’re not looking at a mostly done, unidentifiable space — you’re looking at your master bathroom.
The same goes for electrical items like decorative light fixtures or appliances. Seeing new stainless steel (or whatever your preferred finish is) appliances being brought into and installed in your kitchen make most people go starry-eyed and drool a little. No judgment here — I’ve done the same.

Vows 4: DKOR Interiors Inc. – Interior Designers Miami, FL, original photo on Houzz
- HVAC trim. I mentioned in the last installment that most HVAC work is done during the rough-in stage, so what is left? Essentially, all that needs to be done is the installation of vent covers and thermostats and maybe a little tweaking of the air-conditioning system. Nothing too exciting, but it should be noted nonetheless.
- Miscellaneous. Like I said, there is a lot that can be going on during the trim-out stage. Flooring — such as carpet, wood, tile or laminate — will be installed. (Flooring installers are known for insisting that they be the absolute last people to work on a house.)
Tile will go up in showers and as backsplashes. Countertops will go in. Priming and painting of walls, ceilings, trim and cabinetry will be completed. A little landscaping may even be done.

Vows 5: Viyet Luxury Consignment, original photo on Houzz
There are a million moving parts during the mechanical finishes phase. And I admit, as a homeowner and general contractor, this is exciting to see.
Just like during the Honeymoon, a lot of visibly quantifiable work is being completed. Only this time, instead of things being torn up and thrown out, they’re being brought in and installed. The puzzle pieces are finally fitting together, and you are starting to see the big picture. (Dreamy sigh.)
I’ve harped repeatedly about how communication is key, and this still rings true during the Renewal of Vows stage. But patience is also important.
As you see new things being carried in and installed, it can be so tempting to begin moving back into your new space or using your new kitchen. But your contractor may still need some time and space to work.
There are last-minute items that will ultimately guarantee your satisfaction that need to be taken care of before you and your family can begin enjoying your new remodel. So hang in there, and your patience will be rewarded.

Vows 6: Jay Jeffers, original photo on Houzz
You may be thinking: There can’t be anything left, can there? That’s it, right? Everything is installed, the house looks like a house again, time to move in and get settled. Not so fast. You’re almost there. Find out what final bits and pieces are involved in the end phase of a remodel, what I like to call the Happily Ever After stage.
