
 Facebook
 X
X
 Pinterest
 Copy Link
Raise a Glass and Celebrate the New Year!


Sparkles. Confetti. GLITTER. All New Year’s Eve staples. In fact, we’re pretty sure that New Year’s Eve is the quintessential holiday for all things glitter. Whether your plans involve throwing a party or attending one, here are some creative ideas to step up your game.
Confetti Wands: All you need is clear tubes and confetti, how simple is that?! Once you stuff them, lay them out somewhere all your guests can easily find them (so probably by the bar). We know what you’re thinking: “Don’t they make a mess?” Well yes they do, but what fun can you have without making a little mess?! So sparkly and festive!
Bubbly Bar: It’s not a New Year’s Eve party without one of these. A “bubbly bar” allows your guests to taste and personalize their champagne drinks. A bar cart is a great alternative if you want to make the bubbly bar a mobile attraction. They’re the perfect display for your champagne and treats. P.S. metallic straws are totes all the rage. Pop, fizz, clink!
Golden-Brushed Balloons: Go out and get a dozen helium-filled white latex balloons with strings attached. Wear gloves and hold the balloon by the tied end. Use gold enamel paint or “liquid gold leaf” and apply to balloons in quick, upward strokes. Make sure to only gild the bottom third to get this look. OR you could just buy gold balloons if you’re running low on time/gumption/is it 2016 yet?
Sparkly Bottles: Glam up your bottles and make them as sparkling as the wine inside. Grab a can of Super 77 adhesive spray, latex gloves, an old sheet, and as much glitter as you can find. Spray the bottle and sprinkle glitter over the adhesive one section at a time. Repeat until the whole bottle is covered, then shake off the excess glitter and display. Make sure to leave the top third of the bottle clean so you can pop the champagne! Hint: this is probably the easiest, yet most effective way to take your shindig to a whole new level!
Quirky Tip: Add a little extra something by hanging a fortune cookie off of each champagne glass. Everyone is going to want to know what’s in store for them once the clock hits midnight. And we all know fortune cookies always tell the truth.
New Year’s Eve is obviously the perfect reason to get fun with your champagne, so try something new this year! What’s better than some good ol’ bubbly? PINK bubbly. Cuz everything’s better in pink. Check out more ideas and details on our Pinterest page.
How To Prevent Your Pipes From Freezing


As winter temperatures begin to creep up around your home you may start feeling nervous about your water pipes and plumbing. If so, you’re not alone. Frozen pipes (or rather, burst pipes) can cause expensive water damage to your home and property. Even a small tear in a water pipe can send hundreds of gallons of water each minute into your home. According to the Insurance Information Institute, one in 55 homes will submit a property damage claim due to water or freezing this year. Given the fact that many homeowners take the winter holidays to travel and leave home, it’s important to know what preventative measures you can take to winterize your home. Here are some tips for protecting exposed pipes from freezing temperatures.
Wrap and insulate pipes and plumbing
You can purchase inexpensive foam pipe covers at the hardware store and wrap pipes or plumbing to prevent heat loss inside the pipes. You can also invest a bit more money and create a more permanent insulation environment for your plumbing by thoroughly wrapping pipes with layers of thick fiberglass insulation. This can be a DIY project or you can hire a plumber to do this for you. Keep in mind that the cost to fix a burst pipe runs an average of $5,000, so spending money to properly insulate your home is a smart way to approach this project.
Identify exposed pipes
Exposed pipes are pipes that are not insulated and may be subject to greater shifts in temperatures. This could include pipes located on the exterior of your home, pipes that lead from the exterior to the interior, or plumbing located in colder rooms like the garage, the attic or the basement (37% of frozen pipes occur in the basement). For faucets or plumbing located outside, like an exterior faucet, you’ll want to follow these steps to get them ready for winter. If you plan on being away from home for a long period of time, it might be a good idea to shut off the water supply and open all of the taps until they run dry.
Why frozen pipes burst
The rips and tears that occur in a frozen pipe aren’t primarily from the expansion of ice: ice blockages create a build up of pressure between the ice and the faucet, and it’s this increase of pressure that actually breaks the pipe. (It should be noted that the expansion of ice can directly cause damage to connection points or weak plumbing.) Additionally, several ice blockages might occur within the same pipe, as can several tears or breaks. The water leaks out when the ice melts and releases the water trapped behind it. Homeowners might not actually see the damage until just after winter, when temperatures rise, ice melts, and water starts leaking into the house. Water can freeze in the plumbing when temperatures reach 20 degrees Fahrenheit, however it has been determined that wind chill factor can increase the likelihood of frozen water so even temperatures higher than 20′ F can result in risk.
Don’t turn off your heat
If you plan on being away from your home for an extended period of time, like for a long holiday break, think twice about turning off the thermostat. First, with the temperature off or set too low, even your pipes located within insulated walls have the potential to freeze. Second, when you enter a freezing home and crank up the thermostat your heating unit will have to expend a tremendous amount of energy to warm up the home, costing potentially more money and stressing the system. Set the thermostat to a temperature you deem safe for being away and consider opening up interior doors and cabinet doors to keep the warm air flowing to all of your plumbing. If you fear a burst pipe, install a water sensor that can remotely alert you to the presence of water inside your home.
Leave the water running
If you are expecting freezing temperatures you can turn on a faucet and let the water run in a steady but small flow. An open tap releases air pressure from inside the pipe, and can prevent tearing. So even with a blockage of ice inside the plumbing, an open tap can keep the pressure from building between the blockage and the faucet. If you have both hot and cold taps then leave both open.
Homes most at risk
Homes located in regions that experience reoccurring freezing winter temperatures are usually constructed with well insulated pipes and plumbing. Unfortunately, homes built in Southern climates where only occasional freezing occurs are potentially more at risk for burst pipes. Homes in these warmer regions aren’t usually constructed with frost in mind and homeowners may be caught by surprise by a singular, but damaging, winter ice storm. Regardless of which area you live in, if you suspect air leaks or are wondering if your home needs additional insulation, consider hiring an energy efficiency expert. This expert utilizes specific measuring tools and devices (like infrared technology) to understand exactly where heat loss is occurring in your home and can make recommendations as to how to make your home warmer.
How you can tell if your pipes are frozen
The test to tell if your pipes are frozen is simple: just turn on your faucet or flush the toilet. If no water comes out, suspect a blockage of ice. Turn off your water supply immediately. You may be able to use a heat source like a hair dryer to warm up the pipe and melt the ice however, be aware that any dripping water can cause the potential for electrocution. Never use an open flame as this could cause a fire. Always call a plumber right away if you suspect damage to the pipe or if you aren’t sure where the blockage has occurred. Find an expert on Porch.
This article originally appeared on Porch.com
Written by Anne Reagan
![]() Porch.com is the free home network that connects homeowners and renters with the right home service professionals.
Porch.com is the free home network that connects homeowners and renters with the right home service professionals.
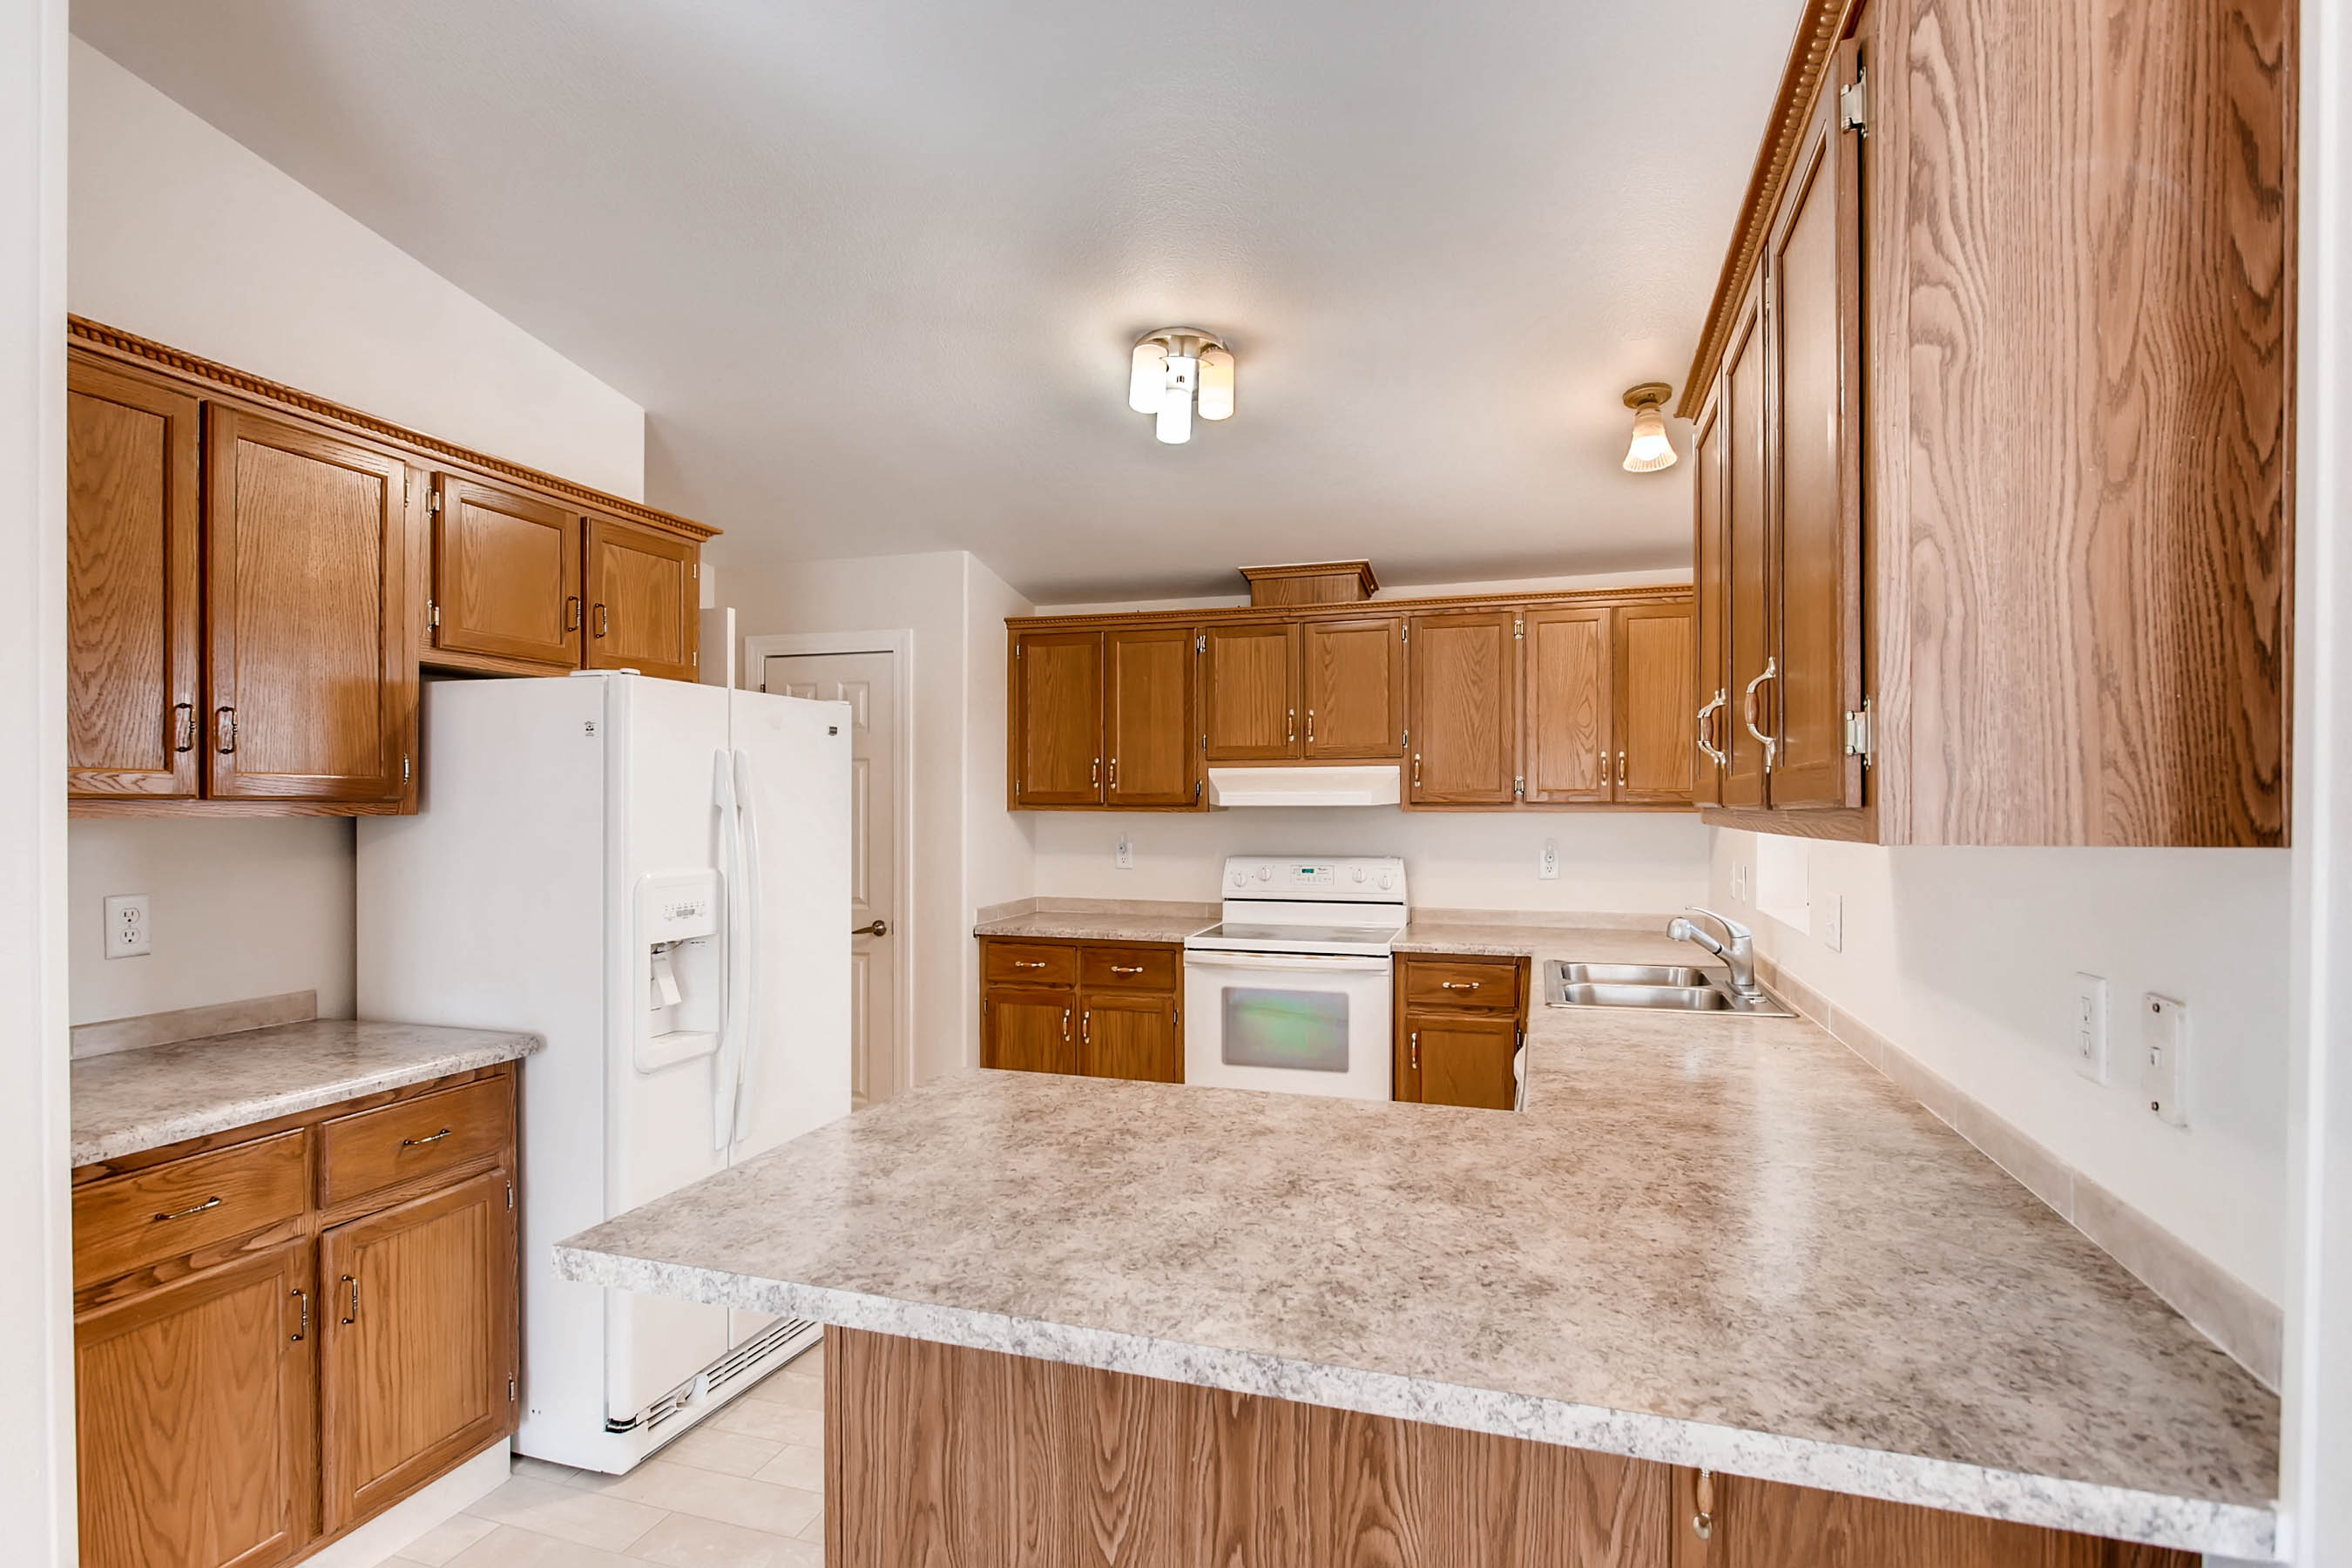
Homey Ranch In An Active Community
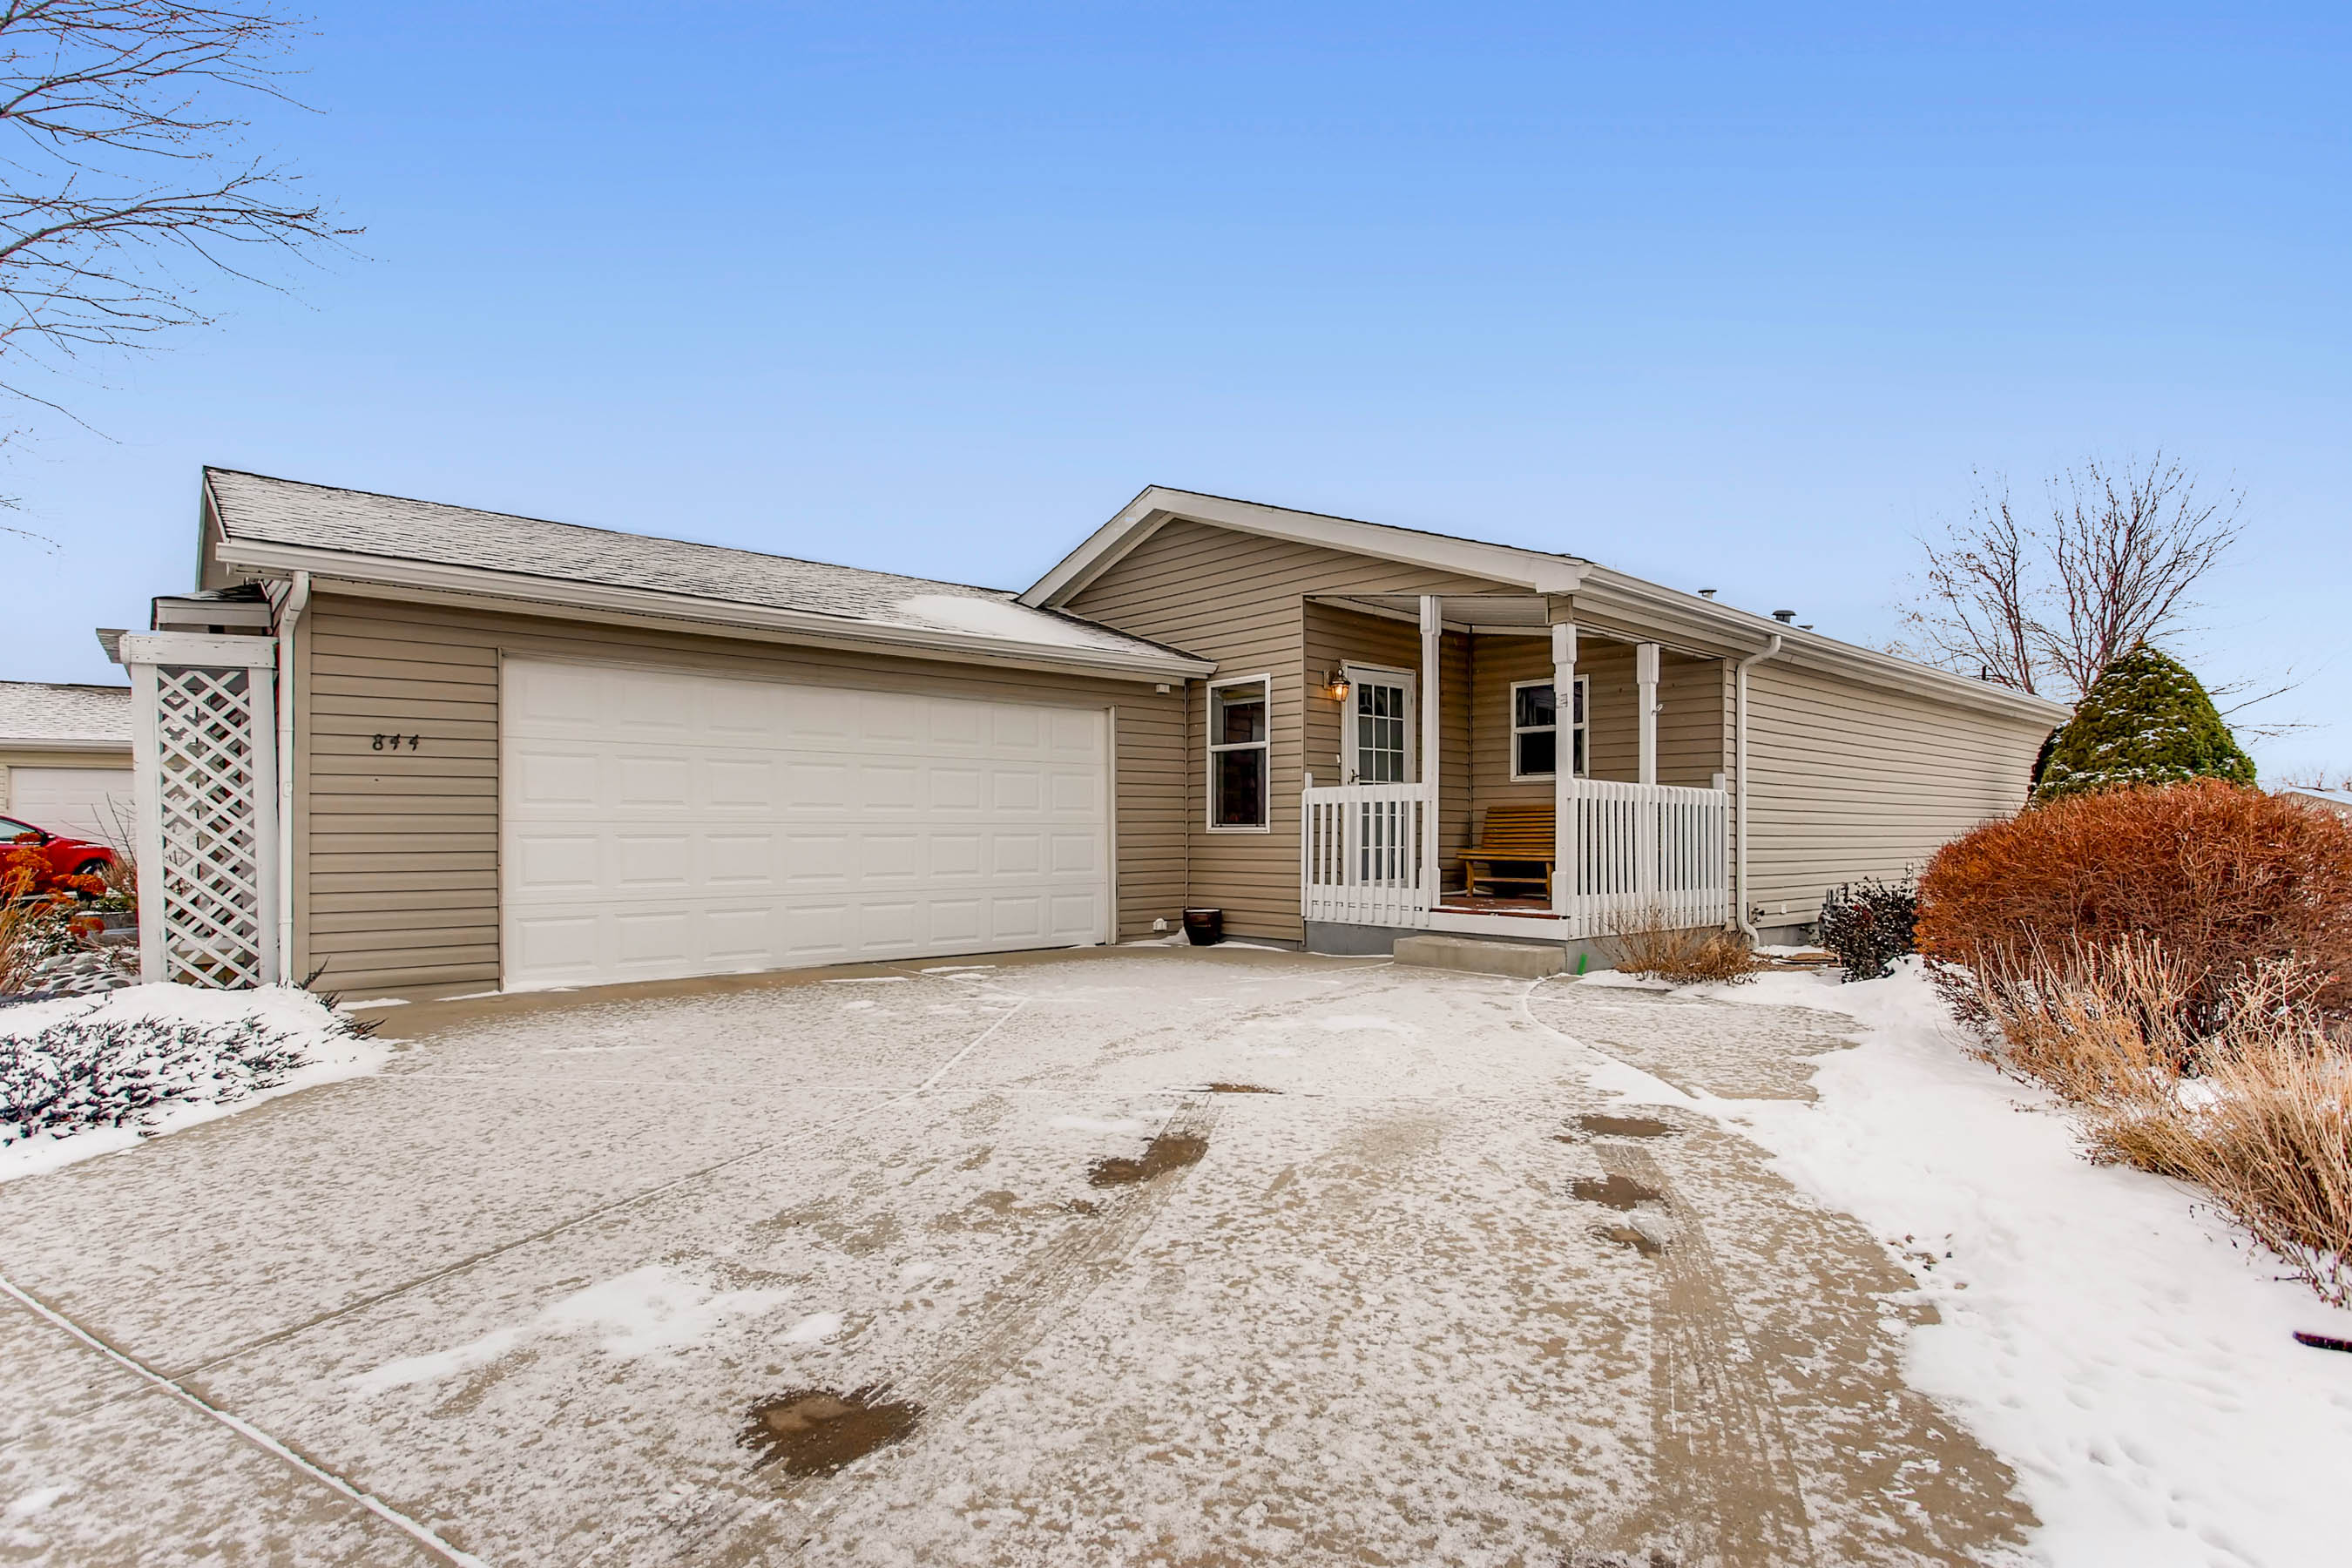
Featuring 2 Bedrooms, 2 Bathrooms And 2 Patios!
Enjoy the active lifestyle in this 55+ gated neighborhood w/ weekly community activities! Open ranch style home features no stairs, 2 bedrooms, an office and 2 baths. New carpet, luxurious vinyl tile, counter tops and paint. Superior location, backing to private open space with two patios and nice yard. Finished 2-car garage and all appliances stay. Lot rent and monthly fee of $878 includes clubhouse, exercise room, billiards, hot tub, pickle ball courts, monthly calendar of group activities and fun events.
For more information, please visit: http://windermerenoco.com/listing/73695246. You may also call either Aaron Pearson or Susan Ruff at (970) 460-3033.

A Beginner’s Guide to Managing a Remodel
Browsing photos and ideas can be a fun part of creating your dream room. But making your designs a reality also takes smart planning and organization. Project management is an essential part of remodeling, and there’s nothing like the feeling of implementing a plan to create something new and beautiful. These tips can help you achieve your desired results.
Find a Local Contractor to Create Your Dream Home

YourSpace Contractors, original photo on Houzz
Become a list writer. Making lists is key when it comes to project management. It’s the only way to properly organize your thoughts and prevent any details from being forgotten.
The most important list is your scope of work, or specifications, document. This is basically a detailed list of everything to be done, from start to finish. If you’re dealing with one main builder who’s organizing all the work, then you’ll need to make sure he or she gets a copy, so the goals are clear and all the information is provided.
Also, having detailed specifications makes it easier if you want to obtain multiple quotes, and you’ll know it’s a fair comparison since all the builders will be quoting using the same criteria.

frenchStef Interior Design, original photo on Houzz
Make sure you’re all on the same page. If you’re coordinating separate subcontractors (cabinetmaker, plumber, electrician), then it would be worth indicating who’s responsible for each task. Give a complete copy of the specifications to all of them, so they’re all aware of what everyone is doing. Discuss the specifications with your subcontractors since they may be able to provide help and advice. A schedule is also useful, so you can keep track of progress and everyone knows who’s going to be on-site on which day.
With prior knowledge that a partition wall will feature some lighting, for instance, the builders will know to leave the stud frame open for the electrician to run the wires through before it’s boarded up and plastered over. Trying to feed wires through after the fact is much harder, takes longer and risks unnecessary damage.

Sian Baxter Lighting Design, original photo on Houzz
Break into subsections. In addition to your main specifications, it’s a good idea to have sublists for each separate element of your design. For example, your main specifications may say “install 6 x recessed LED downlights in ceiling,” but your lighting specifications will detail where they are to be positioned, the type of bulb, the hardware finish and so on. The more information you provide, the more accurate your quote should be and the less likely it will be for mistakes or misunderstandings to occur. It will also minimize any unexpected costs.
This bathroom has a minimalist elegance, but it’s far from straightforward. This project would have required a builder’s spec, including layout and elevation drawings with dimensions, an electrical spec with lighting plan, a plumbing spec with layout drawing, and a decorating spec — phew!
Plan like a pro. Finalize your design before starting any work, rather than trying to do it as you go along. The process will be much more enjoyable without constant deadlines presenting themselves, and if you haven’t planned, you may find your options restricted based on work that’s already taken place.
Take a couple of weeks to put it all together, write your specifications, draw up the plans, get everything ready and make all the decisions before proceeding. This will save you time and money along the way, and significantly reduce stress levels during the project.
This clever design features well-thought-out lighting and custom cabinetry. Careful consideration would have been given to where to position the outlets, radiators, lights, switches and other details.

Yellow Letterbox, original photo on Houzz
Never assume. You know the saying. When writing your specifications or drawing your plans, never assume that someone else will know what you want unless you explicitly state it. Include every tiny detail, no matter how picky it may seem. As well as avoiding mistakes, it also prevents any disputes over what is and isn’t included in the quote.
This bathroom just wouldn’t have looked the same if white grout had been used, for instance. You may think it would be absurd to even consider using white grout in this case, but if you haven’t asked for dark gray, you can’t expect it and you can’t assume that you will be asked what color you want. White is standard, and a tiler may use it if nothing has been specified.
Stand by for decisions. Your builder will present many questions and decisions to you along the way. Which tiles do you want on the walls? Where do you want these wall lights? What color do you want on the baseboards?
Your best bet will be to try to pre-empt as many of these decisions as possible and have the answers ready or, even better, provide the information in advance. Making these decisions under pressure can lead to impulse moves you may regret later. However, taking too long could hold up the project, costing you time, money and the patience of your builder. No one wants an unhappy builder.
Inevitably, there will be some questions you couldn’t have anticipated, but if you communicate well with your contractors, they should, where possible, give you time to make a decision without holding up the project. Don’t be afraid to ask their opinion on the best course of action, but don’t feel pressured to compromise on the design if you don’t want to.

Brilliant Lighting, original photo on Houzz
Give yourself time to deliver. This is one of the classic pitfalls, so take note. When pulling your design ideas together and deciding which products and materials to use, make a note of the lead times. Many pieces of furniture are made to order and can have lead times of up to 12 weeks, sometimes longer. Similarly, tile and natural stone can take much longer than expected to arrive, and products from abroad can encounter holdups during transit.
This chandelier was custom-made for the project and looks fantastic. This is no last-minute, off-the-shelf, next-day-delivery job. It can be a huge shame if you’ve spent hours, days, weeks choosing the perfect product, but when you come to order it, you find that it will take too long to be delivered, perhaps time you can’t afford. Then you have to decide whether to hold up the work or pick something else based on the fact it can be delivered quickly.
Find a Bathroom Vanity for Your Bath Remodel
Factor in a contingency. Even when you have the very best of intentions, issues that you couldn’t have predicted may arise during your project. So it’s a good idea to factor in a 10 percent contingency within your budget for these matters, especially with old buildings. Who knows what condition the walls are in behind those kitchen cabinets before you rip them out? Or what may be lurking underneath that carpet when you pull it up?
In these situations, it’s important to expect the worst and don’t let it throw you off your game. You are a project manager extraordinaire, and you’ve totally got this. Just accept that these things happen, find out what the options are and make a decision. Your contractors will be able to advise on what to do, so harness their expertise and trust them to help you find the right solution.

Elayne Barre Photography, original photo on Houzz
Call in the cavalry. If you choose to manage your project yourself, it’s certainly an enjoyable and rewarding process, but it also takes a certain type of person. You have to be organized, calm under pressure, strategic and confident — not to mention being able to afford the time to plan, coordinate and oversee the work.
If you have qualms about taking it on yourself, then consider hiring a project manager. Yes, there will be a fee, but consider that a badly managed project can cost you time and money, and you may not achieve the results you were after. A pro will take care of everything and allow you to rest easy, knowing you’re in safe hands.
Keeping Up with The Joneses: Seven Yard Tools a First-Time Homeowner Needs

So basically, when you have a baby and wife and a career, your home reno slows down a little when your extended family flies back to their respective time zones. Last month, we shared about that pesky 15% of a project that gets left undone. And maybe we still haven’t fixed the grout line in the shower but… we did start a new project! Cleaning up the yard!
Did you know that gardening tools are really expensive? I didn’t. We even priced out what it would cost to have a landscaper come every two weeks just to mow and edge our front and back yard (which would leave us to the weeding, sweeping, etc.) but alas… that is also expensive (about $100 per month). So… Hi-ho, hi-ho, it’s off to Home Depot we go…

Seven Yard Tools All First Time Home Buyers Need:
Lawnmower: Self-propelled so you don’t have to work as hard. Just being real. Our lot is about 7,000 square feet so there’s a whole lot of other things I will do to break my back. Mowing the yard doesn’t have to make the cut (the cut… because it’s a lawn mower… get it?) $399 + gasoline (verses $150 for a bagless push mower… ain’t nobody got time for that.)

Weed-eater: Not just for trimming weeds but more for making the edges of things look more like edges rather than wobbly overgrown lines. It basically gets to the stuff your mower can’t. My dad advised we buy a gas-powered trimmer – he said they last longer and can be more powerful. A little more tricky to start though and more maintenance. I guess we could have gone either way. Who knew gardening would be such a gamble? No wonder my wife loves to garden. She also loves the casino. $119 + gasoline (Sorry, environment!)
Hose Reel: Speaking of my wife, I called Jenn from Home Depot and told her that I had found the perfect solution to our front yard hose, all coiled up on the ground. I had found a $70 hose reel/box. It was the prettiest hose box I had ever seen. My wife said that spending $70 on a plastic hose box may be a little extravagant so we met in the middle and purchased this $30 reel that seems to do the trick.

Gardening Gloves: Protective gloves are probably the cheapest thing on this list… yet we have not bought them. After paying over $100 for literal dirt to fill our raised garden boxes, I guess some luxury had to be sacrificed. $3.98/pair which is less than my typical triple shot Americano (which is a luxury I cannot part with.)

Hedge Trimmer: I haven’t used ours yet as my wife has taken up hedge trimming to express herself artistically. The previous owner of our 1940’s fixer was really into her yard and planted some really cool stuff over the last 65+ years. But as she aged, the yard was less tended to and some of the larger bushes took on a life of their own. This trimmer does the trick. I recently asked Jenn to commission a topiary of our dog, Whiskey. She declined. $49.97 for a corded trimmer.

Push Broom: Good for sweeping up the big mess you make when you’re trimming stuff. I love that ours is called the “Quickie Bulldozer.” Doesn’t that just radiate power and sweeping efficiency? $9.98 well spent.
Blower/Vacuum: I experienced the thrill of my lifetime when I realized that our electric leaf blower was also a vacuum! Perfect for sucking up all the lawn clippings left behind from the weed eater. It puts that Quickie Bulldozer to shame. It’s got a max air speed of 250 MPH for $63.21. Enter manly grunt akin to Tim “The Tool Man” Taylor.

What Millennials are Looking for in an Apartment or Condo


LinkedIn recently told us that 4,279 new apartments were added to Seattle’s local inventory last year, and based on the number of cranes you constantly see around the city, we believe them. With so many choices, Millennials are getting really specific about what they want in a living space and the lifestyle it provides them. Here are some of the amenities we’re told that Millennials have come to want, and in some cases, expect:
1. Parking & Electric Car Charging Stations
2. High Speed Internet and WIFI (around the entire building). Preferably free WIFI on the first floor
3. State of the Art Fitness Center – Fitness centers not only act as a place for exercise, but now a place to casually socialize and build friendships. For instance, when a developer integrates fitness classes into the gym, they are creating a space where tenants can connect with their building community.
4. Dog Grooming/Washing Facility & Outdoor Pet Run: As many millennials are postponing starting a family to focus more on their career, their pets are like their children. With that said, an apartment building that doesn’t allow their fury friends will ultimately be losing out on a big portion of the millennial pie.
5. High- Tech Control Automation: Using smart technology to control your thermostat, lights, switches, sensors, and locks while you are away.
6. Business Center/ Work From Home Space: With remote work becoming an increasing popular trend, the potential ways of catering to work-at-home tenants are limitless.
7. Laundry Facility/Service and Dry-Cleaning Drop Off/Pick Up- Laundry is a hassle, and most renters want the burden of doing laundry to be, well, less burdensome. Programs like “Laundry View” are used in some apartment buildings to view how many washers and dryers are in use. It will also send you text alerts when your laundry is done.
Read the full article on LinkedIn.
Buying Waterfront Properties – What You Should Know Before Taking the Plunge


Living on the Water Is a Lifestyle
Enjoying direct and private access to the water is typically the primary motivator for buyers seeking a waterfront property. As such, it’s really important to consider how you intend to use your waterfront. For example, if you’re a boater, evaluate the moorage at the property. Is the water deep enough for your particular type of boat? Is there a boat lift to keep the boat out of the water when not in use, or do you plan to dry dock for the winter? If you’re a swimmer, is the lakeshore accessible to wade in, or do you have to jump off a dock or platform? If you have jet skis, sail boats or other water toys, is there a place to store them or moor them? If you’re looking forward to peaceful days on your stand-up paddle board, is the water in front of your home typically choppy or calm? When you entertain, is there ample parking for guests or space for visitors to tie up their boats on your dock?
Your directional orientation will also impact your waterfront living experience. East-facing waterfront will allow you to enjoy wonderful sunrises. If you prefer sunsets, west-facing waterfront is preferable. South-facing properties generally enjoy light all day but can also experience more direct weather.
Focus on the Property More than the House

The golden rule of real estate, “location, location, location,” is even more true when considering a waterfront property. The ratio of land value to total property value is generally higher in waterfront properties. You can always update and change your home, but you cannot change the location. Consider especially the following features of the property:
- View. One of the great perks of being on the water is enjoying the beautiful views. Understand if your view is protected by CC&Rs or view easements. If there are any view-obstructing trees or structures, identify whose property they are on and your ability to maintain your view.
- Proximity to the Water. If the home is not close to the shoreline, consider how you’ll access the water. If you plan to entertain lakeside, think about how you’ll get food, beverages and supplies down to the waterfront easily.
- Privacy. The property’s feeling of privacy usually corresponds to its waterfront frontage. The larger your waterfront frontage, the more buffer you’ll have from your neighbors.
- Topography of the Land. Is the waterfront property on a level lot or a steep slope? Access to the water is easier on a flat lot – many lakefront lots are steep and can be difficult to get up and down to. Again, this impacts the value of the property.
Understand What You Can and Can’t Do with the Property

Waterfront properties are subject to additional regulations and codes from various local, state and federal agencies. There are very strict regulations on shoreline development. If the property requires a new dock or bulkhead, it’s important to know that this can be a very challenging process given the multiple government agencies involved. These limitations are likely to get even more restrictive in the near future as the shoreline regulations are being updated. Sooner is better than later in applying for any permits related to docks, bulkheads and changes to the shoreline.
Finally, if you’re planning to build or significantly remodel, do a thorough feasibility analysis given city codes and shoreline regulations. New construction often cannot be built as close to the water as the existing structure under current code. In addition to meeting with the city, engage an architect and builder who have significant experience building waterfront properties in your area to help advise you about what likely limitations there are on your particular parcel.
Every Waterfront Property Is Unique – Learn the Nuances

Living on the water means that you have an additional set of factors to consider concerning your waterfront experience. For example, what is the boating traffic like in front of your home? Is it a busy channel or near a favorite fishing spot where boaters tend to congregate? Look closely at the properties of your waterfront neighbors: is there a tear-down next door so there will likely be a construction barge in front of you for the next few years? Does your neighbor have a huge yacht moored all summer that blocks your view? Is there a public beach nearby or community club that will cause noise late into the evenings?
If you’re considering shared waterfront, be especially thorough in understanding your rights and ownership interests. Some shared waterfront properties have a specifically deeded boat slip, though many others share an interest in a community dock. The system for moorage assignment and rotation can often lead to contention among neighbors, so it’s important to learn as much as you can about how the shared waterfront and is handled in your neighborhood.
There is a reason that owning a waterfront home is a life-long dream for so many people – it brings an extraordinary lifestyle. As a significant financial investment and very unique type of real estate, it’s especially critical to engage professionals who understand the complex issues inherent in waterfront properties. Equipped with the right expertise, guidance and knowledge, you’ll be ready to turn to your waterfront dream into a reality.

Kelly Weisfield is a Premier Properties Director and works out of the Windermere Real Estate Mercer Island office. She has the privilege of helping her clients with waterfront, view and luxury homes on both sides of Lake Washington. Prior to becoming a real estate agent in 2011, she was an attorney for 11 years.
Stage Your Home to Impress Holiday Guests


A few tricks used by professional home stagers can make your home holiday-guest-ready, even if you’re preparing for a visit from your in-laws, not potential buyers.
While friends and family might be more forgiving than a home-shopper would be, you’ll still want to create a clean and uncluttered atmosphere for making holiday memories. A major difference is, for friends and family, you don’t need to depersonalize. Tastefully placed photographs and kids’ hand-made masterpieces can help make a house a home, after all.
But you do want to make your place look and smell clean, and you might even want to evoke a sense of holiday magic and warmth. Michele Graham, a Long & Foster regional administrator and accredited home stager who works with agents in the greater Philadelphia area, offered these tips:
Cleanliness first. Make bathrooms sparkle and shine, since these are rooms every guest will probably see. Add fresh cut greens on top of the window treatments, and set out festive holiday hand towels or napkins. Keep small caddies of cleaning supplies in the bathroom and kitchen, or at least on each level of the home, to make clean-ups faster. In the kitchen, run a piece of fresh lemon through the garbage disposal and wipe off the splash guard, which can collect grime.
Clip an automobile air freshener to your shower curtain in a hidden spot to keep the bathrooms smelling good. You can use dryer sheets to do a quick dust job or polish up chrome faucets. Baby oil will make stainless steel appliances shine.
Add sparkle. Put something shiny in every room, whether it’s mirrors, mercury glass, silver or gold candlesticks, picture frames, or a string of white lights. The light will bounce off eye-catching shiny and metallic surfaces.
Bring in some green. Liven up your mantle or table with evergreen branches, holly boughs with berries, dogwood, and other décor provided by nature. You might find the perfect accents right in your own backyard.
Layer and add depth. A few silver and gold accessories add formality, while plaids and burlap are more casual. Embrace the palette of the season, with its gray sky, snow and evergreens. Even after the holidays, you can use white and silver accents around the house. You can add a pop of color using throw blankets and pillows.
Festive curb appeal. Greet your guests upon their arrival with window boxes filled with fresh-cut greens or even fake ones. Holly branches, pine cones and shiny round Christmas ornaments catch the eye.
Graham said you don’t have to spend a lot of money to get your home ready for the holidays. Most of the items she recommends can be found at dollar stores and thrift shops.
And one of the best ways to brighten your space is free. “Keep your window treatments open to let in as much natural light as possible,” Graham said. “It will add a wonderful glow to accent your décor.”
Holiday Mantel Glam Decor


Anyone who has a fireplace can appreciate how versatile a mantel is. It’s easy to change its look with the different holidays and seasons. And there’s no better season to do this than Christmas. Hang a wreath, decorate it with candles, ornaments, and twinkling lights. The options are endless. If you’re not sure where to start, pick a theme. Here are some ideas to consider.
Gilded
Gold never goes out of style – especially when it comes to the holidays. If you choose this theme, the majority of your pieces on your mantel should be gilded in one way or another. Generally, it’s good to have a centerpiece. Try a gilded metal wreath to hang above the mantel and make a bold statement.
All White Everything
Nothing says Winter Wonderland like an all-white theme. All-white is pretty glam as it is, but you can use these stockings to add that little extra je ne sais quoi. What’s even better is you can keep it on after the holidays, through the winter. Add a mirror to the wall above the mantel for added appeal.
Go Green
Go natural with some lush greenery. Create a base of winter greenery and lights, then layer on the Christmas touch with holiday candles and reindeer. Once the holidays are over, switch out the Christmas candles for plain ones and put away the trees and stockings. Leave the garland, crystal and silver candlesticks, and even the wreath for a fantastically decorated fireplace focal point for the remainder of the winter season.
Start with a pre-lit sparkling garland along the mantel top and a pre-lit wreath above. Add in some pine cones, candles (in mason jars or try glassy-babies), and silver accents in whatever way you deem fit. Add some white stockings with a variety of textures and designs and you’re ready to go.
If you have kiddos running around your house, a colorful theme is a good way to go. You can’t go wrong with reds, blues, pinks, greens, oranges, etc.; anything bright makes for one of the most festive themes! You can make a DIY Ornament Garland if you have a bunch of leftovers from your tree. Take a few boxes and frames, wrap them with colorful paper and bows, and lay them tastefully on your mantel.
See our Pinterest board for some visual inspiration!
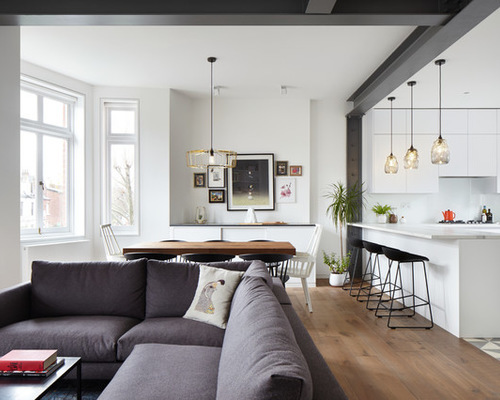
5 Tips to Improve Indoor-Outdoor Flow
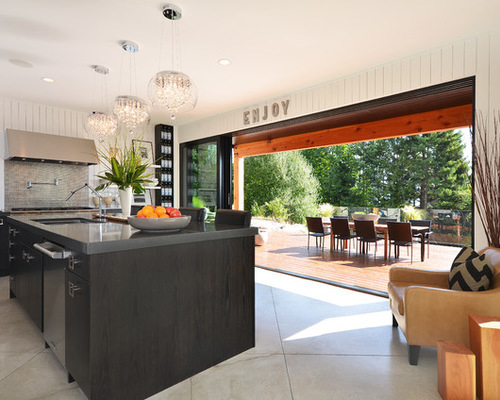
Wouldn’t you love to double the size of your house for the holidays, or when you’re entertaining a large groups of friends? And when the party is over and all the guests have gone home, have your nice, cozy house back just like that?
It doesn’t make sense to maintain a large entertaining space that gets used only a couple of times a year. That’s why it’s so practical to have a functional and efficient indoor-outdoor space.
Modern Outdoor Spaces: Blurring the Lines Between Indoors and Outdoors
Having a well-designed outdoor area adjacent to your main entertaining rooms is a great way to get more space when needed and to add value to your home. The indoor-outdoor concept is not a new idea, but when you combine it with an open floor plan, you can create a large entertaining area that your guests will savor.
Here are some tips to make sure you get the most out of your indoor-outdoor design.

Dawna Jones Design, original photo on Houzz
Create a big opening. Don’t be afraid to invest in big openings between your indoor and outdoor spaces. Large pocket or accordion doors are a great way to blur the visual barriers between the two areas. When weather permits, you can open up the exterior wall and instantly double the floor space.

IndoorOutdoor 2: Giulietti Schouten Architects, original photo on Houzz
Keep it covered. It’s always best to have a combination of covered and uncovered outdoor spaces — but be sure to provide a covered entertaining area if at all possible. Essentially, you’ll be creating a series of outdoor rooms that will give you a sense of place without taking away from the fact that you’re outdoors.
Browse Thousands of Outdoor Umbrellas

JMA (Jim Murphy and Associates), original photo on Houzz
Make it level. The goal is to remove any visual or physical barriers between the two spaces — including any changes in floor level. Making sure your indoor and outdoor spaces are on the same plane assures they’ll function as one space when needed.

IndoorOutdoor 4: Horst Architects, original photo on Houzz
Create floor flow. Choosing a flooring material that works well inside and out is another great way to make the two spaces feel connected.
Take advantage of the view. There is nothing more impressive than a large, open space that takes advantage of an incredible view. Make sure you orient your interior to look at the vista through the adjacent outdoor space. This way you’ll get to enjoy the view from both inside and outside the house.
The truth is, great design is less about the way your house looks (although it should look remarkable), and more about how it functions. A well-designed house will work better, cost less to build, be more efficient to run and maintain, and get you more for less.

IndoorOutdoor 5: GM Construction, Inc., original photo on Houzz
Great design doesn’t cost more to build than good design, but it sure feels a million times better to live in.
By Dylan Chappell, Houzz
