
 Facebook
 Twitter
 Pinterest
 Copy Link
Simple Bathroom Upgrades
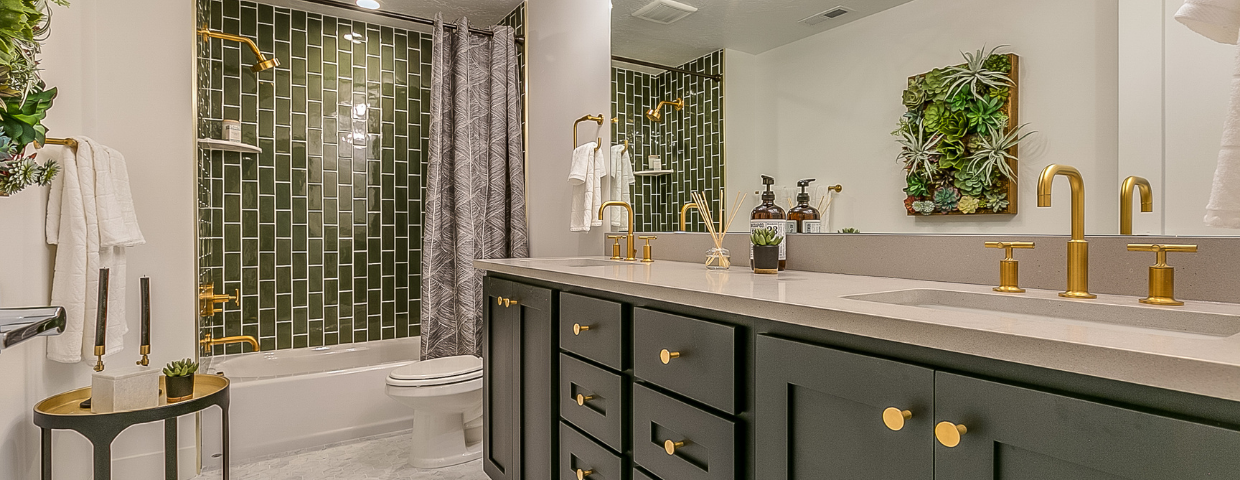
The thought of upgrading a bathroom often brings to mind large-scale renovations, demolition, and hefty price tags. Even projects like replacing a backsplash or repairing tile can be more involved than you might think. However, it’s possible to give your bathroom a makeover without breaking the bank (or your back). Whether you’re looking to just freshen it up or make it feel like your own personal spa, these simple projects can help take your bathroom to the next level.
Upgrade your Décor
If you want to make a big splash without spending big money, consider upgrading your bathroom with new décor. A fresh coat of paint on the walls or a bold, patterned wallpaper can completely change the character of the space, while accent pieces like a new shower curtain and towel racks can reinforce your color choices. Installing shelving is a simple, functional tactic that gives dimension to your walls. Whether it’s in the shower, above your toilet, or beside your vanity, a shelf can save surface space while helping to tie the room together.
Upgrade your Tub
Upgrading your tub doesn’t have to mean buying a replacement. Simply refinishing your tub will have it looking brand new and helps you save money. Over time, tubs accumulate cracks, dings, and discoloration due to mold, but refinishing can cure these imperfections right away. Start by removing all hardware from the tub. Sand the whole surface, fill in any cracks or holes with putty or epoxy, then sand them smooth. Apply multiple layers of primer and topcoat, give it a buff, and enjoy your brand-new bathtub.
If refinishing your tub is too much to handle, consider simply touching it up. Fill in any cracks and apply a fresh line of caulking around the surface. After this is done, shop around for new tub hardware to polish off your cost-effective bathtub makeover.
Upgrade Your Vanity
With just a few tweaks, you can turn your vanity area from a mirror with counter space to an impactful centerpiece. Instead of going all out with a new cabinet install, simply replacing your cabinet hardware and drawer pulls can make a big difference. Think of ways your new hardware can reinforce the style of your bathroom. Match them with your shower rod, faucet, and showerhead to make your bathroom more eye-catching.
Your vanity also offers a great opportunity to add some color to your bathroom. Giving it a fresh coat of paint will help to liven up the space at a low cost. For wooden vanities, a re-stain is a great way to give them new life. Start by removing the doors and drawers. Apply wood stripping to all surfaces, then let them sit for the recommended time. Now you can begin to scrape away the old finish. Sand down all surfaces and apply the primer before staining the wood. Once your stain settles in, apply a second coat and your vanity will be good as new.
Finishing Touches
Well-organized surfaces and compartments will help to create serenity in your bathroom. Whether it’s in the shower, the medicine cabinet, or below the vanity, look for multipurpose organizers that help cut down on bathroom clutter and save space. Add in natural elements like bamboo and river rocks to make your bathroom feel like a soothing sanctuary.
For more ideas on affordable home makeovers, check out our tips for upgrading your bedroom, home office, and kitchen.
Incorporate Pantone’s Color of 2020 into Your Home
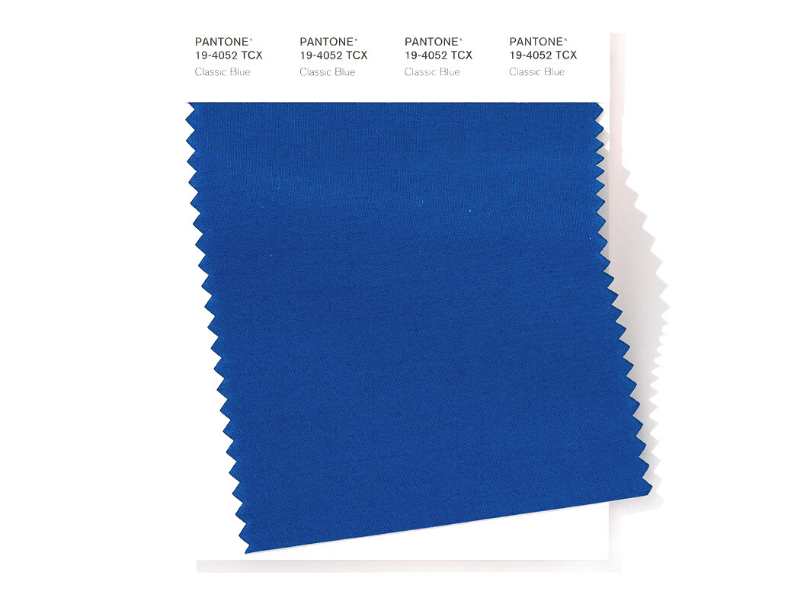

Classic Blue has officially been anointed Pantone’s 2020 “Color of the Year”. Pantone says it picked this color because of its ability to instill calm, confidence, and connection as we cross the threshold into a new decade. A dependable color, Classic Blue is timeless, and enduring, making it a great addition to just about any room in your home.
Here are some ways to add this stunning shade of blue to your home:
Furniture

Add a splash of color to any room with Classic Blue furniture, such as these dining room chairs, which express a sense of tradition and elegance, as well as unexpected boldness.
Tile Work

Geometric patterns are all the rage this year, so why not liven up your kitchen backsplash with tiles that incorporate the color of the year? Here’s an example that achieves this through bold, colorful design that doubles as a piece of art.
Cabinets

If geometric tile isn’t your thing, the are other ways to bring your kitchen to life with this stunning shade of blue. If you’re not in a position to purchase all new cabinets, simply paint your current cabinets for a more affordable update.
Walls

Whether it’s built-ins, panels, or an accent wall, Classic Blue can make your furniture and décor pop. Consider this color when you paint your living room or bedroom as a way to encourage calm and confidence in your favorite spaces.
How to Create a More Beautiful and “Sale” Ready Home
When you love your home but want to make some changes, how do you know where to begin? As a real estate broker and advisor to my clients, I am often asked what improvement projects are most worthwhile or where money is best invested.
 In today’s market, I am consistently seeing that buyers are looking for the “cream puff” listings. They want a home that is well maintained, “move in” ready, priced well, and in a good location. No surprise there, right?
As I work with clients, whether they are preparing to move now or just looking to improve their home for their own enjoyment, I find a few things that consistently show rewards in the end.
Beginning with maintenance items such as roofing, siding, paint (both interior and exterior), windows, and a couple secret weapons that are often overlooked, which offer a huge impact and are more reasonably priced than you may think, are new garage doors and outdoor fixtures. Remember you never get a second chance to make a first impression!
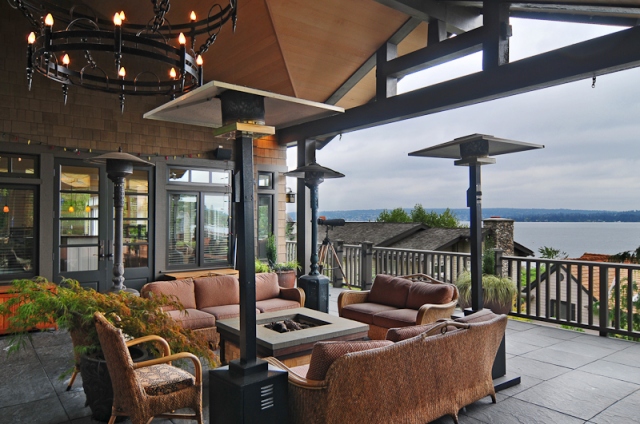
Outdoor living areas have become all the rage by giving the homeowner an opportunity to add additional entertaining space to their home. The options here are endless depending on your budget and amount of space you have to work with, but this can be a great way to improve the function and finish of your home.
Take a minute to ask yourself, where do I spend most of my time in my home? Kitchen, kitchen, kitchen! We all love to eat and hang out in the kitchen. As a result, improvements here are always a good place to start.

Owner’s bedroom suites and bathrooms are also very popular areas for improvement. The range of options for these areas is vast based again on size and budget.
Consider replacing hard surfaces, base and trim, fixtures, and doors. Think outside the box and ask an expert for help choosing something that might set your home apart. Why use the same six-panel door that everyone has? Change it up a bit. Starting with the solid bones using neutral tones and embellishing with accessories to add a splash of color and your own flair is always a winner!

The more open, clean, and well maintained your home is, the greater your return on your investment will be. Buyers in today’s market have access to an abundance of information and have a good eye for short cuts. Work done just to “flip” a home will be called out very quickly! Always ask a professional for advice. You will find your favorite contractor or real estate professional will be more than happy to spend some time helping you make educated decisions that will meet your needs and show long term return.
 By Aimee Shriner
Windermere Real Estate/Northeast Inc.
Kirkland, WA
Orignially posted on RGN Construction’s blog.
All photos are from www.rgncon.com
Weekend Warrior: Quick projects to upgrade your home

Memorial Day traditionally represents the kick-off of summer. Kids are getting out of school, families are making summer vacation plans, and backyard barbeques are on everyone’s minds. This is also a great time of the year to get your house in order and ready for the summer season. The following is a handful of ideas and tips to help you with this process.
Outdoor spaces
 Gardening– It’s not too late to start your garden! This weekend I will be planting an herb garden; I planted summer vegetables a few weeks ago. If you’re thinking of doing the same, just make sure you use starts because many summer harvest vegetables won’t start from seed this late in the season.
Outdoor living– My home has an outdoor space with great potential, including a partially covered patio perfect for entertaining. This weekend I plan to upgrade the space with small touches to make it summer party ready. This includes finding outdoor lighting options, updating the seating and cleaning up the barbeque.
BBQ- Make sure your grill is ready to go this season by making sure everything is clean and in working order before you fire it up. In the northwest that includes making sure the fuel lines are spider-web-free. Also, make sure you have propane or charcoal on hand for impromptu dinners.
Clean Windows- Now is a great time to clean your windows, inside and out. Sun shows more dirt and smudges.
Lawn care- Prepare your lawn for the months ahead. Depending on where you live this means different things. Check your sprinkler system to make sure it wasn’t damaged over the winter; upgrade your lawn care to ensure fuller greens, check for and remove moss to prevent dead patches and start your weeding regimen.
Pool prep- If you have an outdoor pool get this ready for a summer season of fun in the sun, (unless you are lucky enough to enjoy your pool year-round). Same goes for hot-tubs. Make sure your equipment has been serviced, chemicals are available and your pool is clean and ready to use. OR, head to the local hardware store and buy your kiddie pool now before they run out, as I learned one particularly hot July!
De-winterize- I once was doused head to toe when we were turning the water back on to our exterior pipes because the pipe had split in the winter- so make sure all your pipes survived the cold, check your winterized projects and prepare your house for summer. This is also a good time to look around the exterior, checking roof, gutters and siding.
Summerize- Check or replace AC filters, window screens, and household fans to make sure these are all functioning and will help provide maximum circulation in your house. Consider installing an attic fan or vent to help pull heat out of your home all winter long. Pack away excess cold weather items such as heavy blankets, jackets and other items so they aren’t in your way. Same goes for any sundry items you only use during fall and winter.
Inside spaces
Lighten the Space- Though I likely won’t spend much time inside once the mercury rises, I want to keep the house as light and cool as possible. I have found that replacing the curtains with a lighter shade lets the light in, but also keeps the rooms from overheating from sun exposure. Summer always makes me want to lighten up with the accessories- lighter colors, more whites, bright accents and less clutter.
Rearrange – Freshen up spaces by rearranging some of your wall art. If you don’t have enough wall pieces to rearrange regularly it may be time to add to your collection. You can find inexpensive original art online at stores such as Etsy or in person at local galleries. You can always play with other items like framed images from books, vintage posters or record albums. Here are some terrific ideas for using what you have to add interest to a room.
 Air it out- Open all the windows, shake out the rugs and update home fragrances to fit summer moods (citrus, freesia, clean linen, coconut, melon, fruits and tropical, etc.). You can create your own diffuser with essential oils to distribute fragrance. This may be more symbolic than practical but it always makes me feel ready for summer.
Paint- If you have a room you really want to refresh, a three-day weekend is a good time to take on a project of scale, so you have plenty of time to prep, paint, dry, and clean up. Painting is one of the least expensive ways to really transform how a room feels. Need help picking colors and paint type? Here is some good advice.
Garage or Basement- Tackle a big space that makes a big difference. Our garages and basements often become year-long dumping grounds for seasonal decorations and clothing, items that don’t fit in cabinets, memorabilia and maintenance tools. Go through your items and sort by keep, throw out and donate/sell and then group your keeps by function. Make sure your tools are accessible for easy gardening and entertaining by making sure your tools are accounted for, ready to go, and easy to reach. Here is a useful video on garage organization.
Yard/Garage Sale- If you have overflow at your house, plan a yard/garage sale to get rid of items you no longer need or want. Just make sure to pack everything up and donate it at the end of the sale otherwise you are just letting the clutter back in!
Plan a party- Once your space is all cleaned up and redecorated you will want to show it off! Plan a summer BBQ, dinner party, pool party, picnic or any other gathering.
What are your planning for Memorial Day weekend?
Keeping Up with the Joneses: The Great Paint Debate


A few weeks back, Jenn and I decided to finally pull the trigger on painting our home. The vinyl siding of the 1942 Seattle Cape Cod fixer we purchased nine months ago had been sun bleached to the point of resembling a kind of soft lemon chiffon yellow you’d see on a cake your grandmother baked. Great for dessert, bad for today’s exterior home color. We wanted a charming, warm and inviting new exterior home color but were fearful about what it would cost to have a professional do it. We had saved between 10-15k by renovating our bathroom ourselves. Couldn’t we just pick up some paint and make a Saturday of it?

Pro tip: In Seattle, painting outside competes with the weather. Make sure you have a runway of at least a week of good weather to ensure you can paint the house in its entirety while leaving time for it to dry.
Seeing as the summer season was pretty much over (say it ain’t so!) and the wet Seattle fall was nearly upon us, we figured we had only a week or two left to get the job done. I’m the kind of person who jumps on a new project… and maybe sometimes I put the horse before the cart. *Cue Jenn’s pursed-lips smirk* So once Jenn and I agreed we were going through with the project, I had three different painters bid out the job and booked the least expensive (but experienced) professional within two days. I scheduled him to arrive the following day.
Good Husband Tip: Don’t give your wife 12 hours to decide what color to paint your house.
Pro Tip: Don’t feel bad about shopping for the best price with home professionals. They bid homes out every day and won’t be offended. Most of the time, they present a bid with room for negotiation. It never hurts to get a second bid or ask for a cheaper price.
 With the pressure of our painter showing up the next day, we scarfed down dinner and took a trip to the paint store. (I tried to convince my wife this was an opportunity for us to bond as a family unit. “We could make it educational! Teach Addie about hues and shades! C’mon, honey… it’ll be fun!” *Cue Jenn’s pursed-lips smirk*) We knew we had to get special paint for our vinyl siding so that narrowed it down to about 20 options. And we wanted a sort of dark blue so we picked out two colors that looked promising and headed home to test them out.
Pro Tip: When testing paint, make sure you let it dry before you decide which color to go with. Paint a few different swatches on various sides of the house and watch how it looks during different times of the day.
One test swatch (on the right, called “Prime Time”) was a little purplely/blue grey and the other was a slightly lighter blue (on the left, called “Stone Cold). Those are two seriously stellar wrestler names, amiright?

With our painter arriving that evening, the pressure was on for us to choose. We’re Millennials so we did the only logical thing you can do when making a big decision. We asked our friends on Facebook. 76 comments later, there was still no clear answer.
Mid-debate, our dear friend Kim Gorsline of Kimberlee Marie Interior Design called us up with some highly insightful information. First of all, a paint store has pre-mixed vinyl siding paint but they can actually make ANY color into vinyl siding paint. Which means we had a lot more choices (which left me feeling excited and gave Jenn heartburn). More importantly, Kim pointed out that the two options we had might not be exactly what we hoped for. She suggested a few colors that had more grey tones and in much deeper shades. She promised us that we’d still get the blue house of our dreams even if the colors looked dark grey on the swatches.
Pro tip: You can get small paper swatches for free or pay a few bucks for a large paper square but nothing will compare to a sample of real paint on your surface. We spent $59.34 on paint samples and it was worth every penny.
Back to the paint store we went, grabbing three more options to test. Our painter began taping off the trim as we took a few steps back to assess the swatches… BOOM! We had our answer… Britannia Blue by Benjamin Moore. Not the best wrestler name but a nice blue nonetheless.
We trust Kim’s vision and design talent wholeheartedly and as the days went on and the paint went up, we couldn’t have been more pleased. I installed some new lights fixtures and house numbers that Jenn picked out. Only this time, I gave her three days of lead time *Cue Jenn’s pursed-lips smirk*


6 Extreme Interior Paint Makeovers
Today we’re looking at how paint has changed your rooms, from the kitchen to the bedroom, from the living room to the laundry room.

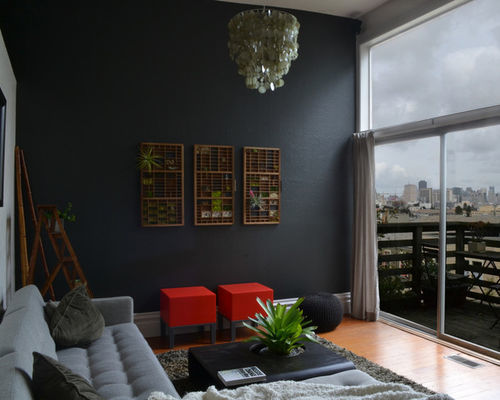
Makeover 1: Stephanie Van Dyke, original photo on Houzz
AFTER: Houzz user Stephanie Van Dyke’s newly dark living room walls.

Makeover 2: Before Photo, original photo on Houzz
BEFORE: Van Dyke wanted to switch up these light walls. The new colors are Ralph Lauren’s Smoked Glass and Tibetan Jasmine. “The Smoked Glass is a beautiful, dynamic color that changes throughout the day,” she says.

Makeover 3: Before Photo, original photo on Houzz
BEFORE: Houzz user and blogger c2marsha did not have much love for this pale green color in her bedroom. “The old pale green color just felt really stale and boring; we wanted something bolder but not bright or harsh,” she says.
Related: Add Style and Function With a New Bedroom Bench

Makeover 4: c2marsha, original photo on Houzz
AFTER: “We chose Behr Bitter Chocolate for our master bedroom, which sits on the second floor of our Dutch colonial in Minneapolis,” she says. “We didn’t want our room to feel too feminine or masculine, and we wanted it to feel like it fit us well, which made it very difficult to pick a color!”
The rich brown brought in a modern touch that works with their mix of vintage and traditional pieces.

Makeover 5: Before Photo, original photo on Houzz
BEFORE: Maple trees surrounding the house and the colors on the walls made Houzz user hellovijp’s home in Quebec City very dark inside.

Makeover 6: hellovijp, original photo on Houzz
AFTER: Because one room flows into the next and the spaces were lacking cohesion, hellovijp painted the entire floor the same color, SICO’s Portobello #6185-41. It really lightens things up while keeping the look warm.

Makeover 7: Before Photo, original photo on Houzz
BEFORE: Amanda Haytaian wanted a fresh look for her living room; pink walls and a dated fireplace were no longer working.

Makeover 8: Amanda Haytaian, original photo on Houzz
AFTER: She brought the pink into the room via smaller accents. A beautiful new coffered ceiling and marble fireplace surround freshen up the space. The walls are Benjamin Moore’s Etiquette in matte, and the trim is Benjamin Moore’s Steam in semigloss.

Makeover 9: Before Photo, original photo on Houzz
BEFORE: Becky, of the blog this is happiness, had been dreaming of a whiter kitchen.

Makeover 10: Becky, original photo on Houzz
AFTER: “It’s still a work in progress, but we took our very dark kitchen to a cheerful, bright white,” she says. Kwal acrylic paint in Pure Snow did the trick.
Tip: She recommends having the cabinets spray painted to avoid brushstrokes.

Makeover 11: Before Photo, original photo on Houzz
BEFORE: “This laundry room is a great example of white not making a poorly lit, windowless room light and airy; it just made it gray, dingy and scuff-marked,” says Cathy Zaeske.

Makeover 12: Cathy Zaeske, original photo on Houzz
AFTER: Going for an industrial chic look, she chose a new pendant light and Sherwin-Williams’ high-gloss 6076 Turkish Coffee. The new room is much better at inspiring the homeowners to want to do their laundry.
By Becky Harris, Houzz
